- Company Articles
- Products and Technology
- Installation And Maintenance
- Troubleshooting Parallel Lean Pipe Joint Loosening: Causes & Fixes

Troubleshooting Parallel Lean Pipe Joint Loosening: Causes & Fixes
Related Product
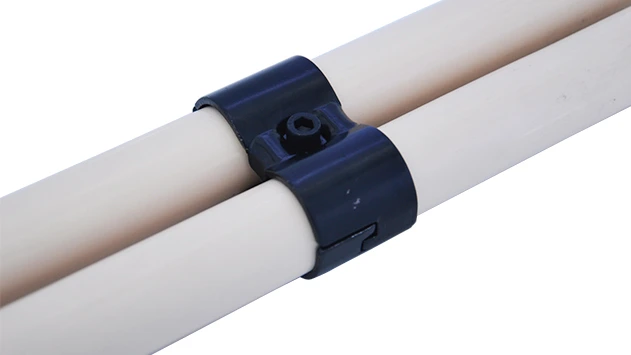
Parallel Lean Pipe Joint
Parallel lean pipe joint used for 2 pcs 28MM lean pipe connection in parallel direction to enhance frame structure, usually for heavy payload requirement for workbench. flow rack, hand trolley.
Walk into any modern manufacturing facility, and you'll likely spot a network of lean pipe structures—workbenches, flow racks, material carts—quietly keeping production humming. These systems are the unsung heroes of efficiency, designed to adapt, organize, and streamline workflows. But what happens when the backbone of these structures starts to falter? We're talking about parallel lean pipe joint loosening—the silent productivity killer that can turn a smooth operation into a frustrating game of "will this hold?"
If you've ever noticed a lean pipe workbench wobbling mid-shift, watched parts slide off a tilted flow rack, or heard that unnerving "creak" when a cart rolls by, you've encountered the problem. Loose joints aren't just a minor annoyance; they threaten safety, slow down production, and chip away at the reliability of your entire lean system. But fear not—this guide will walk you through why these joints loosen, how to diagnose the issue, and the fixes that will have your lean pipe structures standing strong again.
Why Do Parallel Lean Pipe Joints Loosen? The Hidden Culprits
Before we dive into fixes, let's get to the root of the problem. Parallel lean pipe joints are supposed to be the glue that holds your structures together, but they're under constant stress. Let's break down the most common causes behind their loosening:
1. Improper Installation: Cutting Corners in the Setup Phase
Many joint issues start on day one—during installation. It's easy to rush through assembly, especially when deadlines loom, but even small mistakes here can lead to big problems later. For example, using a regular T-joint instead of a dedicated parallel lean pipe joint might seem like a quick fix, but those joints aren't designed to handle the lateral stress of parallel pipes. Or maybe the installer skipped the torque wrench, tightening joints "by feel" instead of to the manufacturer's specs. A joint that's even slightly under-tightened becomes a ticking time bomb; every vibration, every load, every bump brings it closer to loosening.
Misalignment is another silent saboteur. If the pipes aren't perfectly straight before tightening, the joint bears uneven pressure from day one. Imagine trying to hold two sticks together at a slight angle—over time, the friction wears down the connection, and eventually, it slips. That's exactly what happens to misaligned lean pipe joints.
2. Vibration: The Invisible Wear-and-Tear Machine
Manufacturing floors are noisy places—machinery hums, conveyor belts rattle, forklifts rumble. All that vibration doesn't just fade into the background; it travels through your lean pipe structures like an invisible wave. Every time a nearby press cycles or a caster wheel hits a crack in the floor, that energy transfers to your joints, slowly but surely loosening them.
Mobile structures like material carts are especially vulnerable. If your lean pipe workbench sits near a high-vibration machine, or if you're constantly moving a cart with swiveling caster wheel s across uneven floors, the joints take a beating. Over weeks and months, that repetitive motion acts like a wrench, gradually undoing the tightness of your connections.
3. Material Fatigue: When Your Pipes and Joints Start to Wear Out
Not all lean pipe and joints are created equal. Low-quality materials or using the wrong type for the job can spell disaster. For instance, aluminum lean pipe is lightweight and corrosion-resistant, but it's not as rigid as steel. If you're using thin-walled aluminum pipe in a high-load area, the constant flexing can weaken the joint connections over time. Steel pipes, on the other hand, might rust if exposed to moisture, creating gaps between the pipe and joint as corrosion eats away at the surface.
Joints themselves also suffer from fatigue. The metal components inside a joint—threads, pins, locking mechanisms—wear down with each adjustment, load, or vibration. A joint that's been tightened and loosened multiple times (common in reconfigurable lean systems) may lose its grip, no matter how much you crank it down.
4. Overloading: When "Just a Little Extra" Becomes Too Much
We've all been there: the workbench is full, but you need to stack one more box of parts "just for a minute." Or the flow rack is supposed to hold 50kg per shelf, but today it's holding 70kg. Overloading is a silent killer because the damage isn't always immediate. Your lean pipe structure might look fine at first, but the extra weight puts constant stress on the joints. Over days and weeks, that stress causes the joints to flex, stretch, and eventually loosen. You might not notice until a shelf sags or a joint finally gives way.
Visual cues often give this away: pipes that bow slightly under load, joints that look "pushed out" at the edges, or even small cracks in the plastic coating of the pipe (a sign of excessive pressure).
Troubleshooting 101: How to Diagnose Loose Parallel Lean Pipe Joints
Loose joints rarely announce themselves with a bang—they're more like a slow leak. Catching them early means less downtime and cheaper fixes. Here's a step-by-step guide to diagnosing the problem:
Step 1: The "Gentle Shake" Test
Start simple. Stand next to your lean pipe structure (workbench, rack, etc.) and give it a gentle, controlled shake. A stable structure should feel solid—no wobbling, no creaking, no movement in the joints. If you notice the top swaying independently of the base, or hear a "rattle" from the joints, you've got a loosening issue.
Step 2: Visual Inspection—The Devil's in the Details
Get up close and personal with the joints. Look for gaps between the pipe and joint—even a 1mm gap is a red flag. Check for rust or corrosion, especially on metal components; this weakens the connection. Inspect the pipe itself: is it bent? A bent pipe puts uneven stress on joints, forcing them to loosen. Also, look for wear on the joint's locking mechanism—stripped threads or cracked plastic parts are sure signs of trouble.
Step 3: Tightness Check with the Right Tools
Don't rely on "hand tight." Grab a torque wrench (most lean pipe joints specify a torque range, like 15-20 Nm) and test each joint. If the wrench clicks immediately when you start turning, the joint was under-tightened. If it takes significant force to reach the spec, the joint might have been over-tightened (which can strip threads or crack the joint).
Step 4: Load Testing—Remove, Then Rebuild
Sometimes, the weight on the structure masks the problem. Remove all items from the workbench or rack, then test stability again. If the structure feels solid without the load, overloading is likely the culprit. If it's still wobbly, the issue is with the joints or installation, not just the weight.
Step 5: Trace the Vibration Source
Isolate the structure from nearby machinery. If possible, move a mobile cart to a quiet corner or lock the caster wheel s of a workbench. If the wobble decreases, vibration from other equipment is contributing to joint loosening. Check if the caster wheel s themselves are worn—uneven wheels can cause constant shaking as the structure moves.

From Quick Fixes to Long-Term Solutions: Repairing Loose Joints
Once you've diagnosed the problem, it's time to fix it. The solution depends on how severe the issue is and how long you need it to last. Let's start with temporary fixes for urgent situations, then move to permanent solutions that prevent recurrence.
Temporary Fixes: When You Need to Keep Production Rolling
Sometimes, you can't shut down the line for a full repair. These quick fixes will buy you time until you can perform a more thorough solution:
- Retighten with Precision: Use a torque wrench to tighten the joint to the manufacturer's specs. Avoid over-tightening—this can damage threads or crack the joint.
- Add Locking Washers: Slide a split lock washer between the joint and pipe before tightening. The washer "bites" into both surfaces, preventing the joint from backing out due to vibration.
- Apply Thread Locker (Temporarily): Use a removable thread locker (blue formula) on the joint's threads. This creates a temporary bond that resists vibration loosening but can be broken with standard tools later.
Permanent Solutions: Building a Structure That Lasts
For a long-term fix, you'll need to address the root cause. Here are the most effective strategies:
Solution 1: Upgrade to High-Quality Parallel Lean Pipe Joints
Not all joints are created for parallel pipes. If you've been using generic T-joints or elbow joints for parallel connections, switch to dedicated parallel lean pipe joint s. These are engineered to distribute stress evenly along the pipe, reducing the chance of loosening. Look for joints with reinforced locking mechanisms and corrosion-resistant materials (like zinc-plated steel or nylon).
Solution 2: Reinforce the Structure with Additional Supports
Sometimes, the issue is that the structure is under-supported. Add diagonal braces or cross-bars to reduce sway and distribute weight more evenly. For example, a tall lean pipe workbench might benefit from a brace connecting the top shelf to the base, preventing lateral movement that loosens joints.
Solution 3: Address Vibration at the Source
If machinery vibration is the culprit, isolate the structure. Place rubber vibration dampeners under the feet of the workbench or cart. For mobile structures, upgrade to shock-absorbing caster wheel s or lock the wheels when the cart is stationary. You can also move the structure farther from high-vibration equipment if possible.
Solution 4: Upgrade to Sturdier Materials
If your current lean pipe is bending or flexing, consider upgrading. Aluminum lean pipe is a great option for corrosive environments, but if you need more rigidity, go for steel pipes with a thicker wall (1.5mm vs. 1.2mm). For joints, choose metal over plastic—they handle stress and vibration better over time.
Solution 5: Correct Installation Practices (Yes, Training Matters!)
Even the best parts fail with poor installation. Train your team to: align pipes perfectly before tightening, use torque wrenches, and select the right joint for the job. Create a quick-reference guide with torque specs and joint types—this reduces mistakes during reconfigurations.

Preventive Maintenance: Keeping Joints Tight for the Long Haul
The best fix is the one you never have to make. A little preventive maintenance goes a long way in keeping parallel lean pipe joints tight:
| Maintenance Task | Frequency | What to Do |
|---|---|---|
| Visual Inspections | Weekly | Check for gaps, rust, or bent pipes. Look for signs of overloading (sagging shelves). |
| Torque Checks | Monthly | Use a torque wrench to retighten joints to specs. Focus on high-stress areas (workbench corners, cart wheels). |
| Vibration Source Audit | Quarterly | Note any new machinery or changes in workflow that might increase vibration near lean structures. |
| Joint Replacement | Annually (or as needed) | replace joints with visible wear (stripped threads, cracked plastic). Keep spare joints in stock to avoid delays. |
| Load Capacity Review | Bi-Annually | Ensure structures aren't exceeding weight limits. update labels if workflows change. |
Pro tip: Assign "lean pipe guardians" on each shift—team members responsible for reporting loose joints or wobbly structures immediately. This turns everyone into a maintenance detective, catching issues before they escalate.
Real-World Success: How ABC Manufacturing Fixed Their Joint Woes
Let's put this into practice with a story. ABC Manufacturing, a mid-sized electronics assembler, was struggling with their lean pipe workbench es on Line 4. The workbenches, used for circuit board assembly, kept developing loose joints—causing parts to slide off and workers to waste time readjusting. The maintenance team initially tried retightening joints, but the problem kept recurring.
After following our troubleshooting steps, they discovered two issues: 1) The original installation used regular T-joints instead of parallel lean pipe joint s, and 2) the workbenches were positioned 10 feet from a high-speed conveyor, which vibrated constantly. The caster wheel s on the workbenches weren't locked, so the vibration caused the benches to shake all shift.
Their solution? They replaced all T-joints with parallel lean pipe joints, locked the caster wheel s during production, and added rubber dampeners under the bench feet. They also trained the assembly team to report wobbles immediately. Within a month, Line 4's downtime due to loose joints dropped by 75%—and workers reported feeling more confident in their workspace.
Final Thoughts: Your Lean Pipe Structures Deserve Care
Parallel lean pipe joint loosening might seem like a small issue, but it's a window into the health of your entire lean system. By understanding the causes—improper installation, vibration, material fatigue, overloading—and applying the right fixes, you're not just tightening a joint; you're strengthening your commitment to efficiency, safety, and reliability.
Remember: A solid lean system is built on solid joints. Invest the time in proper installation, regular maintenance, and quality parts, and your lean pipe structures will reward you with years of trouble-free service. Now go give those joints a check—your production line will thank you.