- Company Articles
- Products and Technology
- Installation And Maintenance
- Troubleshooting Stuck One Way Rotatory Straight Lean Pipe Joints: Quick Fixes

Troubleshooting Stuck One Way Rotatory Straight Lean Pipe Joints: Quick Fixes
Related Product
One Way Rotatory Straight Lean Pipe Joint
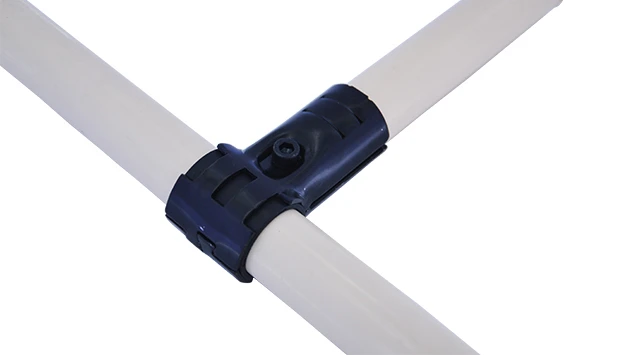
Two way lean pipe joint for 2 pcs 28MM lean pipe connection in straight angle with rotatory fucntion, which used widely in workbench, flow rack, hand trolley frame connection.
Picture this: You're on the factory floor, deep in the middle of a production assemble rush. Your team is relying on a smooth workflow—parts moving from station to station, workbenches adjusted for optimal ergonomics, and every second counting. Then, suddenly, it happens: a critical joint on your lean pipe system seized up. The one way rotatory straight lean pipe joint that's supposed to let a section of your flow rack pivot gently in one direction? It's stuck solid. Frustration mounts, deadlines loom, and you're left thinking, "Why now?"
If you've ever worked with lean pipe systems, you know these joints are the unsung heroes of efficiency. They're the reason your workbenches can be reconfigured in minutes, your material racks can adapt to new parts, and your entire production line stays agile. But when they stick, they don't just slow things down—they throw a wrench into the entire lean philosophy of minimizing waste and maximizing flow. That's why knowing how to troubleshoot a stuck one way rotatory straight lean pipe joint isn't just a "nice-to-have" skill; it's essential for keeping your operation running like a well-oiled machine.
In this guide, we're going to dive deep into the world of lean pipe joints—specifically, the one way rotatory straight variety. We'll break down why they get stuck, walk through step-by-step quick fixes, and even share preventive maintenance tips to keep them moving smoothly for the long haul. Whether you're a seasoned plant manager or a new technician, by the end, you'll have the tools to tackle this common issue head-on and get back to what matters: keeping your production assemble line efficient, flexible, and frustration-free.
Understanding the One Way Rotatory Straight Lean Pipe Joint
Before we jump into troubleshooting, let's make sure we're all on the same page about what these joints are and why they matter. Lean pipe systems—often made from aluminum lean pipe, stainless steel, or traditional pe-coated pipes—are the backbone of modular industrial setups. They're used to build everything from workbenches and flow racks to conveyor systems and turnover trolleys. And at the heart of that modularity? Joints. Lots of them.
The one way rotatory straight lean pipe joint is a specialized component designed for controlled movement. Unlike fixed joints that lock pipes in place, or 360-degree rotating joints that spin freely, this one does exactly what its name suggests: it rotates in a straight line, but only in one direction. Think of it like a ratchet—twist it clockwise, and it glides; try to twist it counterclockwise, and it locks. This one-way action is perfect for applications where you need parts to flow in a specific direction (like a downward slope on a flow rack) or where you want to prevent accidental backtracking of materials.
These joints are made up of a few key parts: a outer casing (usually metal or high-strength plastic), an inner ratchet mechanism with teeth, a spring-loaded pawl that catches those teeth to prevent reverse rotation, and a washer or bearing to reduce friction during movement. Over time, though, even the sturdiest components can run into trouble. Let's break down the most common culprits behind a stuck joint.
Why Do One Way Rotatory Straight Lean Pipe Joints Get Stuck?
1. Dust, Debris, and Grime Buildup
Factories and warehouses are messy places. Even with regular cleaning, dust, metal shavings, oil residue, and small bits of packaging material find their way into every nook and cranny—including the tiny gaps in your lean pipe joints. When debris settles into the ratchet mechanism or clogs the bearing, it creates friction. At first, the joint might just feel "stiff." But over time, that friction builds up, and suddenly, movement stops altogether. This is especially common in high-debris areas, like near cutting stations or where cardboard packaging is frequently opened.
2. Dry or Contaminated Lubricant
Lubrication is the lifeblood of moving parts, and one way rotatory joints are no exception. Most joints come pre-lubricated from the lean pipe supplier, but that lubricant doesn't last forever. It can evaporate over time, especially in warm environments, or get contaminated by dust and grime (remember that debris we just talked about?). When the lubricant dries up, metal-on-metal contact increases, leading to wear and, you guessed it, sticking. Using the wrong type of lubricant—like heavy oil that attracts dust—can make the problem even worse.
3. Misalignment of Pipes or Joints
Lean pipe systems are all about precision. If the pipes connected to your one way rotatory joint are even slightly misaligned—say, one pipe is angled up while the other is straight—the joint will bear uneven stress. Over time, that stress can bend the inner components, warp the casing, or jam the ratchet mechanism. Misalignment often happens during setup (if parts are forced together instead of gently aligned) or after heavy use (if a pipe gets knocked or bumped out of place).
4. Worn or Damaged Components
Nothing lasts forever, and lean pipe joints are no exception. The pawl, ratchet teeth, or bearing can wear down with repeated use. A pawl that's bent or a tooth that's chipped might not engage properly, causing the joint to lock up unexpectedly. Similarly, if the washer or bearing inside the joint is cracked or worn smooth, it can't reduce friction anymore, leading to stiffness and sticking. In some cases, exposure to moisture or chemicals (like cleaning agents) can even cause rust or corrosion, which gums up the works.

Quick Fixes: Step-by-Step Troubleshooting
Now that we know why these joints get stuck, let's roll up our sleeves and fix them. The good news? Most issues can be resolved with basic tools and a little patience. We'll start with the simplest fixes (cleaning and lubrication) and work our way up to more involved solutions (realignment and part replacement).
Fix 1: Clean Out Dust and Debris
If your joint is sticking, the first thing to check is debris buildup. Here's how to clean it out:
Step 1: Disconnect the joint (if possible). If the joint is part of a larger structure (like a flow rack), gently loosen the adjacent pipes using a hex key. You don't need to fully remove everything—just create enough space to access the joint itself.
Step 2: Blow away loose debris. Use a can of compressed air (the kind used for cleaning keyboards works great) to blast away dust and loose particles from the joint's (gaps). Hold the can 6–8 inches away to avoid damaging delicate parts, and aim the nozzle at the base of the joint where the ratchet mechanism is housed.
Step 3: Brush away stubborn grime. For debris that's caked on, use a soft-bristled brush (an old toothbrush works in a pinch) to gently scrub the joint's surface and crevices. Be careful not to push debris further into the mechanism—brush outward, away from the joint.
Step 4: Wipe with a dry cloth. Finish by wiping the joint with a clean, lint-free rag to remove any remaining dust. If there's oil residue, dampen the rag with a small amount of isopropyl alcohol (avoid harsh solvents, which can damage plastic components) and wipe again.
Test it out: Reconnect the joint loosely, then try rotating it. If it moves more freely, you're good to go! Tighten the adjacent pipes back into place. If not, move on to the next fix.
Fix 2: Re-Lubricate the Joint
If cleaning alone doesn't do the trick, dry or contaminated lubricant is likely the culprit. Here's how to re-lubricate:
Step 1: Choose the right lubricant. Not all lubricants are created equal. Avoid petroleum-based oils (like motor oil) or grease, which attract dust and can harden over time. Instead, opt for a silicone-based lubricant spray or a dry PTFE (Teflon) lubricant. These are designed to repel dust and stay slippery longer—perfect for lean pipe joints.
Step 2: Apply lubricant sparingly. Less is more here. Hold the lubricant spray 4–6 inches from the joint and apply a short burst directly into the gaps where the ratchet mechanism is located. If the joint has a small access hole (some do), aim the nozzle there. Let the lubricant seep in for 1–2 minutes.
Step 3: Work the joint. Gently rotate the joint back and forth (in its allowed direction) to distribute the lubricant evenly. You might feel some initial resistance, but keep going—this helps work the lubricant into the ratchet teeth and bearing.
Step 4: Wipe away excess. Use a clean rag to wipe off any lubricant that oozes out of the joint. Excess lubricant can attract dust later, so it's better to be thorough here.
Test it out: Rotate the joint again. It should move smoothly now. If it's still sticking, the issue might be misalignment or worn parts.
Fix 3: Realign Misaligned Pipes
Misalignment is trickier to spot, but it's a common cause of stuck joints. If your pipes are bent, twisted, or not perfectly straight, the joint has to fight against that stress every time it moves. Here's how to check and fix alignment:
Step 1: Check for visual cues. Stand back and look at the lean pipe structure. Are the pipes connected to the joint straight, or do they curve slightly? Is the joint sitting at an angle, or is one pipe higher than the other?
Step 2: Use a level. Place a small bubble level on top of the pipes adjacent to the joint. If the level shows the pipes are uneven (one side higher than the other), that's a sign of vertical misalignment. For horizontal misalignment, use a straightedge (like a long, straight piece of aluminum lean pipe) to check if the pipes form a straight line.
Step 3: Loosen and realign. Use a hex key to loosen the set screws on the joint and the adjacent pipe clamps. Gently adjust the pipes until they're straight and level. If vertical alignment is off, raise or lower one side slightly. For horizontal misalignment, push or pull the pipes until they line up with the straightedge.
Step 4: Tighten gradually. Once aligned, tighten the set screws and clamps gradually —alternating between sides to avoid uneven pressure. Overtightening can warp the joint, so stop when the pipes feel secure but not rigid.
Test it out: Rotate the joint. With the pipes aligned, it should move without resistance. If it still sticks, it's time to inspect for worn parts.
Fix 4: replace Worn Components
If you've cleaned, lubricated, and realigned, but the joint still won't budge, the problem is likely worn or damaged internal parts. Common culprits include cracked ratchet teeth, a bent pawl, or a worn bearing. Here's how to handle this:
Step 1: Identify the worn part. If you're comfortable disassembling the joint (check your lean pipe supplier's manual for guidance), carefully take it apart. Look for visible damage: chipped teeth on the ratchet, a pawl that's bent or doesn't spring back, or a bearing that's cracked or seized. If disassembly feels too risky, skip to Step 2.
Step 2: Contact your lean pipe supplier. Most suppliers stock replacement parts for common joints, including ratchet mechanisms, pawls, washers, and bearings. Have your joint's model number handy (it's usually printed on the casing) to ensure you get the right part. If you can't find the model number, take a photo of the joint and email it to the supplier—they'll help you ID it.
Step 3: replace the part (or the entire joint). If you're replacing a small component (like a washer or O-ring), follow the supplier's instructions to install it. If the ratchet teeth or pawl are damaged, it's often easier (and more cost-effective) to replace the entire joint. Simply remove the old joint, slide the new one onto the pipes, and tighten the set screws.
Test it out: With the new part or joint installed, the rotation should be smooth and crisp.—you're back in business!

Common Causes and Quick Fixes at a Glance
| Common Cause | Quick Fix | Tools Needed | Time to Fix |
|---|---|---|---|
| Dust and Debris Buildup | Clean with compressed air, brush, and alcohol wipe | Compressed air can, soft brush, lint-free rag, isopropyl alcohol | 5–10 minutes |
| Dry or Contaminated Lubricant | Apply silicone-based or PTFE lubricant | Lubricant spray, rag | 5 minutes |
| Misaligned Pipes | Loosen, realign with level/straightedge, retighten gradually | Hex key, bubble level, straightedge | 10–15 minutes |
| Worn Ratchet/Pawl/Bearing | replace worn part or entire joint | Hex key, replacement parts (from lean pipe supplier) | 15–30 minutes (plus ordering time) |
Preventive Maintenance: Keep Joints Moving Smoothly
They say an ounce of prevention is worth a pound of cure, and that's especially true for lean pipe joints. A little regular maintenance can save you hours of downtime and frustration. Here are our top tips:
Proactive Maintenance Checklist
Weekly Cleaning:
Spend 5 minutes each week blowing out dust from joints with compressed air. Focus on high-use areas like flow racks and workbenches.
Monthly Lubrication:
Every 4–6 weeks, apply a light coat of silicone lubricant to all one way rotatory joints. This keeps friction low and prevents dryness.
Quarterly Alignment Checks:
Use a level to inspect pipe alignment quarterly. Catching misalignment early prevents stress on joints.
Six-Month Inspections:
Every six months, take a close look at joint components for wear. Check for cracks, rust, or bent parts—replace them before they fail.
Train Your Team:
Teach operators to spot signs of trouble (stiff joints, unusual noises) and report them immediately. Early reporting = faster fixes.
Final Thoughts: The Role of Joints in Lean Success
At the end of the day, lean pipe systems are more than just pipes and joints—they're the foundation of a flexible, efficient production assemble process. And the one way rotatory straight lean pipe joint? It's a small but mighty part of that foundation. When it works, you barely notice it. But when it sticks, it's a reminder of how even the tiniest components can impact your entire operation.
By understanding why these joints get stuck—whether from debris, dry lubricant, misalignment, or wear—and knowing how to fix them quickly, you're not just solving a problem. You're embodying the lean philosophy: empowering your team to eliminate waste (in this case, wasted time and frustration) and keep the flow going. And with the preventive maintenance tips we've shared, you can keep those joints moving smoothly for years to come.
So the next time you're on the factory floor and that joint sticks? Take a deep breath, grab your compressed air and lubricant, and remember: you've got this. And if you ever need replacement parts, your trusted lean pipe supplier is just a call away. Here's to smoother rotations, fewer headaches, and a production line that never skips a beat.