- Company Articles
- Products and Technology
- Installation And Maintenance
- Troubleshooting Stuck Rotatory Mechanisms in Chrome Parallel Lean Pipe Joints

Troubleshooting Stuck Rotatory Mechanisms in Chrome Parallel Lean Pipe Joints
Related Product
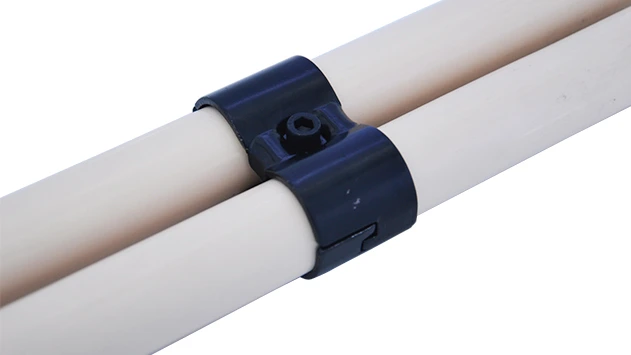
Parallel Lean Pipe Joint
Parallel lean pipe joint used for 2 pcs 28MM lean pipe connection in parallel direction to enhance frame structure, usually for heavy payload requirement for workbench. flow rack, hand trolley.
Introduction: The Unsung Hero of Lean Workflows
In the bustling world of manufacturing and production, where every second counts and efficiency is king, there's a silent workhorse holding everything together: the chrome parallel lean pipe joint. These unassuming components are the backbone of lean systems, quietly enabling the flexibility and adaptability that modern factories rely on. From assembling custom workbenches to building dynamic flow racks, these joints connect lean pipes with precision, allowing teams to reconfigure workspaces on the fly, reduce waste, and keep production lines moving.
But what happens when that silent workhorse suddenly grinds to a halt? A stuck rotatory mechanism in a chrome parallel lean pipe joint isn't just a minor annoyance—it can throw a wrench into your entire workflow. Imagine a line worker trying to adjust a material rack mid-shift, only to find the joint seized, delaying a batch order. Or a maintenance team struggling to reposition a conveyor, held back by a joint that refuses to rotate. These scenarios aren't just frustrating; they eat into productivity, disrupt lean principles, and can even lead to unnecessary downtime.
That's why understanding how to troubleshoot and fix stuck rotatory mechanisms isn't just a "nice-to-know" skill—it's essential for anyone managing a lean workspace. In this guide, we'll walk through the common causes of stuck joints, step-by-step troubleshooting techniques, and proactive maintenance tips to keep your lean pipe and accessories working seamlessly. Whether you're a floor supervisor, a maintenance technician, or a lean system enthusiast, this article will equip you with the knowledge to tackle joint issues head-on and keep your operations running smoothly.
Understanding Chrome Parallel Lean Pipe Joints: How They Work
Before diving into troubleshooting, let's take a moment to appreciate the design of chrome parallel lean pipe joints. These components are engineered for one primary purpose: to connect two or more lean pipes in a parallel configuration while allowing controlled rotation. Unlike fixed joints, which lock pipes in place, rotatory joints feature internal mechanisms—often ball bearings or friction-reducing sleeves—that let the connected pipes swivel, pivot, or adjust angle with minimal effort.
The "chrome" in their name isn't just for show. Chrome plating adds a layer of durability, protecting the joint from rust, corrosion, and wear—critical in factory environments where dust, moisture, and constant use are par for the course. The "parallel" aspect refers to their ability to align pipes side-by-side, making them ideal for structures like workbench frames, material racks, or turnover trolleys, where stability and adjustability are key.
At their core, these joints rely on precision. The internal rotatory mechanism—whether it's a set of small ball bearings or a smooth plastic sleeve—must move freely to allow rotation. When that mechanism gets blocked, damaged, or worn, the joint stiffens up. Think of it like a door hinge: if you ignore it, dust and grime build up, and eventually, it creaks, sticks, or refuses to open. The same principle applies here, but with higher stakes—your entire lean system's functionality depends on these joints moving as intended.
Pro Tip: Not all lean pipe joints are created equal. While chrome parallel rotatory joints are common, there are dozens of variants—like 90° fixed joints, 45° adjustable joints, or vertical joints—each with unique mechanisms. Always confirm you're working with a rotatory parallel joint before troubleshooting; fixed joints are designed not to rotate, so mistaking one for the other could lead to unnecessary (and damaging) disassembly!

Common Causes of Stuck Rotatory Mechanisms
Stuck joints rarely happen without reason. More often than not, the issue traces back to one (or a combination) of four common culprits: contamination, wear and tear, misalignment, or overloading. Let's break down each cause, how to spot it, and why it leads to sticking.
1. Contamination: Dust, Grease, and Grime Buildup
Factories are messy places. Even in well-maintained facilities, dust, metal shavings, oil, and debris are constant companions. Over time, these particles find their way into the small gaps of your chrome parallel lean pipe joint's rotatory mechanism. At first, you might notice a slight "grittiness" when rotating the joint. Then, as more debris accumulates, it acts like sandpaper, increasing friction and eventually jamming the mechanism.
Grease can be a double-edged sword here. While lubrication is essential, old or low-quality grease tends to attract dust. Instead of reducing friction, it becomes a sticky trap for particles, forming a thick, gunky residue that clogs the joint. This is especially common in high-dust environments, like woodworking shops or metal fabrication floors, where fine particles are always in the air.
2. Wear and Tear: When Parts Start to Break Down
Even the most durable components wear out over time. The internal rotatory parts of a chrome parallel lean pipe joint—like ball bearings, plastic sleeves, or metal washers—take a beating with every rotation. If your joint is used daily (or hourly), these parts gradually degrade. Ball bearings might crack or lose their smooth coating; plastic sleeves can warp or develop cracks; metal components may corrode or bend.
You'll typically notice wear-related sticking as a gradual process. The joint might start rotating less smoothly, then develop "dead spots" where it gets stuck mid-swivel, and finally seize entirely. In some cases, you might even hear a grinding or clicking sound when trying to rotate it—this is a clear sign that internal parts are damaged and need attention.
3. Misalignment: When Pipes Pull (or Push) Too Hard
Lean pipe structures are built by connecting pipes and joints, but if those pipes aren't aligned properly during assembly, stress gets placed on the joints. Imagine building a table with legs that are slightly uneven: the tabletop will wobble, and the corner joints will bear extra weight. The same happens with lean pipe systems. If two parallel pipes are installed at a slight angle, or if the structure is overloaded, the chrome parallel joint is forced to "hold" that misalignment, which strains the rotatory mechanism.
Over time, this strain causes the joint's internal parts to shift out of place. Bearings might pop out of their grooves, or the rotating sleeve might warp. The result? A joint that sticks because it's being pulled in multiple directions, not just rotating as intended. Misalignment is often tricky to spot because the structure might look "fine" to the naked eye, but the hidden stress on the joint tells a different story.
4. Overloading: Pushing the Joint Beyond Its Limits
Every lean pipe joint has a weight limit. Whether it's stamped on the packaging or listed in the supplier's specs, exceeding that limit is a recipe for disaster. Chrome parallel rotatory joints are designed to support the weight of the structure and its contents, but they're not indestructible. If you load a material rack with heavy components beyond the joint's capacity, the extra weight compresses the internal rotatory mechanism, squeezing bearings or deforming sleeves.
This is especially common in fast-paced environments where teams are rushing to meet deadlines. A worker might pile extra boxes onto a trolley, or a supervisor might add an extra shelf to a rack without checking the joint specs. The joint might seem to handle it at first, but over time, the constant pressure wears down the mechanism, leading to sticking or complete failure.

Step-by-Step Troubleshooting: Getting Your Joint Moving Again
Now that we've covered the "why," let's tackle the "how." Troubleshooting a stuck chrome parallel lean pipe joint doesn't require advanced engineering skills—just patience, basic tools, and a systematic approach. Below is a step-by-step guide to diagnose and fix the issue, starting with the simplest solutions and moving to more involved repairs.
Step 1: Visual Inspection and Initial Testing
Start with the basics. Before grabbing tools, take a close look at the stuck joint. Is there visible dirt, grease, or debris around the edges? Are the connected pipes bent or misaligned? Gently try to rotate the joint by hand—note where it sticks (e.g., "it moves 10° then freezes" or "it's stuck completely"). Listen for sounds: grinding, clicking, or squeaking can clue you into what's wrong.
If the joint is only slightly stiff (not fully stuck), try wiggling the connected pipes gently while rotating. Sometimes, misalignment causes temporary sticking, and a little movement can free up the mechanism. If that works, great—but don't stop there! Temporary fixes often mask underlying issues. Proceed to the next steps to prevent it from happening again.
Step 2: Clean the Joint (Most Common Fix)
Contamination is the number one cause of stuck joints, so cleaning should be your first intervention. Here's how to do it safely:
What you'll need: A soft-bristled brush (old toothbrushes work well), a clean rag, mild degreaser (avoid harsh chemicals like acetone, which can damage plastic components), and a can of compressed air (optional).
Process:
1. Use the brush to gently sweep away loose debris around the joint. Focus on the gaps between the joint and the pipes, where dust and grime collect.
2. Dampen the rag with degreaser and wipe the joint thoroughly, paying attention to the rotatory area. If the joint has a small opening (for lubrication or adjustment), gently wipe inside with a Q-tip.
3. Let the degreaser sit for 5–10 minutes to break down stubborn grease.
4. Wipe away the degreaser with a clean, dry rag. If there's still debris in tight spots, use compressed air to blow it out.
5. After cleaning, try rotating the joint again. If it moves more freely, you've solved the problem! If not, move to Step 3.
Step 3: Lubricate the Rotatory Mechanism
If cleaning alone doesn't work, the joint might need lubrication. Over time, the original lubricant dries out or gets contaminated, increasing friction. The key here is to use the right lubricant—avoid thick greases (they attract dust) or household oils (they degrade plastic components). Instead, opt for a light machine oil (like 3-in-1 oil) or a silicone-based lubricant, which is ideal for plastic and metal parts.
Process:
1. After cleaning (Step 2), apply a small amount of lubricant to the joint's rotatory area. If there's a lubrication hole (common in higher-quality joints), squeeze oil directly into it. If not, apply a drop or two to the gap between the rotating parts.
2. Gently rotate the joint back and forth to work the lubricant into the mechanism. You should feel it start to loosen up as the oil spreads.
3. Wipe away any excess lubricant with a clean rag—too much will attract dust later.
4. Test rotation again. If it's smooth now, congratulations! If it still sticks, proceed to Step 4.
Step 4: Check for Misalignment or Overloading
If cleaning and lubrication don't work, the issue might be structural. Start by checking if the joint is under stress from misaligned pipes or overloading:
For Misalignment: Stand back and look at the structure. Are the connected pipes parallel, or do they bow slightly? Use a level to check if the pipes are straight. If they're misaligned, gently loosen the adjacent joints (not the stuck one) and adjust the pipes until they're straight. Retighten the joints and test rotation again.
For Overloading: Check the weight of the items on the structure. If it's a material rack, remove some items and see if the joint moves more freely. If it does, the joint was overloaded. Refer to your lean pipe supplier's specs to confirm the weight limit, and redistribute the load accordingly.
Step 5: Disassemble and Inspect Internal Parts
If the joint is still stuck, it's time to look inside. This step requires basic tools: a hex key (most joints use hex screws), pliers, and a small flathead screwdriver. Note: If the joint is part of a critical structure (e.g., supporting heavy equipment), disassemble only after securing the structure to prevent collapse.
Process:
1. Use the hex key to loosen the set screws that hold the joint to the pipes. Remove the joint carefully—some may have internal springs or small parts that can pop out.
2. Inspect the internal rotatory mechanism. Look for damaged ball bearings (cracks, missing balls), worn plastic sleeves (scratches, warping), or bent metal components. Check if any parts are misaligned (e.g., a bearing popped out of its groove).
3. If parts are damaged, you'll need to replace them. Contact your lean pipe supplier with the joint's model number to order replacement components (most suppliers stock common parts like bearings or sleeves).
4. If parts are just misaligned (e.g., a bearing slipped), gently reposition them with tweezers or a small screwdriver. Reassemble the joint, apply lubricant, and test rotation before reattaching it to the pipes.
Step 6: replace the Joint (Last Resort)
If the internal parts are severely damaged (e.g., a cracked housing or shattered bearings), replacement is the only option. While this might seem like a hassle, it's cheaper than letting a stuck joint disrupt production. When ordering a new joint, ensure it matches the specifications of the old one—same size, chrome plating, and rotatory mechanism type. Most lean pipe suppliers offer quick shipping, so downtime should be minimal.
To replace: Remove the old joint (as in Step 5), clean the pipes, attach the new joint, and tighten set screws. Test rotation immediately to ensure it works smoothly, then reattach any accessories (e.g., shelves, rollers) and reload the structure gradually, checking for stability.
Common Issues, Symptoms, and Fixes: A Handy Reference Table
| Symptom | Likely Cause | Fix |
|---|---|---|
| Joint sticks slightly; moves with force | Light contamination or dry lubricant | Clean with degreaser, apply light lubricant |
| Joint moves, but grinds/ clicks | Worn ball bearings or misaligned internal parts | Disassemble, inspect, replace damaged bearings |
| Joint stuck completely; no movement | Heavy contamination, seized mechanism, or broken parts | Clean thoroughly, lubricate; if no luck, replace joint |
| Joint sticks only when structure is loaded | Overloading or misalignment | Reduce load, adjust pipes for alignment |
| Joint rotates unevenly (stiff in one direction) | Misaligned internal sleeve or bent component | Disassemble, realign or replace sleeve |
Preventive Maintenance: Keeping Joints Moving for the Long Haul
They say an ounce of prevention is worth a pound of cure, and nowhere is that truer than with lean pipe joints. Regular maintenance takes minutes but saves hours of downtime later. Below are key practices to keep your chrome parallel lean pipe joints—and all your lean pipe and accessories—in top shape.
1. Schedule Regular Cleaning and Lubrication
How often? It depends on your environment. In dusty factories or outdoor settings, clean and lubricate joints every 2–4 weeks. In cleaner environments (e.g., electronics assembly), monthly maintenance should suffice. Create a checklist for your team: mark each joint with a small tag, and log when it was last serviced. Consistency is key—even a quick wipe-down and drop of oil can prevent buildup.
2. Train Teams on Proper Loading
Overloading is often a human error issue. Post weight limits on material racks, trolleys, and workbenches. Train new employees to check these limits, and remind seasoned staff during toolbox talks. Consider adding visual cues, like color-coded labels ("Red = Max 50 lbs") to make it easy to remember. When in doubt, consult your lean pipe supplier for spec sheets—they'll have detailed weight ratings for each joint type.
3. Inspect During Routine Walkarounds
Make joint checks part of your daily or weekly facility walkarounds. As you pass by lean structures, give each rotatory joint a gentle wiggle—if it feels stiff, add it to the maintenance list. Look for signs of wear: rust, cracks, or oil leaks (which indicate excess lubricant). Catching issues early (when they're just "stiff" instead of "stuck") makes repairs faster and cheaper.
4. Invest in Quality Joints (and Accessories)
Not all lean pipe joints are built to last. Cheap, low-quality joints often have plastic components that wear quickly or metal parts prone to corrosion. While they might save money upfront, they'll cost you in downtime later. When sourcing from a lean pipe supplier, prioritize joints with chrome plating, sealed bearings (to keep out debris), and clear weight ratings. It's a small investment that pays off in reliability.
Real-World Success Story: How One Factory Fixed Stuck Joints and Boosted Efficiency
Let's wrap up with a real example. A mid-sized automotive parts manufacturer in Ohio was struggling with frequent delays on their assembly line. The culprit? Stuck rotatory joints on their material racks, which held small components for workers. Every time a joint seized, workers had to stop production, call maintenance, and wait for repairs—costing the company an estimated 2–3 hours of downtime per week.
The maintenance team decided to take action. They started by implementing the troubleshooting steps above: cleaning and lubricating all joints, checking for misalignment, and replacing three severely damaged joints. They then created a weekly maintenance schedule, assigning a technician to inspect and service the racks. Finally, they added weight limit labels and trained the assembly team to report stiff joints immediately.
The results were dramatic. Within a month, downtime from stuck joints dropped to zero. Workers reported smoother operations, and the maintenance team saved hours by addressing issues early. The factory even expanded the program to other lean structures, like their roller track conveyors and turnover trolleys, leading to a 5% overall increase in line efficiency. All from a little attention to their chrome parallel lean pipe joints!
Conclusion: Keep Your Lean System Flowing
Stuck rotatory mechanisms in chrome parallel lean pipe joints might seem like a small problem, but in the world of lean manufacturing, small problems add up. By understanding the causes—contamination, wear, misalignment, overloading—and following a systematic troubleshooting approach, you can keep these critical components moving smoothly. Remember: regular maintenance is your best defense. A few minutes of cleaning and lubrication each month can prevent hours of downtime and keep your lean system true to its purpose—maximizing efficiency, minimizing waste, and keeping production on track.
Whether you're a seasoned pro or new to lean systems, the key is to stay proactive. Inspect, clean, lubricate, and address issues early. And when in doubt, don't hesitate to reach out to your lean pipe supplier—they're experts in their products and can offer tailored advice. With the right care, your chrome parallel lean pipe joints will continue to be the silent heroes of your workflow, supporting your team and your goals for years to come.