- Company Articles
- Products and Technology
- Installation And Maintenance
- Turning Angle Code 2020 for Workbench E: Assembly Step-by-Step Guide

Turning Angle Code 2020 for Workbench E: Assembly Step-by-Step Guide
Related Product
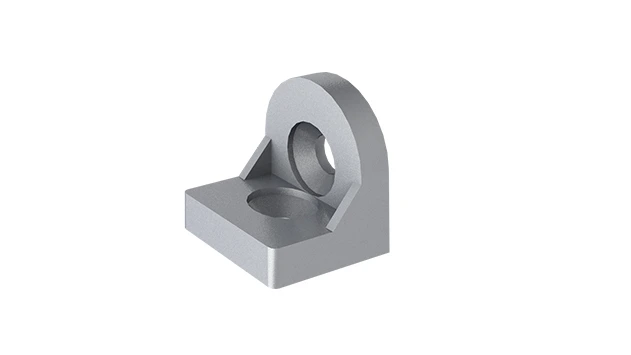
Urning Angle Code 2020
The turning angle aluminum profile connector provides a 90 degree hidden corner connection. 2020 it is means this size is used for 20 series aluminum profile.The corner code comes with set screws that allow for quick, easy connections.
Whether you're setting up a new workshop, upgrading your production line, or simply need a sturdy, reliable workspace, the Workbench E (single deck-without caster) is a go-to choice for many professionals. But what makes this workbench truly versatile is its compatibility with components like the Turning Angle Code 2020 and aluminum profile accessories—small parts that make a big difference in stability and functionality. In this guide, we'll walk you through assembling your Workbench E from start to finish, with a focus on using the Turning Angle Code 2020 correctly and integrating aluminum guide rail A for seamless material handling. Let's dive in!
Before You Start: What You'll Need
Assembling furniture or workbench components can feel daunting at first, but with the right tools and a bit of patience, you'll have this done in no time. Here's what you'll want to gather before unboxing your Workbench E:
- A Phillips-head screwdriver (or a power drill with a Phillips bit for faster work)
- A hex key set (most aluminum profile accessories use hex screws, so this is a must!)
- A rubber mallet (for gently tapping parts into place without damaging them)
- A spirit level (to ensure your workbench sits evenly—no wobbly surfaces here!)
- A measuring tape (to double-check distances and alignments)
- A clean, flat workspace (clear some floor space or use a large table—you'll need room to lay out parts)
Pro tip: Lay out a soft blanket or cardboard on your workspace to protect the workbench frame and aluminum parts from scratches. Trust me, you don't want to mar that sleek aluminum finish before you even start!
Gather Your Parts: What's in the Box?
Before diving into assembly, let's make sure you have all the parts you need. The Workbench E (single deck-without caster) kit should include the following—if anything is missing, reach out to your supplier right away. Here's a quick breakdown:
| Part Name | Quantity | Description |
|---|---|---|
| Workbench E Frame (Aluminum Profile) | 1 set | Main frame with pre-drilled T-slots for accessories |
| Turning Angle Code 2020 | 4 | L-shaped aluminum brackets for corner joints |
| Aluminum Guide Rail A | 2 | Straight guide rails for material support (1.2m length) |
| Aluminum Profile Accessories | 1 pack | Includes T-nuts, hex screws, end caps, and cable clips |
| Worktop (Single Deck) | 1 | Plywood or aluminum composite (varies by model) |
| Legs (Aluminum Pipe) | 4 | Adjustable height (80-100cm) with leveling feet |
Take a minute to sort these parts into piles—this will save you from hunting for a Turning Angle Code 2020 halfway through assembly. You'll notice the aluminum profile accessories come in a small bag; open it and separate the screws by size—trust me, mixing up M5 and M6 screws is a common headache!

Step-by-Step Assembly: Let's Build This Workbench!
Now that you're prepped, let's get hands-on. We'll break this down into 7 simple steps—no engineering degree required, I promise.
Step 1: Unpack and Inspect the Frame
Start by laying the Workbench E frame on your workspace. It should consist of four main aluminum profile pieces: two long side rails and two shorter end rails. Check each piece for dents or scratches—minor scuffs are normal, but deep dents might affect the fit. If something looks off, contact your supplier before proceeding.
Next, locate the pre-drilled T-slots along the length of each profile. These slots are where you'll attach the Turning Angle Code 2020 and aluminum profile accessories later. Run your finger along them to ensure they're clean—dust or debris can make inserting T-nuts tricky.
Step 2: Attach Legs with Turning Angle Code 2020
Here's where the Turning Angle Code 2020 shines—it's the secret to sturdy, precise corner joints. Grab one long side rail and one short end rail, and position them to form a right angle (like the corner of a rectangle). Now, take a Turning Angle Code 2020 and align its holes with the T-slots on both rails.
insert a T-nut into the T-slot of the long rail, then thread a hex screw through the hole in the Turning Angle Code 2020 and into the T-nut. Tighten it by hand first—you'll want to adjust the angle before fully securing. Repeat this for the short rail, using another T-nut and screw. Once both sides of the angle code are loosely attached, use your level to ensure the corner is square (90 degrees). When it looks straight, tighten the screws with your hex key—firm but not over-tight (stripping threads is a real risk here!).
Do this for all four corners, attaching the remaining legs as you go. Each leg should screw into the bottom of the Turning Angle Code 2020—most legs have a threaded end that fits directly into the bracket. If your legs are adjustable, leave them at their shortest length for now; we'll level the workbench later.
Step 3: Square the Frame and Check Stability
With all four corners assembled, your frame should look like a rectangular table base. Stand it upright (you might need a helper for this—aluminum is light, but the frame can flex). Once upright, push gently on each corner—if it wobbles, one of the Turning Angle Code 2020 joints might be loose. Tighten the screws a quarter-turn and test again until it feels solid.
Now, measure the diagonals of the frame (from corner to opposite corner). Both measurements should be equal—if not, the frame is "racked" (out of square). To fix this, gently push the longer diagonal corner inward until the measurements match. Tighten all Turning Angle Code 2020 screws again once squared—this is critical for the workbench's long-term stability.
Step 4: Install the Worktop
Lay the worktop face-down on your blanket (to protect the surface). Carefully lift the frame and place it upside-down on top of the worktop, aligning the edges. The frame should sit evenly, with about 5cm of overhang on all sides (adjust if your worktop is a different size).
Using the T-slots in the frame rails, attach the worktop with the screws provided. For most models, you'll insert T-nuts into the frame's T-slots, then drive screws up through the worktop into the T-nuts. Space the screws every 30cm along the rails to ensure the worktop doesn't bow under weight. Tighten each screw until the worktop feels secure—don't overtighten, as this can crack plywood or warp aluminum composite tops.
Once attached, flip the workbench right-side up. Stand back and admire your progress—you've got a basic frame with a worktop! Now let's add the finishing touches.
Step 5: Add Aluminum Guide Rail A for Material Support
Aluminum Guide Rail A is what makes this workbench perfect for assembly lines or material handling—these rails let you slide parts across the surface smoothly. Grab one guide rail and position it along the back edge of the worktop, parallel to the long side rail of the frame.
Using the aluminum profile accessories, attach the guide rail to the frame. Most guide rails have pre-drilled holes that align with the frame's T-slots. insert T-nuts into the frame, then use hex screws to secure the rail. Repeat for the second guide rail on the opposite edge, if needed (some setups use one rail, others two—adjust based on your workflow).
Slide a piece of cardboard along the rails to test—they should glide smoothly without catching. If a rail is uneven, loosen the screws and adjust its position until it's level with the worktop.
Step 6: Secure Aluminum Profile Accessories
Now it's time to customize with aluminum profile accessories! This is where you can add tool holders, cable clips, or storage bins. For example, if you need to manage power cords, use the cable clips from the accessory pack—snap them into the T-slots along the back rail, then thread cords through. Tool holders can be attached to the side rails, keeping screwdrivers or pliers within arm's reach.
Take your time here—this is what makes the Workbench E work for your needs. Need a bin for small parts? Use bracket accessories to mount a plastic bin under the worktop. Want to hang a light? Attach a pole bracket to the back rail. The beauty of aluminum profiles is their flexibility—you can always add more accessories later!
Step 7: Level the Workbench and Final Checks
The final step is to ensure your workbench sits evenly. Place your spirit level on the worktop along the length and width. If the bubble is off-center, adjust the leveling feet on the legs. Most feet screw in or out—turn clockwise to lower, counterclockwise to raise. Keep adjusting until the bubble is centered in both directions.
Give the workbench a final once-over: wiggle the legs to check for loose joints, slide materials along the Aluminum Guide Rail A to ensure smooth movement, and test the stability by leaning on the worktop (gently!). If everything feels solid, you're done—congratulations!

Troubleshooting Common Issues
Even with careful assembly, you might run into a few hiccups. Here's how to fix the most common problems:
Loose Turning Angle Code 2020 Joints
If the frame wobbles after assembly, check the Turning Angle Code 2020 screws. Over time, vibration can loosen them—tighten with a hex key. If a joint still feels loose, remove the screw, clean the T-slot with a dry cloth, and add a drop of thread-locking fluid before reinserting. This prevents future loosening.
Uneven Worktop
If the worktop dips in the middle, you might need additional support. Use aluminum profile accessories like center brackets—attach them to the frame rails underneath the worktop, centered between the legs. This adds rigidity and prevents bowing under heavy tools.
Aluminum Guide Rail A Catching
If materials don't slide smoothly, check for debris in the rail or misalignment. Clean the rail with a dry brush, then loosen the mounting screws and realign the rail so it's perfectly parallel to the worktop edge. Tighten the screws and test again—this usually fixes the issue.
Maintenance Tips for Longevity
Your Workbench E is built to last, but a little care goes a long way. Here's how to keep it in top shape:
- Clean regularly: Wipe the worktop and frame with a damp cloth to remove dust and oil. Avoid harsh chemicals—mild soap and water work best for aluminum.
- Tighten joints quarterly: Check the Turning Angle Code 2020 and aluminum profile accessories for looseness every 3 months, especially if the workbench is used daily.
- Lubricate moving parts: If you add roller tracks or casters later, apply a drop of silicone lubricant to the wheels every 6 months to keep them rolling smoothly.
- replace worn accessories: Aluminum profile accessories like T-nuts or end caps can wear out—keep spares on hand so you can swap them out quickly.
Final Thoughts: Your Workbench, Your Way
Assembling the Workbench E with Turning Angle Code 2020 and aluminum profile accessories might seem intimidating at first, but breaking it down into steps makes it manageable. The result? A custom workspace that adapts to your needs, whether you're assembling electronics, woodworking, or managing a production line.
Remember, the key to a great workbench is not just the parts, but how you use them. Experiment with aluminum guide rail A positions, add accessories as your workflow changes, and don't hesitate to tweak the setup—this is your space, and it should work for you.
Now go grab your tools, fire up that project, and enjoy the fruits of your labor—you've earned it!