- Company Articles
- Products and Technology
- Installation And Maintenance
- Turning Angle Code 3030 Assembly Tips: Speed Up Installation Without Errors

Turning Angle Code 3030 Assembly Tips: Speed Up Installation Without Errors
Related Product
Turning Angle Code 3030
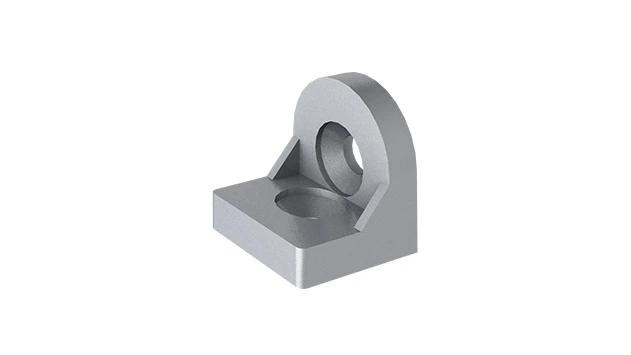
The turning angle aluminum profile connector provides a 90 degree hidden corner connection. 3030 it is means this size is used for 30 series aluminum profile.The corner code comes with set screws that allow for quick, easy connections.
Introduction: The Hidden Frustration of Misaligned Assembly (And How to Fix It)
Imagine this: You're in the middle of setting up a new aluminum profile workstation. The 3030 national standard profile A pieces are laid out, the tools are ready, and you're eager to get the job done. But as you start connecting the frames, something feels off. The corners won't line up, the bolts keep slipping, and by the time you think you've got it right, the whole structure wobbles like a table with a missing leg. Sound familiar? If you've worked with aluminum profiles, you know the struggle—especially when it comes to those critical corner connections. That's where the Turning Angle Code 3030 comes in. This small but mighty accessory is the unsung hero of sturdy, precise assemblies. But even the best parts need the right technique. In this guide, we'll walk through actionable, no-nonsense tips to master Turning Angle Code 3030 assembly, so you can cut installation time, eliminate errors, and build structures that stand the test of time.
First Things First: What Even Is a Turning Angle Code 3030?
Before we dive into the "how," let's make sure we're on the same page about the "what." The Turning Angle Code 3030 is a specialized connector designed for 30x30mm aluminum profiles—think of it as the glue that holds your frame's corners together, but way more reliable than glue. Unlike generic L-brackets, this angle code is engineered to fit snugly into the T-slots of 3030 national standard profile A, creating a rigid, load-bearing joint that won't loosen over time. It's commonly used in workbenches, material racks, and production line structures—anywhere you need a 90-degree angle that's both strong and easy to adjust.
But here's the kicker: Even though it's designed for simplicity, many assemblers still fumble with it. Why? Because they skip the prep work or rush the steps. Let's fix that. We'll start with preparation, move to step-by-step assembly, troubleshoot common mistakes, and even share pro hacks from seasoned fabricators. By the end, you'll wonder how you ever assembled profiles without these tips.

Prep Work: The "Boring" Stuff That Saves You Hours Later
You've heard it a hundred times: "Measure twice, cut once." Well, when it comes to Turning Angle Code 3030 assembly, it's more like "Prep once, assemble (almost) stress-free." Here's what you need to do before picking up a single tool:
1. Inspect Your Materials (Yes, All of Them)
Take 2 minutes to check your Turning Angle Code 3030 pieces. Are there any burrs on the edges? A tiny nick might seem harmless, but it can throw off alignment. Next, look at your 3030 national standard profile A. Are the T-slots clean? Dust, metal shavings, or leftover grease can block the angle code from seating properly. Grab a dry cloth or a small brush and wipe out the slots—you'll thank yourself later.
2. Gather the Right Tools (No Substitutes Allowed)
You don't need a garage full of gadgets, but using the wrong tool here will cost you. Here's your must-have list:
- Hex key set (metric): The Turning Angle Code 3030 typically uses M5 or M6 bolts—check the packaging for specifics. A ball-end hex key works best for tight angles.
- Torque wrench (optional but recommended): Overtightening is the #1 cause of stripped threads or cracked profiles. A torque wrench (set to 3-4 Nm for most 3030 applications) takes the guesswork out.
- Rubber mallet: For gently tapping the angle code into place—never use a steel hammer; you'll dent the profile.
- Straightedge or square: To double-check angles before final tightening. A 90-degree square ensures your corners aren't "off by a hair" (which adds up fast in larger structures).
- Gusset Alp 3030 (if needed): For high-load applications, pair your Turning Angle Code 3030 with a gusset—this triangular accessory reinforces the joint, preventing flexing under weight. Think of it as a seatbelt for your frame.
3. Dry Fit First (No Bolts, Just Mock-Up)
This might feel like a waste of time, but trust me: Dry fitting is the single best way to catch errors early. Lay out your 3030 national standard profile A pieces and slot the Turning Angle Code 3030 into the T-slots without tightening any bolts. Push the profiles together—do they meet cleanly? Is there a gap at the corner? If yes, check if the angle code is fully seated in the slot. Sometimes, a tiny misalignment here leads to big problems later. Adjust until the corners are flush, then mark the positions with a pencil (lightly—you don't want permanent marks on the profile). Now you're ready to assemble for real.

Step-by-Step Assembly: The "Slow Is Fast" Approach
Now for the main event: putting it all together. Follow these steps, and you'll have a joint that's tight, true, and ready for action. We'll use a simple 2-profile corner joint as an example, but these tips scale to larger structures too.
Step 1: insert the Turning Angle Code 3030 into the T-Slot
Take your first 3030 national standard profile A and slide the Turning Angle Code 3030 into the end of the T-slot. The code should have a "lip" that faces outward—this will be the corner of your joint. Push it in until it's flush with the end of the profile. If it's stuck, check for debris in the slot (remember that prep step?) or gently wiggle it side to side while pushing. Avoid forcing it—aluminum is soft, and you don't want to scratch the T-slot walls.
Step 2: Align the Second Profile (The "Square" Check)
Now, take the second 3030 profile and position it perpendicular to the first, so their ends meet at a corner. The Turning Angle Code 3030 should now extend into the T-slot of the second profile. Here's where the square comes in: Place the square against the outer edges of both profiles. Are the edges perfectly aligned with the square's 90-degree angle? If not, adjust the second profile until it is. Even a 1-degree misalignment can make the entire structure lean, so take the time here.
Step 3: Hand-Tighten the Bolts (No Power Tools Yet!)
insert the bolts (usually M5 socket head cap screws) through the holes in the Turning Angle Code 3030 and into the T-slot nuts inside the profiles. Hand-tighten only —you want the joint to stay in place but still be adjustable. If you crank the bolts now, you'll lock in any misalignment, and fixing it will mean loosening everything and starting over (ugh). Most angle codes have 2-4 bolts per profile—make sure all are snug but not tight.
Step 4: Double-Check Alignment (Again!)
Now that the bolts are hand-tight, recheck the angle with your square. Sometimes tightening the bolts even a little can pull the profiles out of alignment. If it's off, gently tap the profiles with your rubber mallet to nudge them back into place. This is much easier to fix now than after final tightening.
Step 5: Torque to Spec (The "Goldilocks" Tightness)
Time to lock it down. Using your torque wrench (or a hex key if you don't have one), tighten the bolts to the manufacturer's recommended torque—usually 3-4 Nm for 3030 profiles. If you don't have a torque wrench, aim for "firm but not forceful." A good rule of thumb: Once the bolt stops turning easily, give it a 1/8 turn more. Overtightening will strip the threads in the T-slot nut or crack the profile—both expensive mistakes. Undertightening, and the joint will loosen over time. Goldilocks had it right: Just right.
Step 6: Add Gusset Alp 3030 (For Heavy-Duty Jobs)
If your structure will hold weight (like a material rack or workbench), now's the time to add the gusset alp 3030. This triangular plate bolts onto the outside of the joint, reinforcing the angle and distributing load. Line up the gusset's holes with the T-slots, insert bolts, and tighten to the same torque as the angle code. Pro tip: Use lock washers here to prevent loosening from vibration—especially important in production environments.
Common Mistakes (And How to Spot Them Before They Ruin Your Project)
Even with the steps above, it's easy to slip up. Let's break down the most frequent errors and how to avoid them:
Mistake #1: Using the Wrong Angle Code for Your Profile
Not all 30x30 profiles are the same. The Turning Angle Code 3030 is designed for 3030 national standard profile A, which has specific T-slot dimensions. If you're using a non-standard profile (e.g., a 30x30 with thicker walls), the angle code might not fit, leading to loose joints. Always check the profile's specs against the angle code's compatibility—most suppliers list this on the product page.
Mistake #2: Skipping the Dry Fit (And Paying for It Later)
I once watched a team spend 2 hours disassembling a 6-foot rack because they skipped dry fitting. The corner joints were misaligned, and by the time they noticed, all the bolts were tightened. Don't be that team. Dry fitting takes 2 minutes and saves hours of frustration.
Mistake #3: Overtightening (The Silent Profile Killer)
Aluminum is strong, but it's not indestructible. Overtightening bolts can crack the profile's T-slot or strip the threads on the T-nut. If you hear a "creaking" sound while tightening, stop immediately—that's the aluminum stretching. Back off the bolt and try again with less force.
Mistake #4: Ignoring Debris in the T-Slot
Even a tiny metal shaving in the T-slot can prevent the Turning Angle Code 3030 from seating fully. Before assembly, run a dry cloth or a T-slot cleaning tool (a small brush works too) through the slot. It's a 10-second step that prevents wobbly joints.
Pro Tips: From the Shop Floor to Your Workbench
Now that you've got the basics down, let's level up with tips from fabricators who assemble these joints daily. These hacks will save you time, improve precision, and make you look like a pro (even if you're new to this).
Tip #1: Lubricate the T-Slot Nuts (Yes, Really)
A drop of machine oil or anti-seize on the T-slot nuts makes tightening bolts smoother and prevents galling (when aluminum threads stick together). Just don't overdo it—too much oil attracts dust, which can gunk up the slot later.
Tip #2: Use a Template for Repeated Assemblies
If you're building multiple identical structures (e.g., 10 workbenches), make a cardboard or plywood template. Mark the position of the Turning Angle Code 3030 on the template, then use it to align the profiles each time. This cuts prep time by 50% and ensures consistency across all units.
Tip #3: Check for Squareness with the "String Method" for Large Structures
For bigger frames (like a 10-foot material rack), a square might not be enough. Instead, measure the diagonals of the rectangle. If the diagonals are equal, the frame is square. If not, adjust the Turning Angle Code 3030 joints until they match. This old carpenter's trick works wonders for aluminum profiles too.
Tip #4: Invest in Magnetic Hex Keys
Dropping a bolt into the T-slot is frustrating (and dangerous if you're working overhead). Magnetic hex keys hold the bolt in place while you start threading, so you can keep both hands on the profile. They're cheap ($10-15 for a set) and pay for themselves in saved time.
Tools & Accessories: A Quick Reference Table
| Tool/Accessory | Primary Use | Expert Advice |
|---|---|---|
| Turning Angle Code 3030 | 90-degree corner joints for 3030 profiles | Always check compatibility with your profile (e.g., 3030 national standard profile A) |
| Gusset Alp 3030 | Reinforcing high-load joints | Use with lock washers in vibration-prone areas |
| Torque Wrench (3-4 Nm range) | Precise bolt tightening | Calibrate annually for accuracy |
| Magnetic Hex Key Set | Starting bolts in tight T-slots | Choose ball-end keys for hard-to-reach angles |
| 90-Degree Square (6-inch minimum) | Checking corner alignment | Aluminum squares are lightweight and won't scratch profiles |
Real-World Applications: How These Tips Transform Workflows
Still not convinced these tips are worth the effort? Let's look at a real example. A local electronics manufacturer was assembling 20 workbenches using 3030 national standard profile A and Turning Angle Code 3030. Their first attempt took 4 hours per bench, and 3 of the 20 had wobbly joints that needed rework. After implementing the dry fit, torque wrench, and template tips, they cut assembly time to 2.5 hours per bench and zero reworks. That's 30 hours saved on 20 benches—time they redirected to more important tasks, like training staff or optimizing production lines. The key? They stopped rushing and focused on precision first. Your projects can see similar results.
Conclusion: Your Assembly Process, Upgraded
Assembling with Turning Angle Code 3030 doesn't have to be a headache. By prepping properly, following the step-by-step method, avoiding common mistakes, and using pro tips, you'll build joints that are tight, true, and ready for whatever you throw at them. Remember: The goal isn't just to "get it done"—it's to get it done right, so you never have to revisit the project to fix loose bolts or misaligned frames. Whether you're building a simple shelf or a complex production line, these tips will make you faster, more confident, and more efficient. So grab your Turning Angle Code 3030, your 3030 national standard profile A, and let's build something that lasts.
Now go out there and assemble like a pro. Your wobble-free frames will thank you.