- Company Articles
- Products and Technology
- Installation And Maintenance
- Turning Angle Code 3030 Installation Guide: Step-by-Step for Beginners

Turning Angle Code 3030 Installation Guide: Step-by-Step for Beginners
Related Product
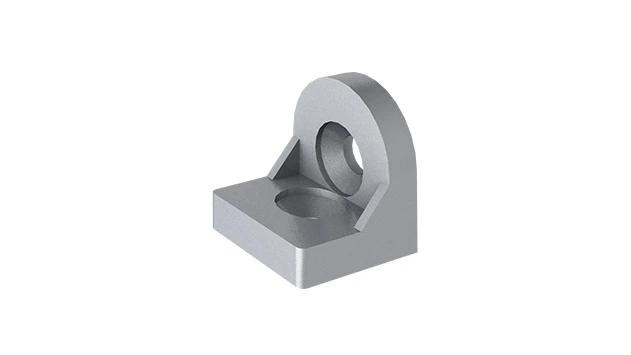
Turning Angle Code 3030
The turning angle aluminum profile connector provides a 90 degree hidden corner connection. 3030 it is means this size is used for 30 series aluminum profile.The corner code comes with set screws that allow for quick, easy connections.
Introduction: Why Turning Angle Code 3030 Matters in Your Aluminum Profile Projects
If you've ever walked into a workshop, a warehouse, or even a modern home office, you've probably seen structures made from sleek, modular aluminum profiles—think sturdy workbenches, efficient material racks, or custom storage shelves. These versatile systems owe their strength and flexibility to small but critical components, and one of the most essential among them is the
Turning Angle Code 3030
. For beginners diving into aluminum profile projects, understanding how to install this tiny but mighty accessory can mean the difference between a wobbly, unstable structure and one that stands the test of time.
Aluminum profiles, especially the popular 3030 series, have become a go-to choice for DIY enthusiasts, small businesses, and large manufacturers alike. Their T-slot design allows for easy customization, and they're lightweight yet surprisingly strong. But to connect these profiles at precise angles—whether you're building a 90-degree corner for a workbench or a multi-angle frame for a material rack—you need a reliable joining solution. That's where the Turning Angle Code 3030 comes in. This compact, L-shaped bracket is designed to lock two 3030 aluminum profiles together at a right angle, distributing weight evenly and ensuring structural integrity.
If you're new to this, you might be thinking, "How hard can it be? Just screw it on, right?" Well, there's more to it than that. Improper installation—like misaligned holes, over-tightened screws, or using the wrong accessories—can lead to loose joints, sagging shelves, or even safety hazards. That's why we've put together this detailed guide. We'll walk you through everything from gathering tools to troubleshooting common mistakes, all in a friendly, easy-to-follow way. By the end, you'll not only know how to install a Turning Angle Code 3030 but also understand how it works with other aluminum profile accessories (like gusset plates or end caps) to create professional-quality structures. Let's get started!
Aluminum profiles, especially the popular 3030 series, have become a go-to choice for DIY enthusiasts, small businesses, and large manufacturers alike. Their T-slot design allows for easy customization, and they're lightweight yet surprisingly strong. But to connect these profiles at precise angles—whether you're building a 90-degree corner for a workbench or a multi-angle frame for a material rack—you need a reliable joining solution. That's where the Turning Angle Code 3030 comes in. This compact, L-shaped bracket is designed to lock two 3030 aluminum profiles together at a right angle, distributing weight evenly and ensuring structural integrity.
If you're new to this, you might be thinking, "How hard can it be? Just screw it on, right?" Well, there's more to it than that. Improper installation—like misaligned holes, over-tightened screws, or using the wrong accessories—can lead to loose joints, sagging shelves, or even safety hazards. That's why we've put together this detailed guide. We'll walk you through everything from gathering tools to troubleshooting common mistakes, all in a friendly, easy-to-follow way. By the end, you'll not only know how to install a Turning Angle Code 3030 but also understand how it works with other aluminum profile accessories (like gusset plates or end caps) to create professional-quality structures. Let's get started!
Tools and Materials: What You'll Need Before You Start
Before you dive into installation, let's make sure you have all the right tools and materials. Think of this as your pre-flight checklist—skipping a tool here could mean frustration later, so take a minute to gather everything. Most of these items are easy to find at hardware stores or online, and many DIYers already have them in their toolkits. Here's what you'll need:
A quick note on the 3030 aluminum profile : These profiles have a cross-section of 30mm x 30mm, with T-slots running along their length. The Turning Angle Code 3030 is specifically designed for this size, so double-check that your profile is indeed 3030 (measure the width and height if you're unsure). Using a smaller or larger profile (like 2020 or 4040) won't work— the angle code won't fit, and your joint will be weak.
| Category | Items | Why You Need Them |
|---|---|---|
| Essential Tools |
• Hex Key (Allen Wrench) – Size M5 or M6 (check your angle code screws)
• Measuring Tape (1m or longer) • Pencil or Marker • Spirit Level (6-inch or longer) • Deburring Tool or Sandpaper (120-grit) • Rubber Mallet (optional, for gentle adjustments) |
Hex keys tighten the screws on the angle code; measuring tape ensures accurate placement; pencil marks where to install; level checks for straightness; deburring tool removes sharp edges from cut profiles. |
| Materials |
• 3030 Aluminum Profile (cut to your project length)
• Turning Angle Code 3030 (quantity depends on your project—usually 1 per corner) • M5 or M6 Socket Head Cap Screws (length: 12mm–16mm, compatible with 3030 profiles) • Flat Washers (optional, to prevent screw heads from digging into the profile) • Gusset Alp 3030 (optional, for extra corner support) |
The 3030 profile is your main structure; angle codes connect profiles at corners; screws secure the angle code to the profile; washers protect the profile surface; gusset alp 3030 adds rigidity to high-stress joints. |
| Safety Gear |
• Work Gloves (to protect hands from sharp edges)
• Safety Glasses (when cutting or deburring profiles) |
Aluminum profiles can have sharp burrs after cutting; gloves and glasses prevent cuts and eye injuries. |
| Optional Extras |
• Torque Wrench (to avoid over-tightening screws)
• Thread Locker (e.g., Loctite Blue, for permanent joints) • Cleaning Cloth (to wipe down profiles before installation) |
Torque wrench ensures consistent tightness; thread locker prevents screws from loosening over time; clean profiles mean better adhesion for accessories. |
A quick note on the 3030 aluminum profile : These profiles have a cross-section of 30mm x 30mm, with T-slots running along their length. The Turning Angle Code 3030 is specifically designed for this size, so double-check that your profile is indeed 3030 (measure the width and height if you're unsure). Using a smaller or larger profile (like 2020 or 4040) won't work— the angle code won't fit, and your joint will be weak.

Preparation: Setting Yourself Up for Success
Now that you have your tools and materials, it's time to prep. Think of this step as laying the foundation for your project—rushing through it might save a few minutes now, but it'll cost you more time (and maybe materials) later when you have to fix mistakes. Let's break it down:
1. Measure and Mark Your Profile
First, decide where on the 3030 aluminum profile you'll install the Turning Angle Code 3030. Most projects (like a simple workbench or shelf) use right-angle joints, so the angle code will go at the end of one profile, connecting to another. Use your measuring tape to mark the position—typically, the angle code should sit flush with the end of the profile, but if your project needs a specific offset (e.g., for a staggered shelf), measure that distance and mark it clearly with a pencil. Pro tip: Draw a light line across the T-slot where the angle code's screw holes will align—this ensures you don't drill or screw in the wrong spot.
2. Deburr the Profile Edges
If your 3030 profile was recently cut (e.g., with a saw), the ends might have sharp burrs or rough edges. These can scratch you, damage the angle code, or prevent a tight fit. Grab your deburring tool or sandpaper and gently smooth the edges. Run your finger along the cut end after—if it feels smooth, you're good to go. If not, keep sanding until there are no sharp spots. This step is small but crucial for both safety and fit.
3. Clean the Profile Surface
Aluminum profiles can collect dust, oil, or fingerprints, especially if they've been stored for a while. Wipe the area where the angle code will attach with a clean cloth (a microfiber cloth works best) to remove any debris. This ensures the angle code sits flat against the profile and that screws tighten properly—dust under the angle code can cause it to sit unevenly, leading to a wobbly joint.
4. Test-Fit the Angle Code
Before grabbing screws, do a dry run: place the Turning Angle Code 3030 on the marked spot of the profile. Check if the screw holes align with the T-slot in the profile. They should line up perfectly—if the holes are offset, double-check that you have the right angle code (some manufacturers make angle codes for different profile sizes, so confirm it's labeled "3030"). If it still doesn't fit, the profile might be a non-standard 3030 (e.g., with different T-slot spacing)—in that case, you may need to source a compatible angle code.
1. Measure and Mark Your Profile
First, decide where on the 3030 aluminum profile you'll install the Turning Angle Code 3030. Most projects (like a simple workbench or shelf) use right-angle joints, so the angle code will go at the end of one profile, connecting to another. Use your measuring tape to mark the position—typically, the angle code should sit flush with the end of the profile, but if your project needs a specific offset (e.g., for a staggered shelf), measure that distance and mark it clearly with a pencil. Pro tip: Draw a light line across the T-slot where the angle code's screw holes will align—this ensures you don't drill or screw in the wrong spot.
2. Deburr the Profile Edges
If your 3030 profile was recently cut (e.g., with a saw), the ends might have sharp burrs or rough edges. These can scratch you, damage the angle code, or prevent a tight fit. Grab your deburring tool or sandpaper and gently smooth the edges. Run your finger along the cut end after—if it feels smooth, you're good to go. If not, keep sanding until there are no sharp spots. This step is small but crucial for both safety and fit.
3. Clean the Profile Surface
Aluminum profiles can collect dust, oil, or fingerprints, especially if they've been stored for a while. Wipe the area where the angle code will attach with a clean cloth (a microfiber cloth works best) to remove any debris. This ensures the angle code sits flat against the profile and that screws tighten properly—dust under the angle code can cause it to sit unevenly, leading to a wobbly joint.
4. Test-Fit the Angle Code
Before grabbing screws, do a dry run: place the Turning Angle Code 3030 on the marked spot of the profile. Check if the screw holes align with the T-slot in the profile. They should line up perfectly—if the holes are offset, double-check that you have the right angle code (some manufacturers make angle codes for different profile sizes, so confirm it's labeled "3030"). If it still doesn't fit, the profile might be a non-standard 3030 (e.g., with different T-slot spacing)—in that case, you may need to source a compatible angle code.
Pro Tip:
If you're working with multiple corners (e.g., building a cube-shaped shelf), lay out all your profiles and angle codes on a flat surface first. This helps you visualize the project and ensures you have enough angle codes and screws before starting. It's easier to adjust now than halfway through installation!

Step-by-Step Installation: How to Install Turning Angle Code 3030
Now for the main event: installing the Turning Angle Code 3030. Follow these steps carefully, and you'll have a secure, professional-looking joint in no time. We'll take it slow, explaining each part so even if you've never held a hex key before, you'll feel confident.
Step 1: Align the Turning Angle Code with the Marked Position
Place the Turning Angle Code 3030 on the 3030 aluminum profile, lining up its screw holes with the T-slot(s) you marked earlier. The angle code has two "arms"—each arm should sit flat against one side of the profile (for a right-angle joint, one arm will attach to the vertical profile, and the other to the horizontal profile). Make sure the angle code is centered on the profile's width (30mm) so it doesn't hang over the edge. If your project uses a gusset alp 3030 (a triangular bracket that reinforces corners), set it aside for now—we'll add it after the angle code is secured.Step 2: insert the Screws into the Angle Code Holes
Take your M5 or M6 socket head cap screws (check the angle code's packaging for the recommended size—most 3030 angle codes use M5 screws) and insert them through the holes in the angle code. Push them gently into the T-slot of the aluminum profile. You should feel slight resistance as the screw's threads catch the T-slot nut inside the profile (if your profile doesn't have pre-installed T-slot nuts, you'll need to insert them into the T-slot first—slide the nut into the slot and align it with the angle code's hole). Don't tighten yet—just hand-screw them until they're snug enough to hold the angle code in place.Step 3: Tighten the Screws Gradually (Don't Over-Tighten!)
Grab your hex key and start tightening the screws. Here's the golden rule: tighten them gradually, alternating between screws . For example, if the angle code has two screws per arm, tighten the first screw a little, then the second, then go back and tighten the first more, and so on. This ensures even pressure and prevents the angle code from shifting. How tight is "tight enough"? You'll feel resistance, and the angle code shouldn't wiggle when you tug it gently. Stop when the screw head is flush with the angle code's surface—over-tightening can strip the threads in the T-slot nut or warp the angle code, weakening the joint. If you hear a "creaking" sound from the aluminum, you've gone too far—loosen it slightly.Step 4: Check Alignment with a Spirit Level
Now that the angle code is attached to one profile, it's time to connect the second profile (for a corner joint). Hold the second 3030 profile against the other arm of the angle code, aligning it with your project's design (e.g., vertical and horizontal for a shelf). Mark the screw holes on the second profile, insert screws, and tighten as in Step 3. Once both profiles are attached, place your spirit level along the top of the horizontal profile and the side of the vertical profile. The bubble should sit in the center—if it's off, gently loosen the screws, adjust the profile until the bubble is centered, then retighten. This step ensures your structure is straight, not leaning, which is critical for stability (no one wants a shelf that tilts!).Step 5: Add Optional Accessories (e.g., Gusset Alp 3030)
For projects that will hold heavy loads (e.g., a workbench with tools or a material rack with boxes), consider adding a gusset alp 3030 to the corner. A gusset is a triangular plate that fits between the two profiles, reinforcing the joint by distributing weight across a larger area. To install it: place the gusset against the inside corner where the two profiles meet, align its holes with the T-slots, insert screws, and tighten as before. Gussets are optional but highly recommended for high-stress joints—they turn a "good" joint into a "great, long-lasting" one.Step 6: Inspect the Joint for Stability
Give the joint a gentle shake or tug. It should feel solid—no movement, no creaking, no loose screws. If it wobbles, check: Are the screws tight enough? Did the angle code shift during tightening? Is the profile aligned correctly? Fix any issues before moving on to the next corner. Remember, a little extra time here prevents big problems later!Troubleshooting Common Mistakes
Even with careful prep, things can go wrong. Here are the most common issues beginners run into and how to fix them:
- Screws won't tighten: If screws spin without getting tight, the T-slot nut inside the profile might be misaligned. Loosen the screw, push the angle code firmly against the profile, and wiggle the screw slightly—this should help the nut catch. If that doesn't work, remove the angle code, slide the T-slot nut to the marked position, and try again.
- Angle code sits unevenly: This usually happens because of debris under the angle code or a bent angle code. Remove the angle code, clean the profile surface again, and check if the angle code is warped (lay it on a flat surface—if it rocks, it's bent). If bent, replace it—warped angle codes can't create stable joints.
- Profile is misaligned (leaning): If the level shows the profile is off, loosen the screws, adjust the profile until it's straight, and retighten. If it keeps leaning, the angle code might be installed at an angle—double-check your initial marks to ensure the angle code was placed straight.
- Stripped screw threads: Over-tightening is the main culprit here. If a screw strips, remove it carefully (use pliers if needed), and replace it with a new screw of the same size. To avoid this, stop tightening when you feel resistance—you don't need to crank it as hard as possible!
Tips for Success: From Beginner to Pro
You've installed your first Turning Angle Code 3030—congrats! Now, here are some extra tips to make your next project even smoother:
1. Invest in a Quality Hex Key Set
A cheap hex key can strip or bend, making it hard to tighten screws. Spend a few extra dollars on a set with ball-end tips—they allow you to tighten screws at an angle, which is handy for hard-to-reach corners.
2. Use a Torque Wrench for Consistency
If you're working on a large project (e.g., a production workbench with dozens of corners), a torque wrench (set to 2–3 Nm for M5 screws) ensures every joint is tightened the same amount. Consistency = stability!
3. Work on a Flat Surface
A wobbly table or uneven floor can throw off your alignment. Set up your project on a flat workbench, plywood sheet, or even the floor (if it's level). This makes it easier to use the spirit level accurately.
4. Label Parts for Complex Projects
If your project has multiple profiles of different lengths, label them with tape (e.g., "Left Vertical," "Top Horizontal") to avoid mix-ups. This saves time and reduces mistakes when installing angle codes.
5. Practice on Scrap Profiles First
New to aluminum profiles? Cut a few scrap 3030 pieces and practice installing angle codes on them. This builds muscle memory and confidence before you tackle your main project. You'll learn how much to tighten screws, how to align profiles, and how to fix small mistakes—all without risking your project materials.
1. Invest in a Quality Hex Key Set
A cheap hex key can strip or bend, making it hard to tighten screws. Spend a few extra dollars on a set with ball-end tips—they allow you to tighten screws at an angle, which is handy for hard-to-reach corners.
2. Use a Torque Wrench for Consistency
If you're working on a large project (e.g., a production workbench with dozens of corners), a torque wrench (set to 2–3 Nm for M5 screws) ensures every joint is tightened the same amount. Consistency = stability!
3. Work on a Flat Surface
A wobbly table or uneven floor can throw off your alignment. Set up your project on a flat workbench, plywood sheet, or even the floor (if it's level). This makes it easier to use the spirit level accurately.
4. Label Parts for Complex Projects
If your project has multiple profiles of different lengths, label them with tape (e.g., "Left Vertical," "Top Horizontal") to avoid mix-ups. This saves time and reduces mistakes when installing angle codes.
5. Practice on Scrap Profiles First
New to aluminum profiles? Cut a few scrap 3030 pieces and practice installing angle codes on them. This builds muscle memory and confidence before you tackle your main project. You'll learn how much to tighten screws, how to align profiles, and how to fix small mistakes—all without risking your project materials.
Conclusion: You've Got This!
Installing a Turning Angle Code 3030 might seem intimidating at first, but as you've seen, it's all about preparation, patience, and attention to detail. By following these steps—measuring carefully, aligning properly, tightening gradually, and checking for stability—you can create strong, professional-quality joints that will last for years. Remember, even seasoned DIYers started with the basics, and every project gets easier with practice.
Now that you know how to install Turning Angle Code 3030, the possibilities are endless. Build a custom workbench for your garage, a sleek storage rack for your office, or even a modular shelf for your home. And don't forget to explore other aluminum profile accessories —end caps to hide sharp edges, casters to make structures mobile, or panels to add shelves. The modularity of aluminum profiles means you can expand or modify your project later, and with the skills you've learned today, you'll be ready for whatever comes next.
So grab your tools, pick a project, and get started. You've got the knowledge—now go build something amazing!
Now that you know how to install Turning Angle Code 3030, the possibilities are endless. Build a custom workbench for your garage, a sleek storage rack for your office, or even a modular shelf for your home. And don't forget to explore other aluminum profile accessories —end caps to hide sharp edges, casters to make structures mobile, or panels to add shelves. The modularity of aluminum profiles means you can expand or modify your project later, and with the skills you've learned today, you'll be ready for whatever comes next.
So grab your tools, pick a project, and get started. You've got the knowledge—now go build something amazing!