- Company Articles
- Products and Technology
- Installation And Maintenance
- Turning Angle Code 4040 Installation Guide: Step-by-Step for Lean Workbenches

Turning Angle Code 4040 Installation Guide: Step-by-Step for Lean Workbenches
Related Product
Turning Angle Code 4040
The turning angle aluminum profile connector provides a 90 degree hidden corner connection. 4040 it is means this size is used for 40 series aluminum profile.The corner code comes with set screws that allow for quick, easy connections.
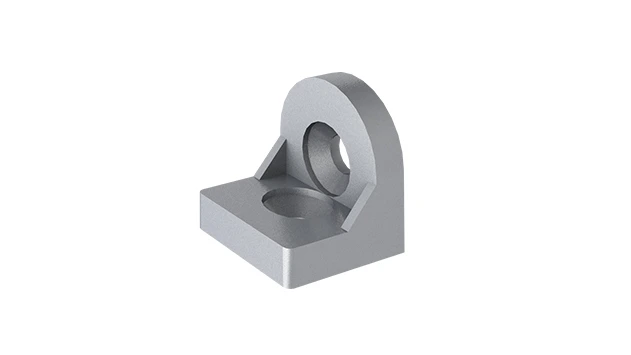
If you've ever spent time setting up a workspace—whether in a factory, workshop, or even a home garage—you know that the little details make all the difference. A wobbly table, misaligned shelves, or parts that just don't fit right can turn a productive day into a frustrating one. That's where components like the Turning Angle Code 4040 come in. These small but mighty connectors are the unsung heroes of building sturdy, reliable workbenches, especially when you're working with aluminum profiles. Today, we're diving into how to install them properly, step by step, so you can build a lean pipe workbench that stands the test of time.
First, let's get on the same page: What even is a Turning Angle Code 4040? Simply put, it's a specialized bracket designed to join aluminum profiles at precise angles—most commonly 90 degrees, though some variants handle other angles too. If you're using 4040 aluminum profiles (a standard size in industrial setups), this angle code is the glue that holds your frame together. And when we talk about a lean pipe workbench , we're referring to a workspace built with efficiency in mind—lightweight, adaptable, and easy to reconfigure. Aluminum profiles are perfect for this because they're strong yet lightweight, resistant to rust, and compatible with a wide range of accessories. But none of that matters if your connections are weak. That's why getting the Turning Angle Code 4040 installation right is non-negotiable.
Whether you're a seasoned builder or new to assembling workbenches, this guide will walk you through everything you need to know. We'll cover tools, prep work, the actual installation steps, troubleshooting common issues, and even a few pro tips to make the process smoother. By the end, you'll have a workbench that's not just functional, but built to support the kind of efficiency that defines a lean system .
What You'll Need: Tools & Materials
Before we dive into the installation, let's gather our supplies. You don't need a fully stocked workshop, but having the right tools on hand will save you time and headaches. Here's a quick checklist:
| Tools | Materials | Optional Extras |
|---|---|---|
| Allen wrench set (metric, ideally 4mm–6mm) | Turning Angle Code 4040 brackets (quantity depends on your design) | Rubber mallet (for gentle adjustments) |
| Tape measure (at least 2m long) | 4040 aluminum profiles (cut to your workbench dimensions) | Thread locker (for extra bolt security) |
| Carpenter's square (to check 90-degree angles) | M6 or M8 bolts (length: 16mm–20mm, compatible with T-slots) | Level (to ensure your workbench is flat) |
| Pencil or marker (for marking drill points) | Aluminum profile accessories (e.g., end caps, if desired) | Debris brush (to clean T-slots) |
Pro Tip:
Not all bolts are created equal! Make sure your bolts are designed for T-slot profiles—they have a rounded head that fits snugly into the slot. Regular hex bolts might not seat properly, leading to loose connections later.
Step 1: Prep Your Workspace & Materials
Before you start tightening bolts, take 5 minutes to set yourself up for success. Trust me, skipping this step is how you end up with scratched profiles or misaligned parts.
1.1 Clear a flat surface. You'll need enough space to lay out your aluminum profiles and angle codes. A garage floor, large table, or even a clean section of concrete works. If the surface is uneven, lay down a sheet of plywood to create a level base—this will make measuring easier.
1.2 Unpack and inspect your parts. Take out all your Turning Angle Code 4040 brackets and check for any defects: cracks in the plastic (if they're nylon-coated), bent metal, or rough edges that might scratch your profiles. Also, slide a bolt into one of the angle code's holes to make sure it threads smoothly—no one wants to discover a stripped thread halfway through installation.
1.3 Clean your aluminum profiles. Aluminum is pretty resistant to grime, but T-slots (the grooves along the profile length) love collecting dust, metal shavings, or leftover oil from manufacturing. Grab a small brush (a toothbrush works in a pinch) and sweep out each slot. If there's stubborn dirt, wipe with a damp cloth and let dry completely—you don't want moisture trapped when you tighten the bolts.
Step 2: Measure Twice, Mark Once (The Golden Rule)
You've probably heard the phrase "measure twice, cut once," but when it comes to installing angle codes, it's more like "measure twice, mark once, then double-check." The goal here is to make sure your angle codes are placed exactly where they need to be so your workbench frame is square and level.
2.1 Lay out your profile frame. Let's say you're building a simple workbench with four vertical legs and four horizontal rails (two on the top, two on the bottom). Lay the profiles on your flat surface in the shape of a rectangle. If your workbench has a top shelf or lower shelf, include those profiles too—now's the time to visualize the whole structure.
2.2 Mark where the angle codes will go. Take your tape measure and pencil. For a 90-degree corner (the most common use case), the angle code should sit flush against the end of one profile and the side of another. Let's say you have a vertical leg (profile A) and a horizontal rail (profile B). The end of profile B should meet the side of profile A. Mark a line on profile A where the edge of profile B will sit—this is where the angle code's "arm" will attach.
2.3 Align the marks with T-slot holes. Aluminum profiles have pre-drilled holes or continuous T-slots. If your profile has discrete holes, line up your mark with the nearest hole—this is where your bolt will go. If it's a continuous T-slot, you can position the angle code anywhere along the slot, but aim for the middle of the profile's width for balance. Pro tip: Use a square to make sure your mark is perpendicular to the profile's edge—crooked marks lead to crooked frames.
Common Mistake:
Rushing the marking step. I once built a shelf where I eyeballed the marks instead of measuring, and the whole thing tilted to the left like a Leaning Tower of Pisa. Spend the extra 30 seconds to double-check—your back (and your tools) will thank you later.
Step 3: Attach the Turning Angle Code 4040
Now for the fun part: actually putting the angle code on the profile. This is where it starts to feel like you're building something real. Let's break it down.
3.1 Position the angle code. Take one Turning Angle Code 4040 and line up its mounting holes with the marks you made on the aluminum profile. The angle code will have two "arms"—one for each profile you're connecting. Let's call them Arm A (for the vertical leg) and Arm B (for the horizontal rail). Press Arm A against the side of profile A, making sure the holes align with your marks.
3.2 insert the bolts. Grab a T-slot bolt and slide it into the T-slot of profile A, aligning it with the hole in Arm A of the angle code. Push the bolt until it's snug against the angle code's hole. Do this for all the holes in the angle code—most have 2–4 bolts per arm for stability. For example, a standard 90-degree angle code might have 2 bolts on each arm, totaling 4 bolts per corner.
3.3 Hand-tighten the bolts first. Don't break out the Allen wrench just yet! Screw the bolts into the angle code by hand until they're finger-tight. This gives you wiggle room to adjust the angle code if it's slightly misaligned. If you tighten them all the way now, you might strip the threads or warp the angle code when you try to move it.
3.4 Repeat for the second profile. Now, take profile B (the horizontal rail) and position its end against the other arm of the angle code (Arm B). Slide bolts into profile B's T-slot, align them with Arm B's holes, and hand-tighten those too. At this point, the two profiles should be connected at a 90-degree angle, held loosely by the angle code and hand-tightened bolts.
Step 4: Square the Frame & Tighten the Bolts
You've got the angle code loosely attached—now it's time to make sure the frame is square before you lock everything down. A square frame is critical for a stable workbench; if it's off by even a few degrees, doors won't close, shelves will rock, and over time, the stress can bend your angle codes.
4.1 Check for squareness. The easiest way to do this is with the "diagonal measurement" trick. Measure the distance from one corner of your frame to the opposite corner (diagonal 1). Then measure the other diagonal (diagonal 2). If the frame is square, both measurements will be identical. If not, gently push or pull the corners until the diagonals match. For example, if diagonal 1 is 100cm and diagonal 2 is 102cm, push the longer diagonal's corners toward each other until both measure 101cm.
4.2 Tighten the bolts (slowly and evenly). Once the frame is square, grab your Allen wrench. Start with one bolt on Arm A, tighten it until it's snug—but not so tight that you strip the thread. Then move to the opposite bolt on Arm A (if there are two), then do the same for Arm B. Tightening in a crisscross pattern (like you would with a car tire) ensures even pressure and prevents warping the angle code. How tight is "snug"? You should feel resistance, and the angle code shouldn't move when you wiggle the profiles. If you hear a creak or feel the metal bending, back off a quarter-turn—over-tightening is a common mistake.
4.3 Repeat for all corners. Now, go to the next corner of your frame and repeat steps 3 and 4: position the angle code, hand-tighten bolts, square the frame section, then fully tighten. Work your way around the entire frame until all angle codes are installed. If you're building a workbench with shelves or extra supports, install those angle codes now too—better to do it all at once than to disassemble later.
Step 5: Test the Stability
You're almost there! But before you start loading your new workbench with tools or materials, you need to make sure it's stable. A quick stress test now can save you from a collapse later.
5.1 Lift and shake gently. With the frame fully assembled, carefully lift one end a few inches off the ground and let it down—this helps settle the connections. Then, push and pull on the corners to check for wobbling. If it feels loose, go back and check the bolts—you might have missed one or under-tightened.
5.2 Add temporary weight. Place a heavy object (like a toolbox or a bag of concrete mix) on the frame and let it sit for 10–15 minutes. This mimics the weight of daily use and can reveal weak spots. If the frame sags or creaks, inspect the angle codes—are they bending? Are the bolts holding? If a bolt starts to back out, add a drop of thread locker (blue, not red—red is permanent!) and retighten.
5.3 Check for sharp edges. Aluminum profiles can have burrs from cutting, and angle codes might have rough spots. Run your hand along the frame—if you feel a sharp edge, file it down with sandpaper. No one wants a splinter while reaching for a wrench!
Step 6: Add the Finishing Touches
Your frame is square, stable, and tight—now it's time to turn it into a real workbench. This is where you add the top, shelves, or any other accessories you need. Since we're focusing on the Turning Angle Code 4040, we'll keep this brief, but here are the key steps:
6.1 Install the workbench top. If you're using a plywood, MDF, or aluminum top, drill holes through the top and into the horizontal rails of your frame. Use bolts or screws to secure it—just make sure they're short enough that they don't poke through the other side. For extra stability, add angle codes under the top to support the edges (this is where those extra angle codes you bought come in handy!).
6.2 Add shelves or drawers (if needed). Using the same angle code installation method, attach vertical supports and horizontal shelves to your frame. Remember to measure and mark again—shelves that are too high or too low are frustrating to use.
6.3 Cap the profiles (optional but recommended). Aluminum profile end caps are cheap and easy to install—just pop them into the ends of the profiles. They prevent dust from getting into the T-slots and protect you from sharp edges. Plus, they make the workbench look more polished!
Troubleshooting: When Things Go Wrong (And How to Fix Them)
Even with careful planning, sometimes things don't go as expected. Here are the most common issues I've run into when installing Turning Angle Code 4040 brackets, and how to fix them:
Bolts won't tighten: If the bolt spins but doesn't get tight, the T-nut (the part inside the T-slot that the bolt screws into) might be misaligned. Loosen the bolt, reach into the T-slot with a small screwdriver, and reposition the T-nut until it lines up with the bolt. Then try again.
Angle code doesn't fit: If the angle code is too loose on the profile, check that you have the right size—Turning Angle Code 4040 is for 4040 profiles. If you accidentally bought 3030 angle codes for 4040 profiles, they won't fit. Double-check the product label before buying!
Frame is still wobbly: If the frame rocks side to side, even after tightening all bolts, the floor might be uneven. Add adjustable feet to the bottom of the legs—these screw into the end of the profiles and let you level the workbench. Trust me, this is a game-changer for garages or basements with sloped floors.
Why This Matters for Your Lean System
At this point, you might be thinking, "Okay, I installed the angle code—so what?" But here's the thing: a well-built workbench is more than just a table. It's part of a lean system —a way of working that minimizes waste, maximizes efficiency, and adapts to change. When your workbench is stable, you spend less time fixing it and more time working. When it's built with aluminum profiles and angle codes, you can reconfigure it later if you need a longer top or extra shelves—no need to buy a whole new bench. That's lean thinking in action.
Plus, the Turning Angle Code 4040 itself is a lean component. It's simple, durable, and designed for quick installation. No welding, no special tools—just bolts and a wrench. That means you can build or modify your workbench in hours, not days. And in a world where time is money, that's a win.
Final Thoughts: You've Got This!
Installing Turning Angle Code 4040 brackets might seem intimidating at first, but like most things, it's just a matter of taking your time and following the steps. Measure carefully, tighten bolts evenly, and test for stability—and you'll end up with a workbench that's sturdy, efficient, and built to last. Whether you're a hobbyist or a professional, this skill will serve you well every time you need to build, repair, or upgrade your workspace.
So go ahead—grab your angle codes, aluminum profiles, and tools. Start small if you need to—a simple frame first, then add the top. Before you know it, you'll be standing back, admiring your handiwork, and wondering why you ever put up with that wobbly old table. Happy building!