- Company Articles
- Products and Technology
- Installation And Maintenance
- Turning Angle Code 4040 Installation Tools: Essential Equipment for Lean Teams

Turning Angle Code 4040 Installation Tools: Essential Equipment for Lean Teams
Related Product
Turning Angle Code 4040
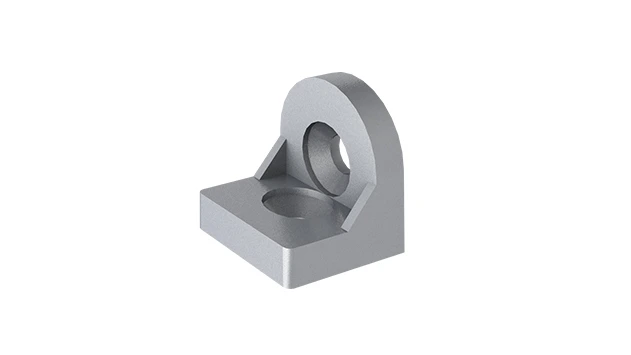
The turning angle aluminum profile connector provides a 90 degree hidden corner connection. 4040 it is means this size is used for 40 series aluminum profile.The corner code comes with set screws that allow for quick, easy connections.
In the fast-paced world of lean manufacturing, every component, no matter how small, plays a critical role in keeping operations running smoothly. Lean teams thrive on efficiency, adaptability, and minimizing waste—and that means paying attention to the tools and parts that hold their workspaces together. One such unsung hero? The Turning Angle Code 4040 . This unassuming connector is the backbone of sturdy, flexible structures built with aluminum profiles , from workbenches to material racks. But to leverage its full potential, lean teams need the right installation tools. In this guide, we'll dive into why the Turning Angle Code 4040 matters, the essential tools required to install it, and how mastering this process can elevate your team's productivity and adaptability.
Understanding the Turning Angle Code 4040: More Than Just a Connector
Before we jump into tools, let's clarify what the Turning Angle Code 4040 is and why it's indispensable for lean systems. At its core, this component is a specialized bracket designed to join 4040 aluminum profiles at precise angles—typically 90 degrees, though some variants accommodate other angles. Unlike rigid welding or permanent fasteners, the Turning Angle Code 4040 allows for quick assembly, disassembly, and reconfiguration, aligning perfectly with lean principles of flexibility and waste reduction.
Imagine a workbench in a electronics assembly line. If production needs shift—say, a new product requires a wider workspace or additional shelving—the Turning Angle Code 4040 lets teams adjust the structure without cutting new materials or hiring welders. This adaptability reduces downtime, cuts costs, and keeps workflows agile. But none of this is possible without proper installation. A poorly secured angle code can lead to wobbly workbenches, misaligned roller tracks, or even safety hazards—all of which derail lean goals.
Made from high-grade aluminum or steel, the Turning Angle Code 4040 is built to withstand the rigors of industrial environments. Its design includes pre-drilled holes that align with the T-slots of 4040 profiles, ensuring a snug fit. Some models feature reinforced edges or anti-slip coatings to enhance stability, making them ideal for heavy-duty applications like material racks or conveyor supports. For lean teams, this durability translates to longer-lasting structures, fewer replacements, and less waste over time.
Why Installation Tools Matter for Lean Teams
Lean manufacturing isn't just about eliminating physical waste—it's also about optimizing time and labor. Installing a Turning Angle Code 4040 might seem simple, but using the wrong tools can turn a 10-minute task into a 30-minute frustration. This wasted time adds up, especially when scaling to larger projects like building an entire production line of workbenches or roller tracks. The right tools ensure precision, speed, and consistency—three pillars of lean success.
Consider this scenario: A team is assembling a material rack using 4040 aluminum profiles and Turning Angle Code 4040 brackets. Without a torque wrench, they overtighten the bolts, stripping the threads in the T-slots. Now, they need to replace the damaged profile, order new parts, and delay the rack's completion. That's waste—of materials, time, and labor—all avoidable with proper tools. On the flip side, a team equipped with the right gear can assemble the same rack in half the time, with confidence that it will hold up under daily use.
Moreover, standardized tools ensure consistency across the team. When everyone uses the same equipment, there's less room for error. A new team member won't struggle to tighten a bolt correctly if they're trained on the exact torque wrench or hex key required. This uniformity reduces rework, improves safety, and makes onboarding faster—all key for lean systems that rely on cross-functional collaboration.

Essential Installation Tools for Turning Angle Code 4040
Now, let's get to the heart of the matter: the tools you need to install a Turning Angle Code 4040 correctly. While the exact toolkit may vary based on the project, these six items are non-negotiable for lean teams aiming for efficiency and precision.
1. Hex Keys (Allen Wrenches): The Foundation of T-Slot Assembly
Hex keys, or Allen wrenches, are the workhorses of aluminum profile assembly. Most Turning Angle Code 4040 brackets use hex-head bolts (often M5 or M6) to secure them to profiles. A high-quality set of hex keys—preferably with ball ends for better access in tight spaces—ensures you can reach every bolt without stripping the head. Look for keys made from chrome-vanadium steel, which resists bending and wear. Pro tip: Magnetic hex keys can save time by holding bolts in place while you align the angle code.
2. Torque Wrench: Precision Tightening for Stability
Over-tightening bolts is a common mistake that leads to stripped threads or warped profiles; under-tightening risks loose connections. A torque wrench solves this by letting you set a specific torque (measured in Newton-meters, or Nm) to match the bolt size and material. For most Turning Angle Code 4040 installations with aluminum profiles, a torque range of 2–5 Nm is typical (check the manufacturer's specs for exact values). A click-style torque wrench is ideal for beginners, as it "clicks" when the desired torque is reached, preventing over-tightening.
3. Deburring Tool: Smooth Edges for Safety and Fit
Aluminum profiles often have sharp edges or burrs from cutting. These burrs can scratch T-slots, damage bolts, or even injure team members. A deburring tool—with a rotating blade or file—quickly smooths these edges, ensuring the Turning Angle Code 4040 slides into place without resistance. This small step prevents snags during assembly and extends the life of both the angle code and the profile.
4. Digital Caliper: Measuring for Perfect Alignment
Lean systems demand precision, and misaligned angle codes can throw off an entire structure. A digital caliper helps measure distances between bolt holes, profile lengths, and angle offsets, ensuring the Turning Angle Code 4040 is positioned exactly where it needs to be. Look for a caliper with a resolution of 0.01mm for accuracy, and opt for one with a locking function to hold measurements while you mark the profile.
5. Rubber Mallet: Gentle Adjustments Without Damage
Even with careful alignment, sometimes the Turning Angle Code 4040 needs a little nudge to seat properly on the profile. A rubber mallet delivers controlled force without denting or scratching the aluminum. Avoid metal hammers, which can mar the finish or weaken the material. A 16-ounce mallet is heavy enough for most tasks but light enough to handle with precision.
6. Magnetic Level: Ensuring Squareness and Stability
A wobbly workbench or uneven roller track can slow down operations and create ergonomic issues. A magnetic level—preferably a 24-inch model with both horizontal and vertical vials—checks if the assembled structure is plumb (vertical) and level (horizontal). The magnet holds the level to the aluminum profile, freeing up your hands to adjust the Turning Angle Code 4040 bolts until the bubble centers. This step is critical for structures like material racks, where unevenness can cause products to slide or tip.
| Tool | Purpose | Key Features to Look For | Common Mistakes to Avoid |
|---|---|---|---|
| Hex Keys | Tightening hex-head bolts on angle codes | Ball ends, chrome-vanadium steel, magnetic tips | Using worn keys that strip bolt heads |
| Torque Wrench | Applying precise torque to bolts | Adjustable (2–5 Nm range), click-style mechanism | Ignoring manufacturer torque specs |
| Deburring Tool | Smoothing sharp edges on aluminum profiles | Rotating blade, ergonomic grip | Skipping deburring, leading to scratched T-slots |
| Digital Caliper | Measuring distances and aligning holes | 0.01mm resolution, locking function | Eyeballing measurements instead of using the caliper |
| Rubber Mallet | Gently seating angle codes on profiles | 16-ounce weight, non-marring rubber head | Using metal hammers that damage profiles |
| Magnetic Level | Checking plumb and level alignment | 24-inch length, horizontal/vertical vials, magnet | Rushing past leveling, leading to unstable structures |

Step-by-Step Installation: Mastering the Turning Angle Code 4040
With the right tools in hand, let's walk through installing the Turning Angle Code 4040. This process assumes you're working with two 4040 aluminum profiles and a standard 90-degree angle code. Adjustments may be needed for other angles or profile sizes.
Step 1: Prepare the Profiles
Start by cutting your 4040 aluminum profiles to the desired length (if not pre-cut). Use a miter saw with a fine-tooth blade for clean edges. Once cut, use the deburring tool to smooth all edges, paying special attention to the T-slot openings. Wipe the profiles with a clean cloth to remove debris—dust or metal shavings in the T-slots can prevent bolts from seating properly.
Step 2: Mark the Bolt Positions
Lay the profiles on a flat surface, aligning them at the angle you need (e.g., 90 degrees for a corner). Place the Turning Angle Code 4040 over the joint, ensuring its holes line up with the T-slots of both profiles. Use the digital caliper to measure from the end of each profile to the center of the angle code's bolt holes—this ensures symmetry if you're building a multi-section structure. Mark the hole positions with a pencil or marker.
Step 3: insert T-Slot Nuts and Bolts
Slide T-slot nuts into the marked positions on both profiles. These nuts will hold the bolts that secure the angle code. For 4040 profiles, M5 or M6 T-slot nuts are standard. Once the nuts are in place, position the Turning Angle Code 4040 over them, aligning its holes with the nuts. insert the hex-head bolts through the angle code and into the nuts—hand-tighten them just enough to hold the code in place.
Step 4: Align and Level the Structure
Place the magnetic level along the top edge of one profile to check for level; adjust the angle code as needed. Then check the vertical profile for plumb. If the structure is wobbly, gently tap the angle code with the rubber mallet to shift it into alignment. This step is crucial—taking time to level now prevents headaches later when adding shelves or equipment.
Step 5: Torque the Bolts
Attach the hex key bit to the torque wrench and set the desired torque (e.g., 3 Nm for M5 bolts). Tighten each bolt in a crisscross pattern (like tightening lug nuts on a car) to ensure even pressure. Stop when you hear the torque wrench "click"—this means you've reached the correct tightness. Avoid over-tightening, as this can warp the angle code or strip the T-slot nuts.
Step 6: Test the Stability
Give the joint a gentle shake to test for movement. If it wobbles, check if any bolts loosened during torquing and retighten them. For added security, some teams apply a small drop of thread-locking fluid (like Loctite) to the bolt threads—this prevents loosening due to vibration, common in manufacturing environments. Wipe away excess fluid with a rag to avoid staining the profiles.
Troubleshooting Common Installation Issues
Even with the best tools, hiccups can happen. Here's how to solve three common problems lean teams face when installing Turning Angle Code 4040 brackets:
Issue 1: Bolt Won't Tighten—Stuck in T-Slot
If the bolt spins without tightening, the T-slot nut may be misaligned or stuck. Try loosening the bolt, then using a small screwdriver or pick to reposition the nut through the T-slot opening. If debris is the culprit, blow compressed air into the slot to clear it. For stubborn nuts, apply a tiny amount of silicone lubricant to the T-slot—this helps the nut slide into place without binding.
Issue 2: Angle Code Doesn't Sit Flat Against the Profile
A warped angle code or bent profile can cause gaps. First, check if the angle code is straight by laying it on a flat surface—if it rocks, it may be damaged and need replacement. If the profile is bent, gently clamp it to a workbench and apply pressure to straighten it (aluminum is malleable but avoid over-bending). For minor gaps, add a thin shim (like a metal washer) between the angle code and profile to ensure full contact.
Issue 3: Profiles Shift After Tightening
If the joint moves after torquing, the angle code may be undersized for the load. Check the manufacturer's weight rating—most Turning Angle Code 4040 brackets support 50–100 kg per joint, but heavy loads (like material racks with full bins) may need reinforced codes. Alternatively, add a second angle code on the opposite side of the joint for extra stability. For dynamic loads (e.g., roller tracks with moving parts), consider using lock washers or thread-locking fluid to prevent bolts from backing out.
Beyond Installation: Integrating Turning Angle Code 4040 into Lean Systems
Installing the Turning Angle Code 4040 is just the first step. Lean teams thrive when they see how individual components fit into the bigger picture. Here's how this connector enhances key elements of lean systems:
Building Adaptable Workbenches
Workbenches are the heart of any production line, and the Turning Angle Code 4040 makes them infinitely customizable. By combining 4040 profiles with angle codes, teams can add shelves, tool hooks, or even integrated roller tracks for material flow. When a new project requires a taller bench or extra storage, simply loosen the angle code bolts, adjust the profiles, and retighten—no need to build a new bench from scratch. This adaptability reduces waste from unused furniture and keeps workspaces tailored to current needs.
Supporting Efficient Material Racks
Material racks built with aluminum profiles and Turning Angle Code 4040 brackets are lightweight yet strong enough to hold heavy bins or parts. The angle code's precision ensures shelves are level, preventing items from sliding off. For example, a material rack B (3 row and 3 floor) —a common setup in lean facilities—relies on angle codes to keep each shelf aligned, making it easy for operators to access parts without searching. When inventory needs change, teams can reconfigure the rack in minutes by moving the angle codes to adjust shelf heights.
Streamlining Roller Track Installations
Roller tracks are essential for lean material flow, allowing parts to glide from one workstation to the next. The Turning Angle Code 4040 secures roller track supports to aluminum profiles, ensuring the track stays level and aligned. For example, when installing a 40 steel roller track , angle codes attach the track's side rails to vertical supports, preventing sagging under load. This stability reduces jams and ensures parts move smoothly, cutting down on operator wait times.
The Bottom Line: Tools as a Lean Investment
For lean teams, the Turning Angle Code 4040 and its installation tools aren't just expenses—they're investments in efficiency, safety, and adaptability. By equipping your team with hex keys, torque wrenches, and the rest of the toolkit, you're not just building structures—you're building a culture of precision and problem-solving. A well-installed angle code reduces downtime, minimizes waste, and empowers your team to adapt to changing demands quickly.
So, the next time you're setting up a workbench or material rack, take a moment to appreciate the Turning Angle Code 4040 and the tools that make it work. These small components and tools are the unsung heroes that keep lean systems running lean—proving that in manufacturing, success often lies in the details.