- Company Articles
- Products and Technology
- Installation And Maintenance
- Watch: Step-by-Step Installation of 3030 Aluminum Profile End Caps

Watch: Step-by-Step Installation of 3030 Aluminum Profile End Caps
Related Product
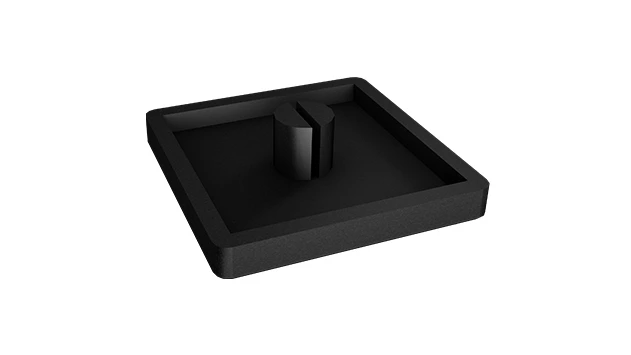
3030 Aluminum Profile End Cap
The aluminum profile end cap adds a finishing touch to your project and closes off profile ends to limit dust and debris buildup, also it can avaid some scratch for material and labor during the assemble work.
Hey there, DIY enthusiasts, workshop pros, and anyone who's ever gotten their hands dirty assembling aluminum profiles! If you've spent time building with aluminum extrusion profiles—whether it's a custom workbench, a material rack, or even a hobbyist 3D printer frame—you know the thrill of seeing those modular, sleek pieces come together. But today, let's talk about a tiny detail that's easy to overlook but makes a huge difference: 3030 aluminum profile end caps . These little caps might seem insignificant, but trust me—they're the unsung heroes that turn a "meh" project into a polished, professional one. I still cringe thinking about the time I skipped end caps on a 3030 profile shelf; within a week, the sharp edges had snagged my gloves, dust had clogged the hollow ends, and let's not mention how unfinished it looked. Since then, I never skip this step. In this guide, I'll walk you through installing these end caps like a pro, share some hard-earned tips, and even help you troubleshoot common headaches. Let's get started!
Why Bother with End Caps, Anyway?
First, let's get real: Why spend time on something as small as an end cap? Well, think of it like putting a lid on a jar—you wouldn't leave it open, right? Aluminum profiles, especially the 3030 size (a workhorse in workshops everywhere), have hollow ends. Without end caps, those ends are open invitations for trouble: sharp edges that can cut hands or snag fabric, dust and debris clogging the T-slots (making it harder to add accessories later), and even moisture seeping in, which can lead to corrosion over time. Plus, let's be honest—an open profile end looks messy. End caps give your project that "finished" look, like adding a cherry on top of a sundae. They're cheap, easy to install, and save you from a lot of headaches down the line. Trust me, your future self (and anyone who uses your project) will thank you.
What You'll Need: Tools & Materials
Before we dive into the steps, let's gather our supplies. You won't need anything fancy—most of this stuff is probably already in your toolbox. Here's a quick breakdown, with a handy table to help you compare options:
| Tool/Accessory | Purpose | Pro Tip |
|---|---|---|
| 3030 Aluminum Profile End Cap | Covers open profile ends; prevents snags, dust buildup, and corrosion. | Stick to aluminum profile accessories made for 3030 profiles—generic caps might not fit snugly. |
| Soft Rubber Mallet | Gently taps end caps into place without damaging them. | Avoid metal hammers! They'll crack plastic end caps faster than you can say "oops." |
| Isopropyl Alcohol & Lint-Free Cloth | Cleans profile ends of dust, oil, or debris that could block the end cap. | Wipe the inside of the profile too—grease from cutting or handling can ruin the fit. |
| Aluminum Profile Rubber Strip | Adds friction for a tighter fit; seals out extra dust and reduces rattling. | Cut strips to match the profile's inner length—yellow or grey options work, but yellow is easier to spot during installation! |
| Deburring Tool or Sandpaper (220-grit) | Smooths sharp edges or burrs left from cutting the profile. | Run the tool lightly around the end—you don't need to sand off material, just knock down the sharp bits. |
Pro move: If you're working with multiple profiles, lay out all your end caps first. Sometimes, even "standard" 3030 caps can have slight size variations (looking at you, off-brand wholesale packs), so matching caps to profiles before installation saves time later.

Step-by-Step Installation: Let's Get Those Caps On!
Okay, tools in hand? Great. Let's walk through installing a 3030 aluminum profile end cap step by step. I'll break it down so even if you're new to this, you'll feel confident.
Step 1: Prep the Profile End (Yes, This Matters!)
First things first: Your aluminum profile's end needs to be clean and smooth. If you just cut the profile (with a saw or miter cutter), there's probably burrs—those tiny, sharp metal bits sticking out. Run your finger lightly around the edge (carefully!)—if it catches, you've got burrs. Grab your deburring tool or sandpaper and gently smooth them down. A few swipes with sandpaper (folded to a point for tight spots) should do it. Next, wipe the end with isopropyl alcohol and a cloth. Even a little dust or oil can prevent the end cap from seating properly, so don't skip this. Let it dry for 30 seconds—alcohol evaporates fast, so you won't wait long.
Step 2: (Optional) Add an Aluminum Profile Rubber Strip
This is a pro tip I learned the hard way: Rubber strips make end caps fit tighter and last longer. If your end cap feels a little loose (common with older or slightly worn profiles), cut a piece of aluminum profile rubber strip to match the length of the profile's inner channel. Slide it into the T-slot or along the inner edge—this adds just enough thickness to help the cap grip. Yellow or grey strips work, but I prefer yellow because it's easy to see if it shifts during installation. No rubber strip? No problem—most caps will fit fine without, but this is a game-changer for snugness.
Step 3: Align the End Cap
Now, grab your 3030 end cap. Most caps have small tabs or notches that align with the profile's T-slots—this ensures it sits straight. Hold the cap so the tabs (if present) face the T-slots, and the flat side of the cap lines up with the profile's end. Take a second to make sure it's centered—if it's lopsided, tapping it in will only make it worse. Pro trick: If you're struggling to align, mark the center of the profile end with a pencil (its off easily!) and line up the cap's center with the mark.
Step 4: Tap Gently into Place
Here's where the soft mallet comes in. Hold the mallet loosely (like you're holding a egg—you don't want to crush it!) and tap the end cap evenly around the edges. Start with light taps—think "gentle nudge" rather than "whack." Work your way around the cap: top, bottom, left, right. This ensures it seats evenly. If you tap too hard on one side, the cap might warp or crack. You'll feel it when it's in place—the cap will stop moving, and it'll sit flush with the profile end. If it's still sticking out a little, give it a few more light taps. Resist the urge to use a metal hammer—plastic caps (the most common type) crack under hard impacts. Trust me, I've wasted more than one cap this way!
Step 5: Check the Fit (And Fix If Needed)
Once the cap is on, give it a gentle tug—side to side, up and down. It should feel secure—no wiggling or sliding. If it pops off easily, it's too loose. Try adding a rubber strip (we talked about that earlier) or wiping the profile end again (maybe there was leftover oil). If it's so tight you can't budge it, great! But if you hear a "crack" while tapping, stop—you might have damaged the cap. Remove it (gently pry with a flathead screwdriver, being careful not to scratch the profile) and try a new one. Better to waste a 50-cent cap than ruin a $20 profile, right?

Pro Tips & Troubleshooting: Because Mistakes Happen
Even with the steps above, you might run into snags. Here are some quick fixes for common issues I've faced (and fixed!):
Problem: End Cap Is Too Tight to Tap In
Solution: Plastic end caps can stiffen in cold weather or if they're brand-new. Warm the cap with a hair dryer on low heat for 10-15 seconds (hold it 6 inches away—you don't want to melt it!). The plastic will soften slightly, making it easier to tap into place. Let it cool for a minute, and it'll harden back up, keeping a snug fit.
Problem: Profile End Is Bent (Oops, Dropped It)
Solution: If the profile end is slightly bent (common if you dropped it), use needle-nose pliers to gently straighten it. Grip the bent edge and apply light pressure—don't yank! If it's really warped, you might need to cut off the bent part with a hacksaw (and then deburr the new end, of course). Better a shorter profile than a wonky end cap.
Problem: Debris Inside the Profile (Gross, But Common)
Solution: Even after cleaning, dust or metal shavings can hide inside the profile. Use compressed air (from a can or air compressor) to blow out the inside—hold the profile upright so debris falls out. Follow up with another alcohol wipe, and your cap will slide in like butter.
Why Quality End Caps Are Worth It
You might be thinking, "Can't I just use any old cap from the hardware store?" Sure, but you'll regret it. Cheap, generic caps are often too thin, made from flimsy plastic, or don't fit 3030 profiles exactly. They'll crack, fall off, or let dust in—undoing all your hard work. Instead, stick to end caps made for aluminum extrusion profiles —reputable suppliers (like those who specialize in aluminum profile accessories) design them to match the exact dimensions of 3030 profiles. They're usually made from durable ABS plastic or even rubber (great for ESD-safe workbenches), and they'll last years, not months. Plus, buying in bulk (wholesale) from a trusted supplier can save you money if you're working on a big project—just make sure to check the size (3030!) before ordering. Trust me, investing a little more in quality caps saves you time and frustration later.
Beyond End Caps: Accessories to Level Up Your Profile Game
End caps are just the start! Once your profiles are capped, consider these accessories to make your setup even better:
Aluminum Profile Rubber Strip
We mentioned this earlier, but it's worth repeating: Rubber strips aren't just for end caps. They're perfect for sealing gaps between profiles (great for shelves that hold small parts), reducing noise (no more rattling!), and even adding a pop of color (yellow strips on grey profiles look sharp). They're cheap, easy to cut, and a small upgrade that makes a big difference.
Corner Codes & Connectors
Want to connect profiles at angles? 2020 switch to aluminum corner codes (or 3030, depending on your profile size) are a must. These little metal brackets reinforce joints, making your frame sturdier. They slide into T-slots and secure with bolts, so you can take apart and reconfigure your project later—no welding required!
Workbench Tops & Material Racks
Once your profiles are capped and connected, add a workbench top (like a plywood or aluminum honeycomb panel) for a functional workspace. Or build a material rack using 3030 profiles and flow rack components—end caps keep the rack looking clean, while rubber strips prevent materials from slipping.
Final Thoughts: Small Details, Big Impact
Installing 3030 aluminum profile end caps might seem like a tiny step, but it's the little things that turn a "homemade" project into something you're proud to show off. From preventing snags to keeping dust out, these caps work hard so you don't have to. And with the steps above—prepping the profile, aligning the cap, tapping gently—you'll have them on in minutes. Remember: Clean the profile, use a soft mallet, and don't skip the rubber strip if you need a tighter fit. And if you mess up? No worries—we've all been there. Just grab a new cap and try again.
Now, go forth and cap those profiles! And if you've got a pro tip I missed, or a funny end cap fail story, drop it in the comments—I'd love to hear it. Happy building!