- Company Articles
- Products and Technology
- Product knowledge
- What Is an Aluminum Profile 3 Way Connector? A Beginner's Guide

What Is an Aluminum Profile 3 Way Connector? A Beginner's Guide
Related Product
Aluminum Profile 3 Way Connector
The 3 way - squared corner connector is an external fastening method that is typically used to create a corner connection between three profiles. It is a heavy-duty connection that is simple to use and provides a polished look.
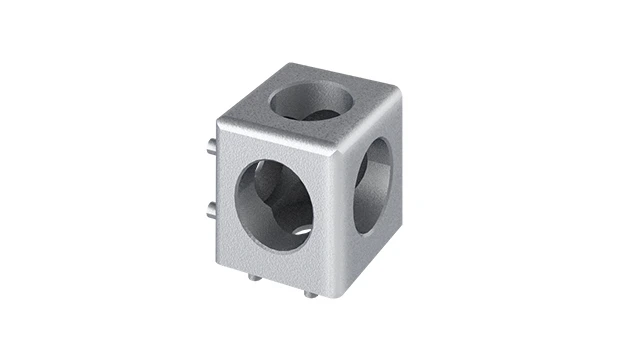
If you've ever walked into a workshop, factory floor, or even a DIY garage, you've probably seen those sleek, modular structures—workbenches that adjust in minutes, material racks that grow with inventory, or production lines that reconfigure as needs change. Behind that flexibility often lies a simple yet powerful component: the aluminum profile 3 way connector. In this guide, we'll break down what it is, why it matters, and how it can transform the way you build and adapt structures in your space.
Aluminum Profiles: The Backbone of Modular Design
Before we dive into the specifics of 3 way connectors, let's start with the foundation: aluminum profiles. These are extruded aluminum bars with a characteristic "T-slot" design—long, narrow grooves running along their length that act as built-in attachment points. Think of them as the "Lego bricks" of industrial and workshop design, but sturdier, more versatile, and built to handle real-world weight and wear.
Aluminum profiles come in a range of sizes, from small 20x20mm (2020) profiles for light-duty projects to robust 40x80mm (4080) or larger for heavy machinery. They're lightweight yet strong, resistant to corrosion, and infinitely customizable. But here's the thing: on their own, they're just pieces of metal. To turn them into functional structures—like workbenches, shelving, or production cells—you need connectors. And that's where components like the 3 way connector step in.
Key Point: Aluminum profiles are the "bones" of modular systems, but connectors are the "joints" that let you shape those bones into almost any structure you can imagine (without using that forbidden word!).
What Is an Aluminum Profile 3 Way Connector?
At its core, an aluminum profile 3 way connector is a small, often unassuming device designed to join three aluminum profiles at a single point. Unlike a basic 2 way connector (which links two profiles end-to-end or at a right angle), a 3 way connector adds a third dimension, allowing you to branch off in a new direction—think of it as the "Y-junction" of the modular world.
These connectors are typically made from aluminum alloy (matching the profiles for consistency) or sometimes stainless steel for extra durability. They come in various designs, but most feature threaded holes or slots that align with the T-slots on the profiles, allowing you to secure them with bolts, screws, or T-nuts. Some are fixed (holding profiles at a strict 90° or 45° angle), while others are swivel or adjustable, letting you fine-tune the angle as needed.
Why does this matter? Imagine building a workbench: you need vertical legs, horizontal rails for the top, and maybe a middle shelf for tools. A 3 way connector at each corner lets you attach the vertical leg to both the front and side rails in one go, creating a stable, rigid joint without welding, drilling, or glue. That's the magic of modular design—and 3 way connectors are a big part of that magic.

Types of Aluminum Profile 3 Way Connectors: A Quick Overview
Not all 3 way connectors are created equal. Depending on your project's needs—load capacity, angle flexibility, or profile size—you'll want to choose the right type. Here's a breakdown of the most common varieties:
| Connector Type | Design Feature | Load Capacity (Approx.) | Compatible Profile Sizes | Best For |
|---|---|---|---|---|
| Standard Fixed 3 Way | Joins three profiles at 90° angles (e.g., vertical leg + two horizontal rails) | 50-150 kg | 2020, 3030, 4040 | Workbenches, basic shelving, static structures |
| Adjustable 3 Way | Swivel joints allow angles from 0° to 180°; some lock in place | 30-100 kg | 2020, 3030 | Curved structures, angled material racks, custom workstations |
| Heavy-Duty 3 Way | Thicker walls, reinforced joints, larger bolts | 200-500 kg | 4040, 4080, 6060 | Industrial material racks, machinery frames, load-bearing shelving |
| Internal 3 Way Connector | Fits inside the profile's T-slot (no protruding parts) | 40-120 kg | 3030, 4040 (with open T-slots) | Clean, streamlined designs (e.g., lab workbenches, display units) |
Each type has its place. For a home workshop workbench, a standard fixed 3 way connector might be all you need. But if you're building a material rack for heavy automotive parts (like a 3-row, 3-floor material rack B), you'd opt for a heavy-duty model to ensure safety and stability.

Why 3 Way Connectors Matter in Lean Systems
If you're familiar with lean manufacturing or lean system principles—focused on minimizing waste, maximizing efficiency, and adapting quickly to change—you'll recognize why 3 way connectors are so valuable. Lean systems thrive on flexibility: the ability to reconfigure workspaces, adjust production lines, or repurpose tools as demand shifts. Modular aluminum structures, held together by 3 way connectors, make that flexibility possible.
Consider a small electronics assembly line. One week, they're producing smartphone chargers; the next, wireless earbuds. With a lean system built on aluminum profiles and 3 way connectors, they can quickly reposition workbenches, add extra material racks, or adjust conveyor heights—all without calling in a contractor or shutting down production for days. The connectors let them "break down" and "rebuild" on the fly, turning what would be a costly, time-consuming overhaul into a morning's work.
Real-World Example: A Local Manufacturer's Lean Transformation
A mid-sized furniture manufacturer near me recently switched from fixed wooden workbenches to aluminum profile systems. Their old setup required sawing, nailing, and gluing whenever they needed a new shelf or a wider workspace—wasting hours of labor and creating piles of scrap wood. Now, using 3 way connectors, they can add a shelf to a workbench in 10 minutes: just slide the connector into the T-slots, bolt on the new profile, and they're back to work. They've cut setup time by 70% and reduced material waste to almost zero. That's lean in action, powered by simple connectors.
Practical Applications: Where 3 Way Connectors Shine
3 way connectors aren't just for factories. Their versatility makes them useful in almost any setting where you need to build, adapt, or rearrange structures. Let's look at some common applications:
1. Workbenches: Your Customizable Workspace
Whether you're a hobbyist, a mechanic, or a lab technician, a workbench needs to fit your tools, your projects, and your body. With aluminum profiles and 3 way connectors, you can design a bench that's exactly the right height, with shelves at the perfect distance, and even add accessories like tool hooks or monitor mounts. For example, the "Workbench E (single deck-without caster)" is a popular base model, but with 3 way connectors, you can add a second tier for parts storage or a side extension for extra workspace—no carpentry skills required.
2. Material Racks: Organize Without Limits
Material racks (like the aforementioned material rack B) are a staple in warehouses and workshops. A 3-row, 3-floor rack might start empty, but as inventory grows, you can use 3 way connectors to add more rows or extend the height. Need to separate small parts from large ones? Add a vertical divider using a 3 way connector to split a shelf into sections. It's organization that grows with you.
3. Turnover Trolleys: Mobile Storage That Moves With You
Turnover trolleys—used to transport materials from one station to another—often need to carry awkwardly shaped items. With 3 way connectors, you can build custom dividers, racks, or holders on the trolley, ensuring tools or parts stay secure during transport. A basic trolley frame can become a specialized carrier for cables, fasteners, or even fragile components, all by adding a few well-placed connectors and profiles.
4. Flow Racks: Streamlining Production
In lean systems, flow racks are all about moving materials smoothly from storage to assembly. These racks use gravity to feed parts to workers, reducing the need for bending or reaching. 3 way connectors help build the angled shelves and support structures that make flow racks work. For example, a 3 way connector at the base of a flow rack can anchor the vertical support, the horizontal frame, and the angled roller track (like plastic roller track guide rails in yellow or grey) in one secure joint, ensuring the rack stays stable even as parts slide down.
Choosing the Right 3 Way Connector: Key Factors to Consider
Not sure which 3 way connector to buy? Here are the top factors to keep in mind:
Profile Size Compatibility
Aluminum profiles come in standard sizes (2020, 3030, 4040, etc.), and connectors are designed to fit specific sizes. A 2020 connector won't work with a 4040 profile—it'll be too small and won't grip securely. Always check the connector's specs to ensure it matches your profile size.
Load Capacity
How much weight will the joint need to support? A light-duty connector might handle 50kg (great for a hobby workbench), but a heavy-duty model could manage 200kg or more (essential for industrial material racks). Don't guess—check the manufacturer's load ratings, and err on the side of caution if you're unsure.
Environment
Will the structure be indoors or outdoors? In a dry workshop, standard aluminum connectors are fine. In a damp garage or a food-processing facility, opt for stainless steel or anodized aluminum to resist rust. For electronics assembly, look for ESD (electrostatic discharge) compatible connectors to prevent static damage to sensitive components.
Adjustability
Do you need fixed angles (90°, 45°) or the ability to swivel? Fixed connectors are sturdier for static structures, while adjustable ones are better for projects where angles might change—like a display rack that needs to tilt for visibility.
Installing a 3 Way Connector: A Step-by-Step Guide
Installing a 3 way connector is surprisingly simple—no special tools required (just a hex key or Allen wrench in most cases). Here's how to do it:
Step 1: Gather Your Tools
You'll need: the 3 way connector, aluminum profiles, T-nuts (small metal nuts that slide into T-slots), bolts (matching the connector's thread size), a hex key, and a level (to ensure everything's straight).
Step 2: Position the Connector
Slide the T-nuts into the T-slots of your aluminum profiles, positioning them where the connector will attach. Most connectors have marks or guides to show where the bolts should go—align these with the T-nuts.
Step 3: Attach the First Two Profiles
Place the connector against the first two profiles, lining up the holes in the connector with the T-nuts in the profiles. insert the bolts through the connector and into the T-nuts, then tighten gently with the hex key—don't over-tighten yet; you'll want to adjust alignment first.
Step 4: Add the Third Profile
Position the third profile in the remaining slot of the connector, again aligning with T-nuts. insert and hand-tighten the bolts. Now, use your level to check that all profiles are straight and at the correct angle (e.g., 90° for a workbench corner).
Step 5: Final Tightening
Once everything is aligned, fully tighten the bolts with the hex key. Be careful not to strip the threads—stop when you feel resistance. Give the joint a gentle shake to test stability; if it wobbles, check the bolts or T-nut positions and adjust as needed.
Pro Tip: If you're building a large structure (like a tall material rack), assemble it on its side first. This makes it easier to align the connectors and profiles without fighting gravity!
Maintenance and Care: Keeping Your Connectors (and Structures) Strong
Aluminum profile systems are low-maintenance, but a little care goes a long way in keeping your 3 way connectors (and the structures they support) in top shape:
Regular Inspections
Every few months, give your structures a once-over. Check for loose bolts or connectors—vibration from daily use can sometimes loosen them. Tighten any that feel wobbly, and replace any bolts that are bent or stripped.
Cleaning
Dust and debris can build up in T-slots and on connectors, making it harder to adjust or remove them later. Wipe down profiles and connectors with a dry cloth or a slightly damp rag (avoid harsh chemicals, which can damage the aluminum finish).
Lubrication (If Needed)
Adjustable or swivel 3 way connectors may have moving parts that benefit from light lubrication. Use a dry lubricant (like graphite spray) to keep them moving smoothly—avoid oil-based lubricants, which attract dust.
replace When Worn
Connectors are tough, but they don't last forever. If you notice cracks, heavy corrosion, or stripped threads, replace the connector immediately. A worn connector compromises the entire structure's stability—better safe than sorry!
Troubleshooting Common 3 Way Connector Issues
Even with the best planning, you might run into snags. Here's how to fix the most common problems:
Problem: The Connector Won't Stay Tight
Possible causes: T-nuts are misaligned, bolts are too short, or the connector is worn. Try repositioning the T-nuts to align better with the connector holes, or switch to longer bolts. If the connector itself is worn (e.g., stripped threads), replace it.
Problem: Profiles Are Misaligned
Possible cause: The connector was tightened before aligning the profiles. Loosen the bolts, adjust the profiles with a level, then retighten. For stubborn misalignment, check if the T-slots are clean—debris can prevent profiles from sliding into place.
Problem: The Connector Doesn't Fit the Profile
Double-check the profile size! A 3030 connector won't fit a 4040 profile, even if it looks close. If you're unsure, measure the profile's width and height (in mm) and compare to the connector's specs.
Conclusion: Small Connector, Big Impact
Aluminum profile 3 way connectors might not be the flashiest tools in your workshop, but they're among the most powerful. They turn rigid, one-use structures into flexible, adaptable systems that grow with your needs—whether you're a hobbyist building a workbench, a small business streamlining production, or a large manufacturer embracing lean principles.
The next time you look at a modular workbench or a reconfigurable production line, take a closer look at the joints. Chances are, there's a 3 way connector holding it all together—quietly, reliably, and ready to help you build something better. So go ahead: grab some profiles, a handful of connectors, and start creating. The only limit is your imagination (oops, almost slipped up there).