- Company Articles
- FAQ
- FAQ
- Common Issues with Lean Pipe Clamp B Chrome & Troubleshooting Tips

Common Issues with Lean Pipe Clamp B Chrome & Troubleshooting Tips
Related Product
Lean Pipe Clamp B Chrome
Lean pipe clamp is used for turnover trolley, workbench, flowrack adjust the frame or fix some accessory.
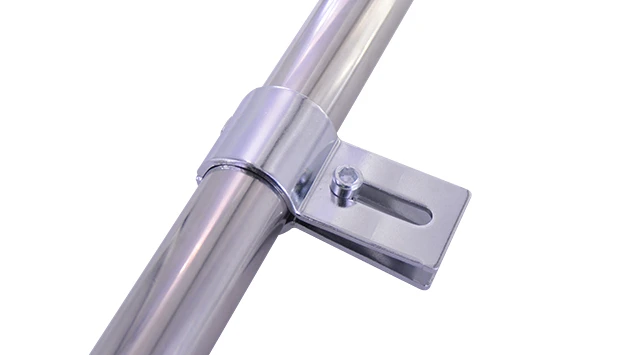
In the world of lean manufacturing, where every second and every component counts, even the smallest parts can make a big difference. Take the Lean Pipe Clamp B Chrome, for example. It might seem like just another piece of hardware in your production assemble line, but this unassuming clamp plays a critical role in holding together everything from workbenches and flow racks to turnover trolleys. When it works well, you barely notice it. But when it fails? Suddenly, that smooth-running lean system starts to wobble, slow down, or even grind to a halt. Let's dive into the common headaches operators and maintenance teams face with these clamps, why they happen, and how to fix them—so you can keep your production floor running like a well-oiled machine.
Why Lean Pipe Clamp B Chrome Matters in Your Lean System
Before we jump into the problems, let's take a second to appreciate why these clamps are so important. Lean Pipe Clamp B Chrome is designed to secure lean pipes (those metal tubes that form the backbone of lean workstations, racks, and conveyors) at specific angles and positions. Think of them as the "glue" that keeps your lean system rigid and reliable. Whether you're building an ESD workstation to protect sensitive electronics or a flow rack to move materials efficiently, these clamps ensure the structure stays stable, even when operators are loading, unloading, or bumping into it during busy shifts.
What makes the "B Chrome" variant stand out? The chrome plating isn't just for looks—it adds a layer of corrosion resistance, which is crucial in factories where moisture, oils, or cleaning chemicals are present. And the "B" designation often refers to a specific design (like a double-jaw or reinforced structure) that offers extra strength compared to basic lean pipe clamps. But even with these features, no clamp is immune to wear, misuse, or manufacturing quirks. Let's break down the issues you're likely to encounter.
5 Common Issues with Lean Pipe Clamp B Chrome (And How to Fix Them)
1. Unexpected Looseness During Operation
Walk through any production assemble area, and you'll probably spot at least one workstation or rack that feels a little wobbly. More often than not, a loose Lean Pipe Clamp B Chrome is the culprit. Operators might notice parts sliding off the workbench, tools rattling, or even the entire structure shifting when they lean on it. Over time, this looseness can throw off workflows, increase the risk of accidents, and even damage sensitive components on an ESD workstation.
What's causing it? Looseness rarely happens without a reason. The most common culprit is insufficient torque during installation —if the bolts aren't tightened to the right level, vibration from machinery or daily use will gradually wiggle them loose. Another cause is thread wear : if the clamp has been tightened and loosened repeatedly (say, during reconfigurations of a flow rack), the threads on the bolts or the clamp's nut can get stripped, making it impossible to get a secure hold. Finally, vibration fatigue is a silent enemy—constant shaking from nearby conveyors or heavy equipment can weaken the bolt's grip over weeks or months.
How to fix it: Start with a visual inspection. Check if the clamp is visibly damaged (cracks, bent jaws) or if the bolts are stripped. If everything looks intact, grab a torque wrench—this tool is non-negotiable here. Most lean pipe suppliers recommend a torque of 15-20 Nm for these clamps (check your supplier's specs to be sure). Tighten the bolts slowly, stopping when the wrench clicks. If the bolts spin without resistance, the threads are likely stripped—time to replace the clamp. Pro tip: When ordering replacements, stick to your original lean pipe supplier if possible. Mixing brands can lead to compatibility issues, which we'll talk about later.
How to prevent it: Prevention is easier than fixing. Train your team to use torque wrenches during installation—no more "eyeballing it" with a regular wrench. For high-vibration areas (like near a roller track or conveyor), apply a small drop of thread locker (like medium-strength Loctite) to the bolt threads before tightening. And make weekly checks part of your operators' pre-shift routine—have them give each clamp a gentle tug to spot looseness early.
2. Corrosion and Chrome Peeling
Chrome plating is supposed to protect the clamp from rust, but even the best plating can fail. You'll know it's happening when you see rust spots, flaking chrome, or a dull, patchy finish on the clamp. In humid environments (think food processing plants or coastal factories), you might even notice greenish corrosion around the bolts. On an ESD workstation, this isn't just unsightly—corrosion can interfere with static dissipation, putting sensitive electronics at risk.
What's causing it? The biggest offender is low-quality chrome plating . Some lean pipe suppliers cut corners by using thin chrome layers (less than 5 microns) or skipping the nickel undercoat that helps the chrome adhere. When this happens, the plating chips or wears off, exposing the steel underneath to moisture. Another cause is exposure to harsh chemicals : if operators are using abrasive cleaners or solvents near the clamp, they can strip the chrome over time. Even a small scratch from a wrench can create a weak spot where rust takes hold.
How to fix it: For minor surface rust, grab some fine-grit sandpaper (400-600 grit) and gently sand the area until the rust is gone. Wipe it clean, then apply a rust-inhibiting primer and a touch-up paint designed for metal (look for one with chrome-like finish if you care about aesthetics). But if the chrome is peeling in large flakes or the corrosion has eaten into the steel, don't mess around—replace the clamp. A corroded clamp loses strength, and a broken clamp could lead to a collapsed rack or a workstation injury.
How to prevent it: Start by choosing the right clamp from the get-go. Ask your lean pipe supplier for details on the plating process—look for clamps with at least 8-10 microns of chrome and a nickel undercoat. In humid areas, install dehumidifiers or use silica gel packs near metal components. When cleaning, skip the harsh chemicals—opt for a damp cloth and mild soap, then dry the clamp thoroughly. And if you notice a scratch, touch it up immediately with paint to seal the steel.
3. Misalignment and Difficulty Adjusting
Ever tried to attach a lean pipe to a clamp, only to find the pipe sits at a weird angle no matter how you twist it? Or struggled to get the bolts lined up, forcing them into place and feeling like you're going to break something? That's misalignment, and it's a common frustration with Lean Pipe Clamp B Chrome. When clamps won't adjust properly, assembly takes longer, and the final structure is never as stable as it should be.
What's causing it? Misalignment often starts at the factory: manufacturing defects like bent jaws or off-center bolt holes can make the clamp impossible to align with the pipe. Another culprit is over-tightening —cranking the bolts too hard can warp the clamp's metal, bending the jaws out of shape. Finally, mismatched pipe sizes are a frequent issue. If you're using a 28mm pipe with a clamp designed for 25mm, the fit will always be off, leading to wobbly connections.
How to fix it: First, check the pipe diameter. Most Lean Pipe Clamp B Chrome is designed for 28mm or 30mm pipes—if yours is smaller or larger, that's the problem. If the pipe size is correct, inspect the clamp for warping: place it on a flat surface. If it rocks or doesn't lie flush, the jaws are bent, and you'll need a new clamp. If the clamp looks straight but still misaligns, try a rubber mallet (never steel!) to gently tap the jaw into place—sometimes a little nudge is all it takes. For stubborn cases, apply a drop of lubricant (like WD-40) to the bolt threads to make adjustment smoother.
How to prevent it: Always verify pipe and clamp sizes before ordering—your lean pipe supplier should have a spec sheet listing compatible pipe diameters. Train your team to tighten bolts until "snug," not "as tight as humanly possible"—over-tightening is a leading cause of warped clamps. And store spare clamps flat in a dry area—throwing them in a toolbox where they get banged around can bend the jaws before they're even used.
4. Stripped Threads and Bolt Failure
There's a sickening feeling when you go to tighten a clamp and the bolt just spins. Or worse, when it snaps off entirely, leaving a broken piece stuck in the clamp. Stripped threads and bolt failure are not just annoying—they render the clamp useless and can delay production while you hunt for replacements.
What's causing it? The number one cause is over-tightening . Bolts have a breaking point, and cranking them beyond the recommended torque (even with a regular wrench) can stretch or strip the threads. Cross-threading is another common mistake: starting the bolt at an angle, which grinds the threads together and damages them. Finally, low-quality bolts are a problem—some lean pipe and accessories kits skimp on hardware, using soft steel bolts that can't handle repeated use.
How to fix it: If the threads on the clamp are stripped, there's no easy fix—you'll need to replace the clamp. For stripped or snapped bolts, use a bolt extractor tool (available at most hardware stores). Apply penetrating oil to the stuck bolt, let it sit for 10-15 minutes, then use the extractor to twist it out. When replacing bolts, don't grab the first ones you find in the toolbox—use high-tensile steel bolts (grade 8.8 or higher) that match the original size (usually M8 or M10). Your lean pipe supplier should stock these, or you can ask for recommendations on compatible hardware.
How to prevent it: Start bolts by hand—turn them clockwise gently until they're snug. If they feel stuck, back them out and try again to avoid cross-threading. Use a torque wrench to ensure you never exceed the recommended torque. And replace bolts every 6-12 months, even if they look fine—metal fatigue weakens them over time, making them more likely to snap.
5. Compatibility Issues with Lean Pipe Joints
You've got your Lean Pipe Clamp B Chrome, your lean pipe joint, and your pipe—so why won't they fit together? Compatibility issues are a hidden frustration in lean systems, especially if you've sourced parts from multiple suppliers. A clamp that works perfectly with one brand's joint might leave gaps or wobble with another's, turning a simple assembly job into a puzzle.
What's causing it? Lean manufacturing parts aren't fully standardized, so dimensions can vary between brands. A "90° lean pipe joint" from Supplier A might have a slightly different height or bolt spacing than one from Supplier B, making it impossible to align with your Lean Pipe Clamp B Chrome. Worn or damaged joint surfaces (like burrs from rough handling) can also prevent a tight fit. Finally, using the wrong clamp type—like a "B" series when the joint requires an "A" series—will throw everything off.
How to fix it: Check for part numbers! Reputable lean pipe suppliers stamp part numbers on clamps and joints, making it easy to cross-reference compatibility. If you're mixing old and new parts, compare the dimensions (length, bolt hole spacing, jaw width) with a ruler. If the joint is worn, use a file to smooth out burrs, or replace it with a matching joint from the same supplier as the clamp. When in doubt, call your supplier—they should be able to tell you which clamps work with which joints.
How to prevent it: Whenever possible, source all your lean pipe and accessories from a single supplier. This way, you know everything is designed to work together. If you must mix suppliers, ask for samples first to test compatibility. And keep a parts catalog from your main supplier handy—most include diagrams showing which clamps pair with which joints.
Quick Reference: Lean Pipe Clamp B Chrome Issues & Fixes
| Common Issue | Key Symptoms | Underlying Causes | Quick Troubleshooting Steps | Prevention Tips |
|---|---|---|---|---|
| Looseness | Wobbly structure, parts shifting, rattling tools | Insufficient torque, thread wear, vibration fatigue | Retighten with torque wrench (15-20 Nm); replace if threads are stripped | Use torque wrenches; apply thread locker in high-vibration areas |
| Corrosion/Chrome Peeling | Rust spots, flaking chrome, dull finish | Low-quality plating, moisture/chemical exposure, scratches | Sand minor rust; replace if chrome is peeling or steel is pitted | Choose clamps with ≥8µ chrome plating; avoid harsh cleaners |
| Misalignment | Pipe sits at an angle; difficulty aligning bolts | Manufacturing defects, over-tightening, mismatched pipe sizes | Check pipe size; replace warped clamps; tap jaws gently with rubber mallet | Verify pipe/clamp sizes; avoid over-tightening; store clamps flat |
| Stripped Threads | Bolts spin freely; bolts snap during tightening | Over-tightening, cross-threading, low-quality bolts | replace clamp (stripped threads); use bolt extractor for snapped bolts | Start bolts by hand; use grade 8.8+ bolts; replace bolts every 6-12 months |
| Compatibility Issues | Gaps between clamp and joint; unstable connections | Non-standard dimensions, worn joints, wrong clamp type | Check part numbers; test fit before assembly; replace mismatched parts | Source parts from one supplier; ask for compatibility charts |
Pro Maintenance Tips to Keep Your Clamps Working Longer
Fixing issues is important, but preventing them in the first place? Even better. With a little regular maintenance, you can extend the life of your Lean Pipe Clamp B Chrome and keep your lean system running smoothly. Here's a simple routine to follow:
Daily Checks: Have operators do a quick visual scan during their pre-shift walkthrough. Look for loose bolts, rust spots, or bent jaws. A 30-second check per clamp can catch small issues before they become big problems.
Weekly Torque Checks: Grab a torque wrench and spot-check 10% of your clamps each week (rotate which ones you check to cover the entire facility over time). Retighten any that are below the recommended torque.
Monthly Cleaning: Wipe down clamps with a damp cloth and mild soap to remove oil, dust, and debris. For ESD workstations, use a static-dissipative cleaner to avoid interfering with static protection.
Quarterly Inspections: Do a deep dive—check for thread wear, corrosion under the chrome, and alignment. replace any clamps that show signs of damage, even if they're still "working." It's cheaper to replace a $10 clamp than to fix a collapsed $500 flow rack.
Annual Overhaul: If you reconfigure your lean system regularly, take the opportunity to replace all bolts and inspect every clamp. This is also a good time to audit your inventory of lean pipe and accessories, so you're never caught without spares.
Choosing the Right Lean Pipe Supplier: Why Quality Matters
At the end of the day, even the best maintenance can't fix a poorly made clamp. That's why choosing a reliable lean pipe supplier is one of the smartest steps you can take to avoid clamp issues. A good supplier doesn't just sell parts—they stand behind their quality, provide clear specs, and offer support when you run into problems.
So what should you look for? Start with material quality : the steel used in the clamp should be high-grade (like Q235 or better), and the chrome plating should meet industry standards (8-10 microns thick with a nickel undercoat). Ask for test reports—reputable suppliers will have no problem sharing data on corrosion resistance or torque strength.
Next, check manufacturing processes . Do they use precision machining for bolt holes? Are the jaws formed with consistent pressure to avoid warping? A supplier that invests in quality control (like inspecting every clamp for alignment before shipping) will save you countless headaches down the line.
Finally, look for customer support . When you call with a question about compatibility or troubleshooting, do they answer quickly and knowledgeably? Do they offer samples or technical diagrams? A supplier that's easy to work with can turn a frustrating clamp issue into a quick fix.
Wrapping Up: Small Clamps, Big Impact
Lean Pipe Clamp B Chrome might not be the most glamorous part of your production line, but they're the unsung heroes keeping everything together. By understanding the common issues—looseness, corrosion, misalignment, stripped threads, and compatibility problems—and how to fix them, you can minimize downtime, reduce frustration, and keep your lean system running at peak efficiency.
Remember: proactive maintenance and choosing quality parts from a trusted lean pipe supplier are your best defenses. A little time spent tightening bolts, cleaning clamps, or verifying compatibility today can save you hours of troubleshooting (and lost production) tomorrow. After all, in lean manufacturing, every detail counts—and that includes the humble clamp holding it all together.