- Company Articles
- FAQ
- FAQ
- FAQ: Installing 3030a EU Standard Aluminum Profile Workbenches

FAQ: Installing 3030a EU Standard Aluminum Profile Workbenches
Related Product
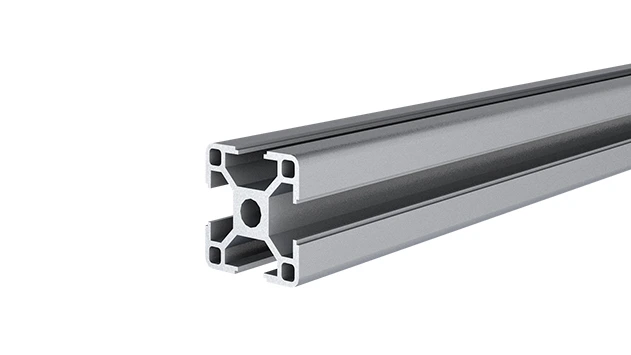
3030A EU Standard Aluminum Profile
3030 is a 3.00 x 3.00CM fractional 30 series square extrusion T-slot profile with four open T-slots, each side with 3.00cm face. The profile has align-a-grooves to assist in aligning connecting profiles.
FAQ: Installing 3030a EU Standard Aluminum Profile Workbenches
There's something uniquely satisfying about building a workspace that fits your needs perfectly. Whether you're setting up a workshop in your garage, organizing a factory floor, or creating a dedicated crafting corner at home, the 3030a EU Standard Aluminum Profile Workbench has become a go-to choice for DIY enthusiasts and professionals alike. Its sleek aluminum frame, modular design, and compatibility with a wide range of aluminum profile accessories make it durable, flexible, and surprisingly easy to assemble—even if you're new to metalworking or furniture building.
But let's be real: starting a project like this can feel a bit overwhelming. Questions pop up left and right: "Do I need special tools?" "How do I make sure the joints don't loosen over time?" "Can I really customize the height without messing up stability?" That's why we've put together this friendly, no-jargon FAQ guide. We'll walk through the most common hurdles people face when installing their 3030a workbench, share practical tips we've learned from years of working with aluminum profiles, and help you build a setup that's not just functional, but something you'll be proud to use every day. Let's dive in!
But let's be real: starting a project like this can feel a bit overwhelming. Questions pop up left and right: "Do I need special tools?" "How do I make sure the joints don't loosen over time?" "Can I really customize the height without messing up stability?" That's why we've put together this friendly, no-jargon FAQ guide. We'll walk through the most common hurdles people face when installing their 3030a workbench, share practical tips we've learned from years of working with aluminum profiles, and help you build a setup that's not just functional, but something you'll be proud to use every day. Let's dive in!
1. What tools and materials do I need before starting installation?
Think of this as your "prep checklist"—skipping even one item here can turn a smooth afternoon project into a frustrating trial-and-error marathon. Let's break it down into tools (the "how") and materials (the "what").
Tools: You don't need a fully equipped machine shop, but a few basics will make all the difference. Here's a quick table to keep you organized:
Materials: This is where your 3030a EU standard aluminum profile takes center stage, but it can't work alone. You'll need:
- 3030a profiles: The main "bones" of your workbench. Measure your desired length, width, and height first—most suppliers sell pre-cut lengths, but cutting your own gives you total control.
- Aluminum profile accessories: These are the "glue" of your setup. Think 90° connectors, three-way joints, T-slot nuts (for attaching shelves or tools), and end caps (to cover sharp profile ends).
- Workbench surface: Plywood, MDF, or a metal sheet—whatever fits your needs. Just make sure it's cut to match your frame's top dimensions.
- Adjustable leveling feet: Critical for uneven floors! Look for ones with rubber bases to prevent slipping and protect your floor.
- Optional extras: Roller tracks (great for sliding materials), cable management clips, or pegboards—all attachable via T-slots in the 3030a profiles.
Pro move: Lay out all materials on a clean, flat surface before starting. It's like cooking—having everything prepped saves you from hunting for a missing joint halfway through assembly!
Tools: You don't need a fully equipped machine shop, but a few basics will make all the difference. Here's a quick table to keep you organized:
| Tool | Purpose | Pro Tip |
|---|---|---|
| Measuring tape + pencil | Marking cut lines and ensuring straight edges | Use a metal pencil or a marker that wipes off aluminum easily—no permanent stains! |
| Miter saw or hacksaw | Cutting 3030a aluminum profiles to length | A miter saw with a fine-tooth blade (40-60 teeth) gives cleaner cuts than a hacksaw. If using a hacksaw, go slow and let the blade do the work. |
| Deburring tool or sandpaper (120-grit) | Smoothing sharp edges after cutting | Aluminum shavings are sharp! Deburr both the inside and outside of the cut end to avoid slicing fingers later. |
| Hex key set (metric, 2.5mm–6mm) | Tightening aluminum profile accessories like joints and brackets | Invest in a set with ball ends—they let you reach screws at awkward angles without stripping them. |
| 4-foot level | Ensuring the workbench is flat and not wobbly | Check level in both directions (left-right and front-back) at every step—small tilts add up! |
| Rubber mallet | Gently tapping joints into place without damaging profiles | Plastic or rubber—never use a metal hammer! Aluminum dents easily, and you don't want to mar the finish. |
Materials: This is where your 3030a EU standard aluminum profile takes center stage, but it can't work alone. You'll need:
- 3030a profiles: The main "bones" of your workbench. Measure your desired length, width, and height first—most suppliers sell pre-cut lengths, but cutting your own gives you total control.
- Aluminum profile accessories: These are the "glue" of your setup. Think 90° connectors, three-way joints, T-slot nuts (for attaching shelves or tools), and end caps (to cover sharp profile ends).
- Workbench surface: Plywood, MDF, or a metal sheet—whatever fits your needs. Just make sure it's cut to match your frame's top dimensions.
- Adjustable leveling feet: Critical for uneven floors! Look for ones with rubber bases to prevent slipping and protect your floor.
- Optional extras: Roller tracks (great for sliding materials), cable management clips, or pegboards—all attachable via T-slots in the 3030a profiles.
Pro move: Lay out all materials on a clean, flat surface before starting. It's like cooking—having everything prepped saves you from hunting for a missing joint halfway through assembly!
2. How do I accurately measure and cut the 3030a aluminum profiles for my workbench?
"Measure twice, cut once" isn't just a cliché—it's the golden rule here. A 1/4-inch mistake in cutting can throw off your entire frame, so let's take this step slow and steady.
Step 1: Plan your dimensions. Start by asking: How tall do I need the workbench? (Standard is 36 inches, but adjust for your height—elbows should rest comfortably at 90° when standing.) How wide and deep? (Leave extra space if you'll add shelves or tools on the sides.) Write these numbers down: for example, "4 legs (36in each), 2 front/back rails (60in each), 2 side rails (24in each)."
Step 2: Mark the cut lines. Lay your 3030a profile flat on a work surface (a piece of scrap wood prevents scratches). Use your measuring tape to mark the desired length— double-check the measurement before drawing the line. For straight cuts, use a speed square or a metal ruler to trace a line across the profile's face. Pro tip: Wrap masking tape around the profile first; the pencil marks show up better, and it helps prevent chipping when cutting.
Step 3: Cutting the profile. If using a miter saw: Clamp the profile tightly to the saw's fence (don't hold it by hand—even a small slip can bend the profile or ruin the cut). Line up your mark with the saw blade, and cut slowly—aluminum is soft, so the blade will glide through, but rushing can cause burrs.
If using a hacksaw: Clamp the profile to a workbench, with the cut line hanging over the edge. Use a hacksaw with 32 teeth per inch (TPI) for smoothness. Saw in short, even strokes, letting the weight of the saw do the work. Keep the blade perpendicular to the profile—tilting it will result in a slanted cut, which makes joints harder to align later.
Step 4: Deburr like your fingers depend on it. After cutting, you'll notice sharp, ragged edges (called "burrs") along the cut end. Grab your deburring tool (or a piece of 120-grit sandpaper) and run it along both the inside and outside edges. Why? Burrs not only hurt if you brush against them, but they also prevent joints from seating flush—meaning your frame might wobble. Spend 30 seconds here; you'll thank us later.
Pro test: After cutting, hold the profile up to a square. The cut should be 90° to the profile's length. If it's off by more than 1°, recut it—precision here pays off in stability later.
Step 1: Plan your dimensions. Start by asking: How tall do I need the workbench? (Standard is 36 inches, but adjust for your height—elbows should rest comfortably at 90° when standing.) How wide and deep? (Leave extra space if you'll add shelves or tools on the sides.) Write these numbers down: for example, "4 legs (36in each), 2 front/back rails (60in each), 2 side rails (24in each)."
Step 2: Mark the cut lines. Lay your 3030a profile flat on a work surface (a piece of scrap wood prevents scratches). Use your measuring tape to mark the desired length— double-check the measurement before drawing the line. For straight cuts, use a speed square or a metal ruler to trace a line across the profile's face. Pro tip: Wrap masking tape around the profile first; the pencil marks show up better, and it helps prevent chipping when cutting.
Step 3: Cutting the profile. If using a miter saw: Clamp the profile tightly to the saw's fence (don't hold it by hand—even a small slip can bend the profile or ruin the cut). Line up your mark with the saw blade, and cut slowly—aluminum is soft, so the blade will glide through, but rushing can cause burrs.
If using a hacksaw: Clamp the profile to a workbench, with the cut line hanging over the edge. Use a hacksaw with 32 teeth per inch (TPI) for smoothness. Saw in short, even strokes, letting the weight of the saw do the work. Keep the blade perpendicular to the profile—tilting it will result in a slanted cut, which makes joints harder to align later.
Step 4: Deburr like your fingers depend on it. After cutting, you'll notice sharp, ragged edges (called "burrs") along the cut end. Grab your deburring tool (or a piece of 120-grit sandpaper) and run it along both the inside and outside edges. Why? Burrs not only hurt if you brush against them, but they also prevent joints from seating flush—meaning your frame might wobble. Spend 30 seconds here; you'll thank us later.
Pro test: After cutting, hold the profile up to a square. The cut should be 90° to the profile's length. If it's off by more than 1°, recut it—precision here pays off in stability later.
3. What's the best way to connect 3030a aluminum profiles using joints and accessories?
This is where your workbench goes from a pile of metal sticks to a solid frame—and it's all about the joints. Aluminum profile accessories, like 90° connectors or T-joints, are designed to lock profiles together tightly, but there's a trick to getting them right. Let's break it down by joint type, since each works a little differently.
90° Connectors (the most common): These are for corners—like connecting a vertical leg to a horizontal rail. Here's how to do it:
1. Slide a T-slot nut into the end of one profile (the "rail"). T-slot nuts fit into the grooves (T-slots) of the 3030a profile and can slide along until you position them.
2. Align the rail with the leg at a 90° angle, so their ends meet. insert the connector into the pre-drilled holes of both profiles—most 3030a joints have screws that thread into the T-slot nuts.
3. Tighten the screws with a hex key— but don't overdo it! Aluminum is strong, but stripping the threads is easy. Tighten until you feel resistance, then give it a 1/4-turn more. The joint should feel solid, not wobbly.
Three-Way Joints (for adding shelves or cross-braces): These let you connect three profiles at once (e.g., a vertical leg, a horizontal rail, and a shelf support). The process is similar, but you'll need to line up all three profiles before tightening. Pro tip: Use a rubber mallet to gently tap the profiles into the joint—this ensures they seat fully before you lock them down.
T-Slot Nuts and Bolts (for custom attachments): Want to add a shelf halfway up the legs? Slide T-slot nuts into the vertical profiles at your desired height, then bolt the shelf brackets directly to them. This is where the 3030a's flexibility shines—no pre-drilling required! Just make sure the nuts are centered under where you'll drill the bracket, so the bolt threads into them cleanly.
Common mistake to avoid: Rushing the alignment. If two profiles aren't perfectly straight when you tighten the joint, the whole frame will be crooked. Use a carpenter's square to check angles before fully tightening, and gently wiggle the profiles into place if needed. A little patience here saves you from disassembling and redoing joints later.
90° Connectors (the most common): These are for corners—like connecting a vertical leg to a horizontal rail. Here's how to do it:
1. Slide a T-slot nut into the end of one profile (the "rail"). T-slot nuts fit into the grooves (T-slots) of the 3030a profile and can slide along until you position them.
2. Align the rail with the leg at a 90° angle, so their ends meet. insert the connector into the pre-drilled holes of both profiles—most 3030a joints have screws that thread into the T-slot nuts.
3. Tighten the screws with a hex key— but don't overdo it! Aluminum is strong, but stripping the threads is easy. Tighten until you feel resistance, then give it a 1/4-turn more. The joint should feel solid, not wobbly.
Three-Way Joints (for adding shelves or cross-braces): These let you connect three profiles at once (e.g., a vertical leg, a horizontal rail, and a shelf support). The process is similar, but you'll need to line up all three profiles before tightening. Pro tip: Use a rubber mallet to gently tap the profiles into the joint—this ensures they seat fully before you lock them down.
T-Slot Nuts and Bolts (for custom attachments): Want to add a shelf halfway up the legs? Slide T-slot nuts into the vertical profiles at your desired height, then bolt the shelf brackets directly to them. This is where the 3030a's flexibility shines—no pre-drilling required! Just make sure the nuts are centered under where you'll drill the bracket, so the bolt threads into them cleanly.
Common mistake to avoid: Rushing the alignment. If two profiles aren't perfectly straight when you tighten the joint, the whole frame will be crooked. Use a carpenter's square to check angles before fully tightening, and gently wiggle the profiles into place if needed. A little patience here saves you from disassembling and redoing joints later.
4. How do I ensure the workbench is level and stable, especially with adjustable leveling feet?
There's nothing more annoying than a workbench that rocks back and forth—you set down a cup of coffee, and it slides off; you try to drill a hole, and the whole thing shifts. The good news? Fixing this is mostly about attention to detail, and adjustable leveling feet are your secret weapon. Here's how to get it right:
Step 1: Assemble the frame first (without the top surface). Build the base frame (legs + rails) and stand it upright. This lets you adjust the feet before adding the heavy top, which makes leveling easier.
Step 2: Find the "uneven spot" culprit. Place your 4-foot level on top of one of the horizontal rails. If the bubble is off-center, that side is either too high or too low. Repeat on the opposite rail and the two side rails—this tells you which legs need adjusting.
Pro tip: If your floor is really uneven (we're looking at you, old garage slabs), place a sheet of plywood under the workbench first. It distributes weight and minimizes dips.
Step 3: Adjust the leveling feet. Most adjustable feet have a threaded stem that screws into the bottom of the legs. To lower a leg, turn the foot counterclockwise; to raise it, turn clockwise. Start with small adjustments—1/4 turn at a time. After each tweak, check the level again.
Pro trick: If you're having trouble reaching the feet once the frame is upright, prop the frame on blocks so the feet hang free. Adjust them, then set the frame down and check level. Repeat until the bubble stays centered on all rails.
Step 4: Lock the feet in place (if needed). Some leveling feet have a locking nut—after adjusting, tighten this nut against the leg to prevent the foot from unscrewing over time (especially if you move the workbench often). For feet without locks, a drop of thread locker (like Loctite Blue) on the stem will keep them secure without making future adjustments impossible.
Step 5: Test for stability. Once level, give the workbench a gentle shake—side to side, front to back. It should feel solid, with no wobbling. If it moves, check the joints (they might need a quick tighten) or recheck the leveling feet. You can also add diagonal cross-braces (using extra 3030a profiles and joints) for extra rigidity, especially if you'll be using heavy tools on the bench.
Final check: Place a heavy object (like a toolbox) on the corner of the frame. If the bench doesn't tip or creak, you're good to go! Leveling might take 10-15 minutes, but it's the difference between a workbench that lasts 10 years and one that frustrates you daily.
Step 1: Assemble the frame first (without the top surface). Build the base frame (legs + rails) and stand it upright. This lets you adjust the feet before adding the heavy top, which makes leveling easier.
Step 2: Find the "uneven spot" culprit. Place your 4-foot level on top of one of the horizontal rails. If the bubble is off-center, that side is either too high or too low. Repeat on the opposite rail and the two side rails—this tells you which legs need adjusting.
Pro tip: If your floor is really uneven (we're looking at you, old garage slabs), place a sheet of plywood under the workbench first. It distributes weight and minimizes dips.
Step 3: Adjust the leveling feet. Most adjustable feet have a threaded stem that screws into the bottom of the legs. To lower a leg, turn the foot counterclockwise; to raise it, turn clockwise. Start with small adjustments—1/4 turn at a time. After each tweak, check the level again.
Pro trick: If you're having trouble reaching the feet once the frame is upright, prop the frame on blocks so the feet hang free. Adjust them, then set the frame down and check level. Repeat until the bubble stays centered on all rails.
Step 4: Lock the feet in place (if needed). Some leveling feet have a locking nut—after adjusting, tighten this nut against the leg to prevent the foot from unscrewing over time (especially if you move the workbench often). For feet without locks, a drop of thread locker (like Loctite Blue) on the stem will keep them secure without making future adjustments impossible.
Step 5: Test for stability. Once level, give the workbench a gentle shake—side to side, front to back. It should feel solid, with no wobbling. If it moves, check the joints (they might need a quick tighten) or recheck the leveling feet. You can also add diagonal cross-braces (using extra 3030a profiles and joints) for extra rigidity, especially if you'll be using heavy tools on the bench.
Final check: Place a heavy object (like a toolbox) on the corner of the frame. If the bench doesn't tip or creak, you're good to go! Leveling might take 10-15 minutes, but it's the difference between a workbench that lasts 10 years and one that frustrates you daily.
5. Can I add accessories like roller tracks or shelves later, and how do I attach them?
One of the best things about 3030a EU standard aluminum profile workbenches is that they're not "set it and forget it"—they grow with you. Want to add a roller track for sliding parts? A shelf for extra storage? A pegboard for tools? All of this is possible, thanks to those handy T-slots and aluminum profile accessories. Let's walk through two common upgrades:
Adding a roller track for material flow: Roller tracks are game-changers if you're working with boxes, parts, or tools that need to slide across the bench (think assembly lines or workshop setups). Here's how to install one:
1. Measure and mark: Decide where you want the track—along the back edge of the workbench, or across a shelf. Mark the positions where the track brackets will attach to the 3030a frame.
2. Attach brackets with T-slot nuts: Slide T-slot nuts into the T-slots of the frame at your marked positions. Bolt the roller track brackets to these nuts—most brackets have pre-drilled holes that align with standard T-slot spacing.
3. Secure the roller track: Once the brackets are in place, snap or bolt the roller track onto the brackets. Test it by sliding a box across—if it sticks, check that the track is level (adjust the brackets up/down if needed) or that the rollers are clean (a little WD-40 on sticky rollers works wonders).
Installing a shelf (upper or lower): Shelves add vertical storage, which is a lifesaver in small spaces. Here's how:
1. Choose your shelf brackets: L-shaped brackets work best—they attach to the vertical legs and support the shelf from below. Make sure the brackets are rated for the weight you'll put on the shelf (heavier tools need sturdier brackets).
2. Position and secure brackets: Slide T-slot nuts into the vertical legs at your desired shelf height. Hold the bracket against the leg, aligning its holes with the T-slot nuts, and bolt it in place. Repeat for all four corners (or more, for longer shelves).
3. Add the shelf surface: Lay your shelf board (plywood, MDF, etc.) on top of the brackets. Secure it with screws from below (into the brackets) to prevent sliding. If you want it removable, skip the screws and just rest it on the brackets—easy to take down for cleaning or reconfiguration.
Pro customization tip: Mix and match accessories! For example, add a pegboard above the workbench by attaching it to a horizontal 3030a rail (using T-slot nuts), then hang tools from hooks. Or install a power strip along the back rail, using cable clips that snap into the T-slots—no more messy cords!
The key here is that 3030a profiles are designed to be modular. You don't have to plan every upgrade on day one—start with the basics, and add on as your needs change. That's the beauty of working with aluminum profiles: your workbench can evolve right alongside your projects.
Adding a roller track for material flow: Roller tracks are game-changers if you're working with boxes, parts, or tools that need to slide across the bench (think assembly lines or workshop setups). Here's how to install one:
1. Measure and mark: Decide where you want the track—along the back edge of the workbench, or across a shelf. Mark the positions where the track brackets will attach to the 3030a frame.
2. Attach brackets with T-slot nuts: Slide T-slot nuts into the T-slots of the frame at your marked positions. Bolt the roller track brackets to these nuts—most brackets have pre-drilled holes that align with standard T-slot spacing.
3. Secure the roller track: Once the brackets are in place, snap or bolt the roller track onto the brackets. Test it by sliding a box across—if it sticks, check that the track is level (adjust the brackets up/down if needed) or that the rollers are clean (a little WD-40 on sticky rollers works wonders).
Installing a shelf (upper or lower): Shelves add vertical storage, which is a lifesaver in small spaces. Here's how:
1. Choose your shelf brackets: L-shaped brackets work best—they attach to the vertical legs and support the shelf from below. Make sure the brackets are rated for the weight you'll put on the shelf (heavier tools need sturdier brackets).
2. Position and secure brackets: Slide T-slot nuts into the vertical legs at your desired shelf height. Hold the bracket against the leg, aligning its holes with the T-slot nuts, and bolt it in place. Repeat for all four corners (or more, for longer shelves).
3. Add the shelf surface: Lay your shelf board (plywood, MDF, etc.) on top of the brackets. Secure it with screws from below (into the brackets) to prevent sliding. If you want it removable, skip the screws and just rest it on the brackets—easy to take down for cleaning or reconfiguration.
Pro customization tip: Mix and match accessories! For example, add a pegboard above the workbench by attaching it to a horizontal 3030a rail (using T-slot nuts), then hang tools from hooks. Or install a power strip along the back rail, using cable clips that snap into the T-slots—no more messy cords!
The key here is that 3030a profiles are designed to be modular. You don't have to plan every upgrade on day one—start with the basics, and add on as your needs change. That's the beauty of working with aluminum profiles: your workbench can evolve right alongside your projects.
6. Troubleshooting: My joints feel loose, or the frame is wobbly—what now?
Even with careful prep, issues can pop up. Let's troubleshoot the two most common problems: loose joints and a wobbly frame.
Loose joints: If a joint feels wobbly or you hear creaking when you lean on the bench, here's what to check:
- Did you use the right joint size? 3030a profiles have a specific slot size (30mm x 30mm), so make sure your joints are labeled for 3030a—using a joint for a smaller profile (like 2020) will never fit tightly.
- Are the T-slot nuts seated properly? Sometimes, T-slot nuts can twist or shift when you tighten the screw, preventing a tight grip. Loosen the screw, wiggle the nut back into alignment (you can feel it "click" into place), then retighten.
- Is the screw stripped? Over-tightening can strip the threads on screws or T-slot nuts. If the screw spins without tightening, replace the nut or screw—they're cheap, and it's better than having a weak joint.
Wobbly frame: If the whole workbench rocks, even after leveling, try these fixes:
- Check for uneven cuts: A slanted cut on one leg can throw off the entire frame. Measure all legs—they should be exactly the same length. If one is shorter, replace it or add a shim under the leveling foot (temporarily) until you can recut it.
- Add cross-braces: Diagonal braces (from corner to corner on the back or sides) add rigidity. Use 3030a profiles and angle joints to connect them—this "triangulates" the frame, preventing side-to-side movement.
- Tighten all joints: Over time, vibration (from tools, moving the bench) can loosen screws. Do a quick once-over with your hex key, tightening each joint 1/8-turn—you'll be surprised how many were just slightly loose.
Last resort: If all else fails, disassemble the frame and rebuild it step by step. Sometimes, a fresh start is faster than chasing one small mistake. Take photos as you take it apart (so you remember how it goes back!) and double-check each joint and cut as you reassemble.
Remember: even pros run into these issues. The difference is that they don't panic—they troubleshoot methodically. Your workbench is a project, and like any project, it might need a little tweaking to get perfect.
Loose joints: If a joint feels wobbly or you hear creaking when you lean on the bench, here's what to check:
- Did you use the right joint size? 3030a profiles have a specific slot size (30mm x 30mm), so make sure your joints are labeled for 3030a—using a joint for a smaller profile (like 2020) will never fit tightly.
- Are the T-slot nuts seated properly? Sometimes, T-slot nuts can twist or shift when you tighten the screw, preventing a tight grip. Loosen the screw, wiggle the nut back into alignment (you can feel it "click" into place), then retighten.
- Is the screw stripped? Over-tightening can strip the threads on screws or T-slot nuts. If the screw spins without tightening, replace the nut or screw—they're cheap, and it's better than having a weak joint.
Wobbly frame: If the whole workbench rocks, even after leveling, try these fixes:
- Check for uneven cuts: A slanted cut on one leg can throw off the entire frame. Measure all legs—they should be exactly the same length. If one is shorter, replace it or add a shim under the leveling foot (temporarily) until you can recut it.
- Add cross-braces: Diagonal braces (from corner to corner on the back or sides) add rigidity. Use 3030a profiles and angle joints to connect them—this "triangulates" the frame, preventing side-to-side movement.
- Tighten all joints: Over time, vibration (from tools, moving the bench) can loosen screws. Do a quick once-over with your hex key, tightening each joint 1/8-turn—you'll be surprised how many were just slightly loose.
Last resort: If all else fails, disassemble the frame and rebuild it step by step. Sometimes, a fresh start is faster than chasing one small mistake. Take photos as you take it apart (so you remember how it goes back!) and double-check each joint and cut as you reassemble.
Remember: even pros run into these issues. The difference is that they don't panic—they troubleshoot methodically. Your workbench is a project, and like any project, it might need a little tweaking to get perfect.
Wrapping up:
Building your 3030a EU Standard Aluminum Profile Workbench is more than just a DIY project—it's about creating a space that works
for you
. With the right tools, a little patience, and this guide, you'll have a sturdy, customizable setup that adapts to your needs, lasts for years, and maybe even inspires your next big project. So grab your hex key, measure twice, and enjoy the process—we can't wait to see what you build!