- Company Articles
- FAQ
- FAQ
- FAQs About 4080 Aluminum Profile End Caps: Size, Fit & Material

FAQs About 4080 Aluminum Profile End Caps: Size, Fit & Material
Related Product
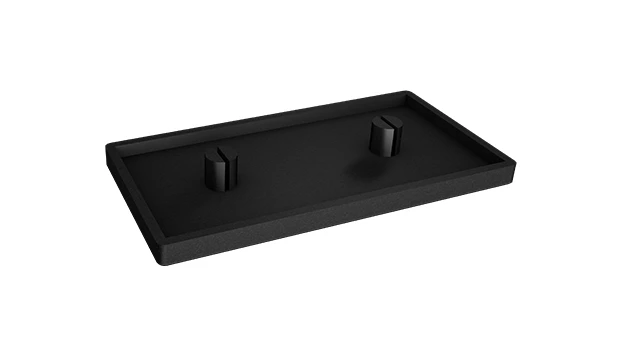
4080 Aluminum Profile End Cap
The aluminum profile end cap adds a finishing touch to your project and closes off profile ends to limit dust and debris buildup, also it can avaid some scratch for material and labor during the assemble work.
If you've ever worked with aluminum extrusion profiles—whether building a workbench, setting up a production line, or organizing a lean system—you've probably encountered the unsung heroes of these setups: end caps. Specifically, if your project uses 4080 aluminum profiles, you know how crucial the right end cap is. These small accessories might seem trivial, but they play a big role in safety, durability, and even the overall look of your structure. In this guide, we're diving into the most common questions about 4080 aluminum profile end caps, from sizing and fit to materials and installation. Let's get started.
1. What exactly is a 4080 aluminum profile end cap, and why do I need one?
Great place to start! A 4080 aluminum profile end cap is a small, usually plastic or rubber component designed to fit snugly over the exposed ends of a 4080 aluminum extrusion profile. Think of it like a "cap" for the profile's open end—hence the name. But why bother with one? Let's break it down:
First, safety . Aluminum extrusion profiles have sharp, raw edges when cut to length. Without an end cap, those edges can scratch hands, snag clothing, or damage tools and materials that brush against them. If you're using the profile in a workspace (like a lean system or production line), this is a big hazard.
Second, protection . The open ends of aluminum profiles are magnets for dust, debris, and moisture. Over time, these can corrode the interior, weaken the profile, or even jam moving parts if the profile is part of a conveyor or sliding system. End caps seal off these openings, keeping the inside clean and dry.
Third, aesthetics . Let's be honest—exposed, raw profile ends look unfinished. End caps give your structure a polished, professional look, which matters if the setup is visible to clients or used in a public-facing area.
In short, end caps are a small investment that pays off in safety, longevity, and appearance. They're a key part of aluminum profile accessories, right up there with brackets and connectors.
2. What does "4080" mean, and how does it relate to the end cap size?
Before we talk end cap sizes, let's clarify what "4080" refers to. The term "4080 aluminum profile" describes the profile's cross-sectional dimensions. In the metric system (which is standard for aluminum extrusions), the numbers represent the width and height in millimeters. So, a 4080 profile is 40mm wide and 80mm tall (or vice versa, depending on orientation—some profiles are 80mm wide and 40mm tall, but the "4080" label usually covers both orientations).
This matters for end caps because the end cap's size must match the profile's end dimensions. A 4080 profile has a rectangular cross-section, so the end cap needs to cover that 40mm x 80mm opening. But here's the catch: not all 4080 profiles are identical. Some have thicker walls, rounded edges, or special grooves (like T-slots for accessories), which can slightly alter the end dimensions. That's why end cap sizing isn't just about "4080"—it's about matching the specific profile's end shape and size.
For example, a standard 4080 aluminum extrusion profile with T-slots on all four sides will have a slightly different end opening than a 4080 profile with a custom cutout or reinforced edges. The end cap must account for these nuances to fit properly.

3. What sizes do 4080 aluminum profile end caps come in? Are they one-size-fits-all?
You might assume "4080" end caps are all the same size, but that's not quite true. While the core dimension is 40mm x 80mm, there are variations based on the profile's design and the end cap's intended use. Let's break down the key size factors:
Standard vs. custom sizing : Most manufacturers offer "standard" 4080 end caps designed to fit the most common 4080 profiles (think: the ones with standard T-slot spacing and wall thicknesses). These are usually 40mm (width) x 80mm (height) in outer dimensions, with a slight taper or lip to grip the profile's inner edges. But if your profile is non-standard—say, it has extra-thick walls or a unique shape—you might need a custom-sized end cap.
Depth (or "insertion length") : This is how far the end cap extends into the profile. Standard end caps typically insert 10-15mm into the profile, which is enough to stay secure. But if you need extra stability (e.g., in high-vibration environments like a conveyor system), you might find end caps with longer insertion depths (20mm or more).
Edge radius : Some 4080 profiles have rounded edges (to reduce sharpness), and their end caps will have matching rounded corners. Others have square edges, requiring square-cornered end caps. Mixing these up will result in a loose fit or gaps.
Are they one-size-fits-all? No. While many 4080 profiles will work with a standard end cap, it's always best to check your profile's exact end dimensions before buying. A 1-2mm difference in width or height can mean the end cap either won't fit or will fall off easily.

4. How do I measure my 4080 aluminum profile to find the right end cap?
Measuring your profile is the first step to ensuring a good end cap fit. It's simple, but you'll need a caliper or a ruler with millimeter markings (a digital caliper is best for precision). Here's how to do it:
Step 1: Measure the outer width and height of the profile end. Place your caliper or ruler across the opening of the profile (the end you want to cap). Measure from one outer edge to the opposite outer edge for both width and height. For a standard 4080 profile, this should be ~40mm and ~80mm, but write down the exact numbers (e.g., 40.2mm x 79.8mm).
Step 2: Measure the inner width and height (optional but helpful). The end cap fits inside the profile, so measuring the inner dimensions can help. For this, measure from the inner edge of one wall to the inner edge of the opposite wall. Subtract twice the wall thickness from the outer dimensions (e.g., if outer width is 40mm and wall thickness is 2mm, inner width is 40mm - (2mm x 2) = 36mm). This gives you the "grip area" the end cap needs to secure itself.
Step 3: Check for edge shape. Are the corners square or rounded? If rounded, measure the radius (how "curved" the corner is). This is usually 1-2mm for standard profiles, but it's worth noting.
Pro tip: If you're buying end caps from the same supplier as your 4080 aluminum profile, ask for their recommended end cap model. Most suppliers design end caps to pair perfectly with their own profiles, saving you the guesswork.
5. How do I ensure the end cap fits my 4080 profile? What if it's too loose or too tight?
A good fit is key—too loose, and the end cap falls off; too tight, and you might damage the profile or the cap trying to install it. Here's how to avoid both issues:
Start with precise measurements (see FAQ 4). The closer your end cap's dimensions match your profile's, the better the fit. Most end caps have a tolerance of ±0.5mm, meaning if your profile's outer height is 80.3mm, an end cap labeled "80mm" with a +0.5mm tolerance will fit (80mm + 0.5mm = 80.5mm, which is just over your 80.3mm profile).
Check for "snap-fit" vs. "press-fit" designs. Most 4080 end caps are snap-fit: they have flexible tabs or lips that bend slightly when inserted, then snap into place. These are forgiving of small size variations. Press-fit end caps, on the other hand, rely on friction and are less flexible—they need almost exact dimensions. If your profile has slightly variable dimensions, snap-fit is safer.
Common fit issues and fixes:
- Too loose: If the end cap wiggles or falls off, try adding a small strip of double-sided tape to the inside of the cap before inserting it. For plastic end caps, you can also gently heat the tabs with a hair dryer (on low heat!) to make them more flexible, then press them into place—they'll cool and grip tighter.
- Too tight: If the end cap won't push in, check for burrs or debris on the profile's inner edges (sand them down if needed). For plastic end caps, a tiny amount of soapy water (as a lubricant) can help. Avoid forcing it—this can crack the cap or warp the profile.
Remember: A perfect fit should feel secure but not require excessive force. If you're struggling, double-check that you have the right end cap for your profile model (e.g., a 4080 "A" profile vs. 4080 "B" profile might need different end caps).
6. What materials are 4080 aluminum profile end caps made of? Which is best?
4080 aluminum profile end caps come in a few main materials, each with pros and cons. The right choice depends on your project's needs—safety, environment, budget, and aesthetics. Let's compare the most common options:
| Material | Pros | Cons | Best For |
|---|---|---|---|
| PVC/Plastic (Most Common) | Affordable, lightweight, flexible (good for snap-fit), available in colors, resistant to moisture and mild chemicals. | Less durable than metal; can crack in extreme cold or warp in high heat; not ideal for heavy impact. | General-purpose use, indoor setups (workbenches, lean systems), budget projects. |
| Rubber | Soft, shock-absorbent (reduces noise if parts hit the end), excellent grip, weather-resistant. | More expensive than plastic; can degrade in direct sunlight over time; heavier than plastic. | High-traffic areas, outdoor use, setups with moving parts (e.g., conveyor systems). |
| Aluminum | Extremely durable, heat/cold resistant, matches the profile's metal look, ideal for heavy-duty use. | Expensive, can scratch (needs finishing), heavier, requires adhesive (no snap-fit—aluminum doesn't flex). | Industrial settings, high-impact environments, where aesthetics require a metal finish. |
| ESD-Compliant Plastic/Rubber | Dissipates static electricity (critical for electronics manufacturing), similar to standard plastic/rubber otherwise. | More expensive than non-ESD options; limited color choices. | Electronics production lines, cleanrooms, or any setup with static-sensitive components. |
Quick recommendation: For most indoor projects (like workbenches, lean system racks, or material storage), standard PVC/plastic end caps work great—they're affordable and get the job done. If you're in a harsh environment (outdoors, high heat/cold, or heavy impact), go with rubber or aluminum. For electronics, ESD-compliant options are a must.
7. Are there different types of 4080 end caps, or is it just "one style fits all"?
Nope—end caps aren't one-style-fits-all! Beyond materials, there are different designs to suit specific needs. Here are the most common types you might encounter:
Snap-on vs. Adhesive-Backed: Snap-on end caps have flexible tabs that "snap" into the profile's inner edges—no tools needed, and easy to remove. Adhesive-backed end caps have a sticky layer (like double-sided tape) to secure them. Snap-on is better for temporary setups or if you might need to remove the cap later; adhesive is more permanent and secure for high-vibration environments.
Solid vs. Vented: Solid end caps completely seal the profile (great for keeping out dust/moisture). Vented end caps have small holes to allow air circulation—useful if the profile is hollow and used for cable management (vents prevent heat buildup from wires).
Colored vs. Natural: Most plastic end caps come in standard colors like black, white, or gray (to match profiles), but you can find custom colors for branding or visibility (e.g., yellow for safety zones). Natural (clear) end caps are rare but available if you want to show off the profile's interior (uncommon, but some designers like the look).
Flanged vs. Flush: Flanged end caps have a small "lip" that extends beyond the profile's edge, adding extra protection against impacts. Flush end caps sit perfectly even with the profile's end, for a sleek, minimalist look.
The takeaway: Think about how you'll use the profile, then pick the style that aligns with those needs. For example, a lean system in a warehouse might use snap-on, solid PVC end caps for easy maintenance, while a high-end electronics workbench might opt for ESD-compliant, flush rubber end caps for safety and aesthetics.
8. How do I install a 4080 aluminum profile end cap? Any tips for a smooth process?
Installing a 4080 end cap is usually straightforward, but a few tips can make it easier and ensure a secure fit. Here's a step-by-step guide:
Step 1: Prepare the profile end. First, clean the end of the profile with a dry cloth to remove dust, debris, or oil. If there are sharp burrs (from cutting the profile), sand them down with fine-grit sandpaper—burrs can tear the end cap or prevent it from seating properly.
Step 2: Align the end cap. Hold the end cap so the tabs (if snap-on) or adhesive (if adhesive-backed) face the profile. Make sure the cap is oriented correctly—some have a "top" and "bottom" (e.g., if the profile has asymmetric T-slots, the cap might need to match that).
Step 3: Press or snap into place. For snap-on caps: Apply even pressure with your thumbs to the center of the cap, then work your way outward to the edges. You should hear a "snap" as the tabs grip the profile's inner walls. For adhesive caps: Peel off the backing, align carefully, then press firmly for 30-60 seconds to ensure the adhesive bonds.
Step 4: Test the fit. Gently tug on the end cap to make sure it doesn't come loose. If it wiggles, check if it's misaligned or if the tabs need to be pressed in further.
Pro tips for tricky installs:
- Too tight? Warm the end cap with a hair dryer (low heat) for 10-15 seconds to soften the plastic/rubber—it will flex more easily. Avoid overheating, as this can warp the cap.
- Too loose? Add a thin layer of silicone caulk (clear) to the inside of the cap before installing. It dries flexible and adds grip. For temporary fixes, double-sided tape works too.
- Removing an old end cap? Use a flathead screwdriver (wrapped in tape to avoid scratching the profile) to gently pry it off. Start at a corner and work your way around—don't yank, as this can damage the profile's edges.
9. Can 4080 aluminum profile end caps be reused? When should I replace them?
Reusability depends on the end cap's material and condition. Here's what to know:
Plastic end caps: These can usually be reused 2-3 times, as long as the tabs (the "gripping" parts) aren't cracked or bent. If the tabs are damaged, the cap won't stay on, so it's time to replace.
Rubber end caps: Rubber is more flexible, so it can often be reused more times than plastic. Watch for cracks, tears, or loss of elasticity (if it feels hard or brittle). Sunlight and chemicals can degrade rubber over time, so outdoor rubber caps may need replacement sooner.
Adhesive-backed caps: These are not reusable—once the adhesive is peeled off, it loses its stickiness. You'd need to replace the adhesive (e.g., with new double-sided tape) to reuse them, which is often more hassle than buying a new cap.
When to replace: Look for signs like:
- The cap falls off repeatedly (tabs are worn or broken).
- Cracks, chips, or tears (compromises the seal against dust/moisture).
- Discoloration or brittleness (rubber/plastic breaking down from age or environment).
- Loss of grip (even after cleaning the profile, the cap won't stay secure).
Replacing a worn end cap is cheap insurance—better to spend a few dollars on a new cap than risk injury from a sharp edge or damage to your profile.
10. Where can I buy 4080 aluminum profile end caps? What should I look for in a supplier?
4080 aluminum profile end caps are widely available, but not all suppliers are created equal. Here's how to find the right one:
Start with your profile supplier. If you bought your 4080 aluminum extrusion profile from a supplier (like a lean pipe supplier or aluminum profile specialist), check if they sell end caps. As mentioned earlier, their end caps are designed to fit their profiles perfectly, so this is the easiest option.
Online retailers. Sites like Amazon, eBay, or industrial supply stores (McMaster-Carr, Grainger) carry end caps. Search for "4080 aluminum profile end cap" and filter by material, type (snap-on, adhesive), or brand. Read reviews to check for fit consistency—look for comments like "fits [Brand X] 4080 profile perfectly."
Local hardware/industrial stores. If you need end caps quickly, check local stores that sell aluminum extrusion profiles or lean system accessories. They may have limited options, but you can inspect the caps in person (measure them, check flexibility) before buying.
What to look for in a supplier:
- Clear sizing info: They should list exact dimensions (width, height, insertion depth) so you can match your profile.
- Material details: Specify if the cap is PVC, rubber, ESD-compliant, etc.—no vague "plastic" descriptions.
- Compatibility notes: Do they mention which 4080 profiles the cap fits? (e.g., "Works with standard 4080 T-slot profiles" or "For [Brand Y] 4080A profiles").
- Return policy: If the cap doesn't fit, can you return it? Good suppliers stand behind their products.
Avoid suppliers with minimal product info or generic listings—you'll likely end up with a cap that doesn't fit.
Final Thoughts: Why End Caps Matter for Your 4080 Aluminum Profile Project
At first glance, 4080 aluminum profile end caps might seem like an afterthought. But as we've covered, they're essential for safety, durability, and professionalism. Whether you're building a lean system on the factory floor, a workbench in your garage, or a conveyor for a production line, the right end cap ensures your setup is secure, clean, and built to last.
Remember: Measure twice, check the material, and don't skimp on quality. A well-chosen end cap is a small detail that makes a big difference. Now go cap those profiles—and enjoy your safe, polished project!