- Company Articles
- FAQ
- FAQ
- Parallel Lean Pipe Joints: Common Questions from First-Time Users

Parallel Lean Pipe Joints: Common Questions from First-Time Users
Related Product
Parallel Lean Pipe Joint
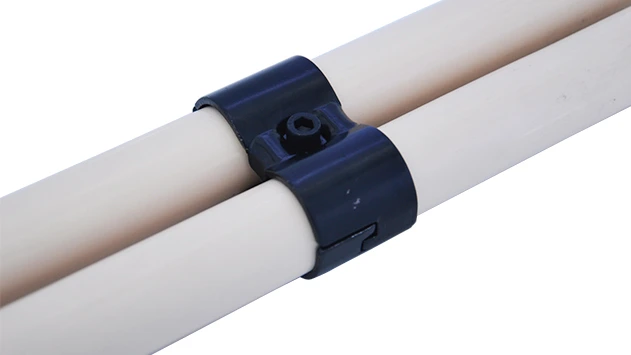
Parallel lean pipe joint used for 2 pcs 28MM lean pipe connection in parallel direction to enhance frame structure, usually for heavy payload requirement for workbench. flow rack, hand trolley.
If you've recently dived into the world of lean manufacturing or workspace organization, you've probably encountered a dizzying array of components: pipes, joints, casters, and accessories that promise to transform chaos into efficiency. Among these, parallel lean pipe joints stand out as unsung heroes—small but mighty connectors that hold your lean system together. Yet for first-time users, they can also be a source of head-scratching: "Which joint do I need?" "Will this work with my aluminum lean pipe?" "Am I overloading it?" In this guide, we're breaking down the most common questions new users have about parallel lean pipe joints, with practical answers to help you build, adapt, and optimize your workspace with confidence.
What Are Parallel Lean Pipe Joints, Anyway?
Before we jump into the questions, let's start with the basics. Parallel lean pipe joints are specialized connectors designed to join two or more lean pipes in a parallel arrangement—think of them as the "glue" that holds horizontal or vertical pipes together in structures like workbenches, material racks, or assembly lines. Unlike 90-degree joints (which connect pipes at right angles) or swivel joints (which allow rotation), parallel joints keep pipes aligned side-by-side, creating stable, load-bearing surfaces.
They come in various materials—steel, aluminum, or plastic-coated steel—and are engineered to work with specific pipe diameters (common sizes include 1 inch, 0.8 inch, and 0.5 inch). Their simplicity is part of their appeal: most use a combination of bolts, clamps, or friction to secure pipes, making them easy to install without specialized tools. But don't let their simplicity fool you—choosing the right parallel joint can mean the difference between a wobbly workbench and a system that stands up to daily use.
Common Questions (and Answers) for First-Time Users
1. How Do I Choose the Right Parallel Lean Pipe Joint for My Project?
The first step is to define your project. Are you building a lightweight workbench for small parts assembly, or a heavy-duty material rack for bulky components? Your answer will dictate three key factors: pipe material , load capacity , and compatibility .
Pipe Material Matters: If you're using aluminum lean pipe (popular for its lightweight, corrosion-resistant properties), opt for joints specifically labeled "aluminum compatible." These often have softer, non-marring grips to avoid scratching the aluminum surface. For traditional steel lean pipe (with or without a PE coating), steel or plastic-coated steel joints are a better bet—they're stronger and designed to handle the pipe's weight.
Load Capacity: Check the manufacturer's specs for "static load capacity" (weight when the structure is stationary) and "dynamic load capacity" (weight when moving, like on a caster-equipped trolley). A parallel joint for a small workbench might handle 50-100 lbs per joint, while heavy-duty versions for material racks can support 200+ lbs. When in doubt, overestimate—adding a few extra joints distributes weight and prevents strain.
Compatibility Check: Not all parallel joints fit all pipes. A joint designed for 1-inch diameter pipe won't work with 0.8-inch pipe, and vice versa. Measure your pipe's outer diameter first (use a caliper or a simple ruler) and match it to the joint's specifications. Many suppliers label joints with pipe size (e.g., "1-inch parallel lean pipe joint") to simplify this.
Pro tip: If you're unsure, ask your lean pipe supplier for a sample kit. Many offer small packs with a few joints and pipe segments so you can test fit before buying in bulk.
2. Can I Mix Parallel Lean Pipe Joints with Other Joint Types?
Absolutely—and in fact, most lean systems require a mix! Parallel joints excel at creating straight, parallel runs, but you'll likely need other joints to add angles, corners, or height adjustments. For example, building a workbench might involve:
- Parallel joints to connect the front and back horizontal pipes of the workbench top.
- 90-degree aluminum pipe joints to connect the top frame to the vertical legs.
- Swivel roller balls (0.5 inch or 1 inch) along the back edge to slide materials easily.
- Caster wheels on the bottom of the legs for mobility.
The key is to ensure all joints are compatible with your pipe material and diameter. For example, if you're using 1-inch aluminum lean pipe, stick with 1-inch joints across the board—mixing sizes can lead to instability. Also, avoid overcomplicating: too many joint types (e.g., parallel + 135-degree + swivel) in one small section can weaken the structure. When in doubt, sketch your design first and label which joint goes where.
3. What's the Maximum Weight These Joints Can Support? (And How Do I Avoid Overloading?)
This is one of the most critical questions—and the answer depends on three factors: the joint's material, the pipe's thickness, and how many joints you use. Let's break it down with an example: a standard steel parallel lean pipe joint (1.5mm thickness) paired with 1-inch steel lean pipe (2.0mm PE coating) typically has a static load capacity of 150-200 lbs per joint. But if you use two parallel joints to connect a 4-foot pipe segment, the total capacity increases to 300-400 lbs (since the weight is distributed across both joints).
To avoid overloading:
Calculate total weight first: Add up the weight of the materials you'll place on the structure (e.g., tools, parts, equipment) plus the weight of the pipes and joints themselves. Aim for joints that can handle at least 1.5x this total—this "safety margin" accounts for accidental bumps or uneven weight distribution.
Space joints evenly: For a horizontal pipe run, space parallel joints every 18-24 inches. Clustering joints too close together wastes materials, while spacing them too far apart creates weak points. For vertical supports (like workbench legs), use at least two parallel joints per leg to anchor it to the horizontal frame.
Check for bending: If a pipe sags under load, it's a sign you need more joints. Even if the joint itself isn't failing, excessive pipe bending can weaken the entire structure over time.
4. Are Parallel Lean Pipe Joints Compatible with Aluminum Lean Pipe vs. Traditional Steel?
Aluminum lean pipe has grown in popularity for its lightweight (about 30% lighter than steel) and rust-resistant properties, making it ideal for cleanrooms or humid environments. But its softer metal means it requires joints designed to avoid crushing or scratching. So, can you use the same parallel joint for both aluminum and steel pipe?
Short answer: It depends on the joint's design. Steel joints with sharp, serrated grips can dig into aluminum pipe, weakening it over time. Instead, look for "aluminum-specific" parallel joints, which often have smooth, rubberized or plastic-coated clamps that grip without damaging the surface. These are sometimes labeled "non-marring" or "aluminum compatible" by suppliers.
Conversely: Aluminum parallel joints can work with steel pipe, but they're not always the best choice. Steel is heavier and stiffer, so aluminum joints (which are lighter) may not provide the same clamping force, leading to loosening over time. For steel pipe, stick with steel or heavy-duty plastic-coated steel joints.
5. How Do I Install Parallel Lean Pipe Joints Without Damaging Pipes or Joints?
Installation might seem straightforward—slide the joint onto the pipe, tighten the bolt—but a few missteps can lead to stripped threads, bent pipes, or loose connections. Here's a step-by-step guide to getting it right:
1. Prep your workspace: Lay out your pipes and joints on a flat surface (a workbench or even the floor works). Use a cloth to wipe away dirt or oil from the pipe ends—debris can prevent the joint from gripping properly.
2. Align the pipes: For parallel joints, the pipes must be perfectly straight and aligned. Hold them side by side and check for gaps—if one pipe is higher or lower, the joint will strain when tightened. Use a level if needed to ensure they're parallel.
3. Slide the joint into place: Most parallel joints have two or more "clamps" (openings for the pipes). Slide the pipes into these clamps until they're flush with the joint's ends (or as marked by the manufacturer's guidelines).
4. Tighten gradually: Use a hex key or wrench to tighten the joint's bolts. Don't overtighten! Steel joints may require a firm "hand-tight plus a quarter turn," while aluminum joints need gentler pressure (overtightening can strip the threads or crush the pipe). A good rule: stop when the joint feels secure and the pipe doesn't wiggle.
5. Test for stability: Gently shake the structure. If the joint shifts or the pipes move, loosen the bolts, realign, and retighten. Repeat until there's no play.
Pro tip: If you're working with long pipe segments, have a helper hold the pipes steady while you tighten the joints. This prevents bending or twisting during installation.
6. What Accessories Do I Need to Use with Parallel Lean Pipe Joints?
Parallel joints rarely work alone—they're part of a ecosystem of lean pipe and accessories that enhance functionality. Here are the most common accessories you'll need, depending on your project:
Pipe end caps: These plastic or rubber caps fit over exposed pipe ends, preventing snags on clothing or damage to materials. They're a must for workbenches or trolleys where people might brush against the pipes.
Clamps and brackets: For attaching shelves, tool holders, or bins to your parallel pipe runs, use pipe clamps (which grip the pipe) or L-brackets (which bolt to the joint). Look for clamps with rubber padding to avoid scratching.
Caster wheels: If you're building a mobile structure (like a turnover trolley), add caster wheels to the bottom legs. Choose swivel casters for maneuverability or rigid casters for straight-line movement. Make sure the caster's mounting plate is compatible with your vertical pipe joints.
Leveling feet: For stationary structures like workbenches, adjustable leveling feet compensate for uneven floors, keeping the surface stable. They screw into the bottom of vertical pipes and can be adjusted up or down as needed.
Swivel roller balls: These small, rotating balls (0.5 inch or 1 inch) attach to parallel pipe runs to create "sliding" surfaces for materials. They're ideal for assembly lines where parts need to glide from one station to the next.
7. How Do I Maintain Parallel Lean Pipe Joints to Prevent Rust or Wear?
Lean systems are built to last, but a little maintenance goes a long way in extending their life—especially for parallel joints, which take the brunt of weight and movement. Here's how to keep them in top shape:
For steel joints (uncoated): Wipe down with a dry cloth monthly to remove dust and moisture. If you notice rust spots, sand them lightly with fine-grit sandpaper and apply a thin coat of anti-rust spray (like WD-40 Specialist Long-Term Corrosion Inhibitor). Avoid harsh chemicals, which can strip any protective coatings.
For aluminum or plastic-coated joints: These are more rust-resistant, but dirt and grime can still build up in the threads. Every 3-6 months, loosen the bolts slightly, spray with compressed air to clear debris, then retighten. For plastic coatings, avoid abrasive cleaners—mild soap and water work best.
Check for looseness: Over time, vibration (from machinery or movement) can loosen bolts. Do a quick "wiggle test" monthly—grab the pipes and shake gently. If a joint moves, retighten the bolts (but again, don't overtighten).
Store spare joints properly: Keep extra joints in a dry, cool place (avoid basements or garages with high humidity). If storing for long periods, wrap steel joints in a cloth to prevent dust buildup.
8. Can I Reuse Parallel Lean Pipe Joints If I Rearrange My Workspace?
One of the biggest perks of lean systems is their flexibility—you can disassemble and rearrange them as your needs change. So, can you reuse your parallel joints when you take apart a workbench to build a material rack? In most cases, yes—with a few caveats.
Inspect for damage first: Check the joint for cracks, stripped threads, or bent clamps. If the bolt holes are worn (i.e., the bolt spins without tightening), the joint is no longer safe to use. Similarly, if the clamping surfaces are dented or warped, they won't grip pipes as securely.
Clean before reuse: Remove any dirt, grease, or rust from the joint and threads. A wire brush works well for steel joints; for aluminum, use a soft cloth to avoid scratching.
Mix and match carefully: If you're reusing joints from a steel pipe system with new aluminum pipe, remember the compatibility rules we discussed earlier. You may need to swap out steel joints for aluminum-specific ones to avoid damaging the new pipes.
Don't overdo it: Most parallel joints can be reused 5-10 times before showing signs of wear. After that, the threads may weaken, or the clamping force may decrease. When in doubt, replace heavily used joints—they're affordable, and the cost is minimal compared to the risk of a collapsed structure.

Final Thoughts: Start Small, Learn As You Go
Parallel lean pipe joints may seem, but they're the backbone of any functional lean system. By choosing the right joint, installing it correctly, and maintaining it properly, you'll build a workspace that adapts to your needs, reduces waste, and keeps operations running smoothly.
Remember: even seasoned pros started with questions. Don't be afraid to experiment—build a small prototype (like a simple shelf) first to get a feel for how joints and pipes work together. And when in doubt, reach out to your lean pipe supplier—they're experts in matching components and can help troubleshoot issues before they become headaches.
At the end of the day, the goal of lean manufacturing is to work smarter, not harder. With parallel lean pipe joints in your toolkit, you're one step closer to a workspace that does just that.